Blueberry Cottage Cheese Breakfast Bake
PREP TIME: 15 minutes
COOK TIME: 45-50 minutes
TOTAL TIME: About 1 hour
RECIPE INTENSITY: Easy
This recipe is perfect for beginners. It requires no special skills—just mixing, pouring, and baking. It’s a low-stress, high-reward dish ideal for a relaxed weekend brunch or a weekly meal prep session.
Ingredients
For the Filling:
-
2 cups (16 oz / 450g) full-fat or low-fat cottage cheese
-
4 large eggs
-
1/3 cup pure maple syrup or honey
-
1 teaspoon vanilla extract
-
1 teaspoon ground cinnamon
-
1/4 teaspoon ground nutmeg
-
1/4 teaspoon salt
-
1 ½ cups fresh or frozen blueberries (do not thaw if frozen)
-
Zest of 1 lemon (optional, but highly recommended for brightness)
For the Oat Crumble Topping:
-
1/2 cup old-fashioned rolled oats
-
1/4 cup all-purpose flour (or almond flour for a gluten-free option)
-
1/4 cup chopped pecans or walnuts (optional)
-
2 tablespoons brown sugar or coconut sugar
-
2 tablespoons cold unsalted butter, cubed
-
A pinch of salt
Equipment
-
8×8 inch (or similar 2-quart) baking dish
-
Mixing bowls (one medium, one small)
-
Blender or food processor (optional, but recommended for a smoother texture)
-
Whisk and spatula
Instructions
Step 1: Prepare and Preheat
Begin by preheating your oven to 375°F (190°C). This ensures the bake goes into a perfectly hot environment for an even cook. Lightly grease your 8×8 inch baking dish with butter, cooking spray, or a light coating of oil. Set it aside.
Step 2: Create the Creamy Base (The Two-Method Approach)
For the absolute smoothest, creamiest texture where the cottage cheese “disappears” into the bake, use a blender or food processor. This is a great trick for those who are texture-averse to cottage cheese.
-
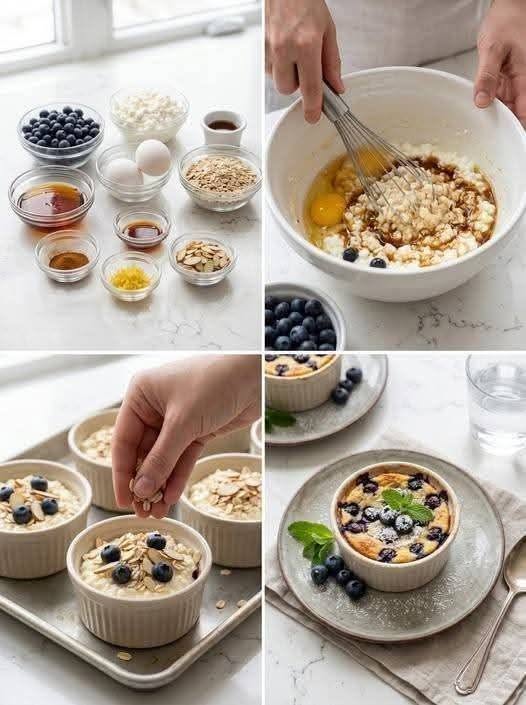
Blender Method (Recommended): Add the cottage cheese, eggs, maple syrup, vanilla extract, cinnamon, nutmeg, and salt to the blender. Blend on high for 30-45 seconds until the mixture is completely smooth and silky. Pour this mixture into a medium mixing bowl.
-
No-Blender Method (Still Great!): In your medium bowl, whisk the eggs vigorously until well-beaten. Add the maple syrup, vanilla, cinnamon, nutmeg, and salt, and whisk to combine. Now, stir in the cottage cheese. It will be a bit lumpy, which adds a lovely, rustic cheesecake-like texture.
Step 3: Incorporate the Berries
Gently fold the blueberries and lemon zest (if using) into the creamy cottage cheese mixture. The lemon zest is a secret weapon—it cuts through the richness and makes the blueberry flavor pop. Be careful not to overmix, especially if using frozen berries, as they can start to bleed color.
Step 4: Make the Simple Crumble Topping
In your small bowl, combine the rolled oats, flour, chopped nuts (if using), brown sugar, and a pinch of salt. Add the cold, cubed butter. Using your fingertips, a pastry cutter, or even a fork, work the butter into the dry ingredients until the mixture becomes crumbly and the butter is about the size of small peas.
Step 5: Assemble and Bake
Pour the blueberry and cottage cheese filling into your prepared baking dish, spreading it into an even layer. Sprinkle the oat crumble topping evenly over the entire surface.
Place the dish in the preheated oven and bake for 45-50 minutes. You’ll know it’s done when the top is golden brown and the center is set. A good test is to give the pan a gentle jiggle; the center should have just a slight wobble, not a liquid one. A toothpick inserted near the center should come out clean.
Step 6: The Crucial Rest
This might be the hardest step, but it’s essential! Remove the bake from the oven and let it rest on a cooling rack for at least 15-20 minutes before slicing. This resting period allows the proteins in the eggs and cottage cheese to set fully, making it easier to slice and giving it the perfect, sliceable-yet-creamy texture. It will also be cool enough to actually enjoy!
Serving & Storing
Serving Suggestions:
Serve this bake warm, at room temperature, or even cold straight from the fridge. It’s delicious on its own, but a drizzle of extra maple syrup, a dollop of Greek yogurt, or an extra handful of fresh blueberries makes it extra special.
Storing Instructions:
This is a fantastic make-ahead meal. Allow the bake to cool completely, then cover it tightly with plastic wrap or transfer individual portions to airtight containers.
-
Refrigerator: It will keep beautifully in the fridge for up to 4-5 days.
-
Freezer: For longer storage, you can freeze individual slices. Wrap them tightly in plastic wrap and then in foil, or place in a freezer-safe bag. It will keep for up to 3 months. Thaw overnight in the refrigerator and reheat in the microwave or a warm oven.
Dietary & Customization Notes
-
Gluten-Free: Use certified gluten-free oats and replace the all-purpose flour in the topping with almond flour or a gluten-free 1:1 baking flour.
-
Dairy-Free: While tricky, you can try substituting the cottage cheese with a dairy-free alternative like silken tofu (blended) and use a plant-based butter for the topping.
-
Add-Ins: Feel free to get creative! Add a mashed ripe banana to the filling for natural sweetness, or swap the blueberries for raspberries, chopped strawberries, or diced apples with a dash of extra cinnamon.
Nutrition Information
Please note: The following is an estimated nutritional calculation based on the ingredients used. Actual values may vary depending on specific brands and measurements.
Per Serving (1/6th of the bake):
-
Calories: ~285
-
Total Fat: 12g
-
Saturated Fat: 5g
-
Cholesterol: 145mg
-
Sodium: 380mg
-
Total Carbohydrates: 30g
-
Dietary Fiber: 2g
-
Total Sugars: 18g (Includes 13g Added Sugars)
-
Protein: 16g