Carnivore Cream cheese pound cake
-
Prep Time: 10 minutes
-
Cook Time: 45-50 minutes
-
Cooling Time: 20+ minutes
-
Yield: 8-10 servings
-
Course: Dessert, Snack, Breakfast
-
Cuisine: American, Carnivore, Keto
Ingredients
This simple list of ingredients is the foundation for something extraordinary. For the best results, ensure all your dairy ingredients are at room temperature. This is crucial for creating a smooth, lump-free batter .
-
8 oz (225 g) full-fat cream cheese, softened to room temperature
-
1/2 cup (1 stick / 113 g) unsalted butter, softened to room temperature (salted butter works too; just omit the added pinch of salt)
-
5 large eggs, room temperature
-
1/4 teaspoon salt (omit if using salted butter)
Optional Ingredients (for a less strict carnivore approach):
-
1/4 cup powdered erythritol or allulose (for a sweet, dessert-like cake)
-
1 teaspoon vanilla extract (adds warmth and complexity)
Equipment Needed
-
Standard 9×5-inch loaf pan
-
Electric hand mixer or stand mixer with paddle attachment
-
Large mixing bowl
-
Rubber spatula
-
Parchment paper
-
Wire cooling rack
Step-by-Step Instructions: Your Path to Pound Cake Perfection
Follow these simple steps, and you’ll be well on your way to a beautiful, delicious loaf. The key is to be patient, especially with the cooling process.
1. Preheat and Prepare (5 minutes)
-
Preheat your oven to 325°F (163°C) . This moderate temperature ensures the cake bakes evenly without burning the outside before the center is set.
-
Prepare your loaf pan by lining it with a sheet of parchment paper. Leave some overhang on the long sides—this will act as “handles” to easily lift the cake out after baking. If you don’t have parchment, grease the pan generously with softened butter.
2. Cream the Base (5 minutes)
-
In your large mixing bowl, combine the softened cream cheese and softened butter.
-
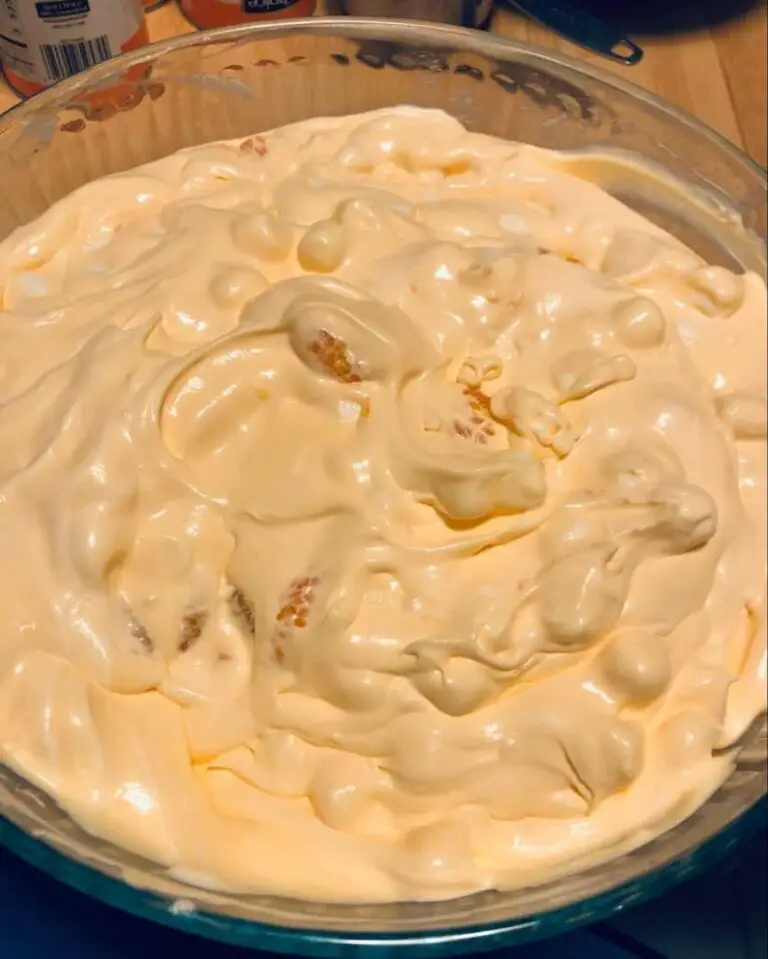
Beat them together with an electric mixer on medium-high speed until the mixture is completely smooth, light, and fluffy. This should take about 2-3 minutes . Don’t rush this step. Properly creaming the butter and cream cheese incorporates air and ensures a tender texture. Make sure to scrape down the sides and bottom of the bowl with a rubber spatula to eliminate any lumps, which would otherwise result in a dense, uneven cake .
3. Incorporate the Eggs (5 minutes)
-
Crack one of the room-temperature eggs into the bowl. Beat it into the butter-cheese mixture on low speed until just combined.
-
Add the remaining eggs one at a time, mixing well after each addition and scraping down the sides of the bowl frequently . Adding the eggs slowly and one by one helps maintain the emulsion you created in the previous step, preventing the batter from curdling.
4. Add Flavorings (2 minutes)
-
If you are using any of the optional ingredients like the sweetener, vanilla extract, or salt, add them to the bowl now.
-
Mix on low speed just until everything is fully incorporated and the batter is smooth. Be careful not to overmix at this stage.
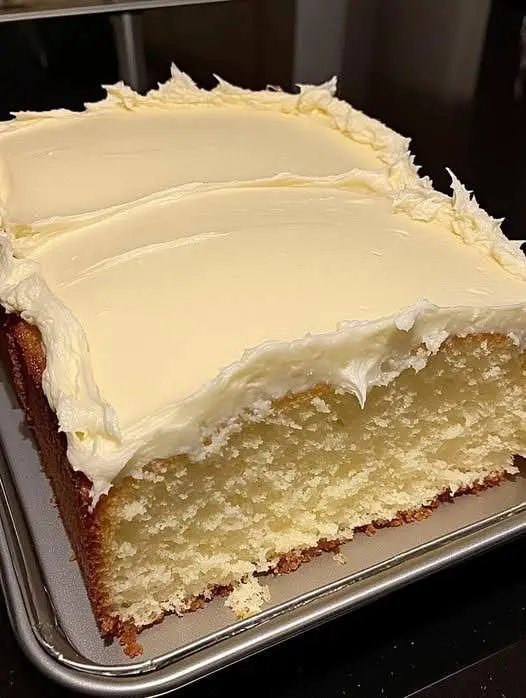
5. Bake to Golden Perfection (45-50 minutes)
-
Pour the finished batter into your prepared loaf pan. Use your spatula to gently smooth the top into an even layer.
-
Carefully place the pan in the preheated oven.
-
Bake for 45 to 60 minutes. The exact time will depend on your oven. The cake is done when:
-
The top is a deep, beautiful golden brown.
-
The edges look set and might be slightly pulling away from the pan.
-
The center is puffed up but still has a slight jiggle to it when you gently shake the pan—it should not look wet or liquid .
-
A toothpick or skewer inserted into the center comes out clean or with just a few moist crumbs attached.
-
6. The Crucial Cooling Process (20 minutes +)
This is perhaps the most important step. Do not rush it! Egg-based cakes like this one are delicate and need time to set properly .
-
Once baked, remove the pan from the oven and place it on a wire cooling rack.
-
Let the cake cool in the pan for 15-20 minutes. This allows it to firm up and become stable.
-
After this rest, use the parchment paper handles to gently lift the cake out of the pan and transfer it directly onto the wire rack to cool completely. Resist the urge to slice into it while it’s warm, as it will be too tender and might crumble.
7. Chill for the Best Texture (Optional but Recommended)
For a texture that is truly phenomenal—dense, creamy, and cleanly sliceable—once the cake has cooled to room temperature, wrap it in plastic wrap and place it in the refrigerator for 1-2 hours (or even overnight) . Chilling also mellows any slight eggy flavor, making the buttery richness the star .
Tips for Success & Troubleshooting
-
Room Temperature is Key: Cold ingredients won’t emulsify properly, leading to a lumpy batter and dense cake. Leave your cream cheese, butter, and eggs on the counter for at least an hour before starting .
-
My cake sank in the middle! Don’t panic. This is completely normal for an egg-based cake with no structural flour . To minimize sinking, ensure you don’t overmix the eggs and that the cake is fully baked through.
-
It tastes too eggy. If you’re sensitive to egg flavor, make sure you use room-temperature eggs, bake the cake a little longer, and most importantly, chill it thoroughly before eating . The cold temperature significantly reduces the eggy taste.
-
For a fluffier cake: If you prefer a lighter, more airy texture, try separating the eggs. Beat the yolks into the butter-cheese mixture as directed. In a separate clean bowl, whip the egg whites with a pinch of salt until stiff peaks form. Gently fold the whipped whites into the final batter until just combined. This incorporates air and creates a more cake-like crumb .
-
Pro Tip for a Silky Texture: For the creamiest, crack-free result, try a water bath. Place your filled loaf pan inside a larger roasting pan. Place the pans on the oven rack, then carefully pour hot water into the larger pan until it reaches about halfway up the sides of the loaf pan . This creates a humid environment that gently and evenly cooks the cake.
Storage and Leftovers
-
Refrigeration: Store any leftover cake in an airtight container in the refrigerator for up to 4-5 days . The flavor and texture are often even better the next day.
-
Freezing: This cake freezes beautifully. Wrap individual slices or the whole loaf tightly in plastic wrap, then again in aluminum foil or a freezer bag. Freeze for up to 2 months . Thaw in the refrigerator overnight before serving.
-
Serving Idea: Try serving a cold slice lightly toasted in a buttered skillet until warm and golden on the outside—it’s incredible .
Nutrition Information
Please note that this information is an estimate and will vary based on the specific brands of ingredients used and whether you include optional sweeteners. The values below are for a standard serving of the strict carnivore version (no sweetener or vanilla), based on 10 servings .
| Nutrient | Amount Per Serving |
|---|---|
| Calories | ~350-430 kcal |
| Total Fat | 33-40g |
| Saturated Fat | 20-25g |
| Protein | 8-12g |
| Total Carbohydrates | 2-4g |
| Sugars | ~2g |