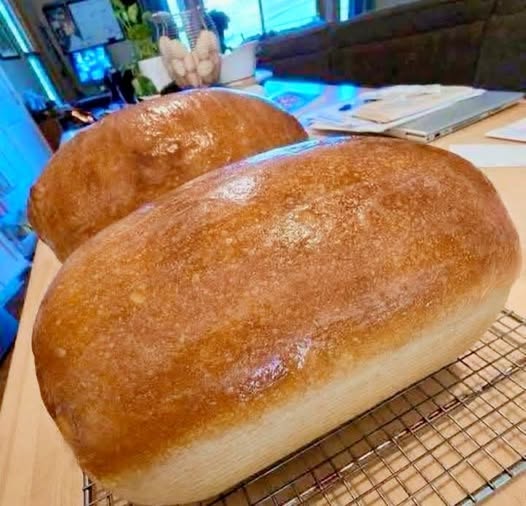
Easy Sourdough Sandwich Bread Recipe
Yield: 1 loaf
Prep Time: 30 minutes (active), 12-16 hours (inactive)
Bake Time: 40-45 minutes
Total Time: 13-17 hours
Difficulty: Medium (Intensity: 3 out of 5) – This recipe requires patience and some basic technique, but no advanced skills are needed.
The Soul of the Loaf: Understanding the Process
This is not a traditional, high-hydration sourdough boule. Instead, we’re using a combination of sourdough starter and a small amount of commercial yeast to guarantee a reliable rise and a soft, sandwich-friendly texture. The long, slow fermentation from the starter develops incredible flavor and makes the bread easier to digest. The process is broken down into manageable stages, making it a rewarding weekend project.
Ingredients
For the success of this recipe, accuracy is key. We recommend using a digital kitchen scale for the best results.
For the Bread:
-
150g (¾ cup) active sourdough starter (100% hydration)
-
360g (1 ½ cups) warm water (about 95°F / 35°C)
-
25g (2 tbsp) olive oil or melted butter
-
25g (1 ½ tbsp) honey or maple syrup
-
480g (4 cups) bread flour
-
9g (1 ½ tsp) fine sea salt
-
3g (½ tsp) instant yeast (optional, but recommended for reliability)
For Topping (Optional):
-
1 tbsp melted butter, for brushing
-
Rolled oats or sesame seeds
Equipment You’ll Need
-
Digital Kitchen Scale
-
Stand Mixer with a dough hook (or a large bowl and sturdy spatula)
-
Large Bowl
-
Plastic wrap or a damp kitchen towel
-
9×5 inch Loaf Pan
-
Instant-Read Thermometer (highly recommended)
Step-by-Step Instructions
Stage 1: Mixing and Autolyse (Time: 20 minutes | Intensity: Low)
-
Combine Wet Ingredients: In the bowl of your stand mixer (or a large mixing bowl), whisk together the 150g active sourdough starter, 360g warm water, 25g olive oil, and 25g honey until the starter is mostly dissolved.
-
Add Dry Ingredients: Add the 480g bread flour and 9g salt to the bowl. If you are using the 3g instant yeast, sprinkle it over the flour, ensuring it doesn’t directly touch the salt initially.
-
Initial Mix: Using the dough hook attachment on low speed (or a spatula by hand), mix for 1-2 minutes until a shaggy, sticky dough forms and no dry bits of flour remain.
-
Rest (Autolyse): Stop mixing, cover the bowl with plastic wrap or a damp towel, and let the dough rest for 20 minutes. This allows the flour to fully hydrate, making the dough easier to work with and improving its final structure.
Stage 2: Kneading and Bulk Fermentation (Time: 1.5-2 hours | Intensity: Low)
-
Knead the Dough: After the rest, knead the dough on medium-low speed for 6-8 minutes. If kneading by hand, turn the dough out onto a lightly floured surface and knead for 8-10 minutes. The dough is ready when it becomes smooth, elastic, and slightly tacky but not overly sticky. It should pass the “windowpane test”: gently stretch a small piece of dough between your fingers; it should stretch thin enough to be translucent without tearing immediately.
-
First Rise (Bulk Fermentation): Form the dough into a smooth ball. Lightly grease the mixing bowl with a bit of oil, place the dough back in, and turn it over to coat. Cover the bowl tightly and let it rise in a warm spot (75-80°F / 24-27°C is ideal) for 1.5 to 2 hours. Because we’re using a small amount of yeast, this rise will be modest; the dough should look puffy and have increased in size by about 50%, but it may not have fully doubled.
Stage 3: Shaping and Final Proof (Time: 2-12 hours | Intensity: Low)
-
Prepare the Pan: Lightly grease your 9×5 inch loaf pan with butter or oil.
-
Shape the Loaf: Turn the dough out onto a lightly floured surface. Gently press it into a rectangle roughly the length of your loaf pan. Tightly roll the dough into a log, pinching the final seam and the ends to seal. Place the loaf, seam-side down, into the prepared pan.
-
Final Proof: Cover the pan loosely with plastic wrap or a damp towel. Now you have a choice:
-
Warm Proof: Let it rise in a warm place for 1.5-2 hours, until the dough crowns about 1 inch above the rim of the pan.
-
Cold Proof (Recommended for Flavor): Place the covered pan in the refrigerator for 8-12 hours (overnight). This slow, cold fermentation develops a more complex, slightly tangier flavor and makes the dough easier to score.
-
Stage 4: Baking and Cooling (Time: 1 hour | Intensity: Medium)
-
Preheat the Oven: About 30 minutes before you’re ready to bake, place a rack in the center position and preheat your oven to 375°F (190°C).
-
Score the Top (Optional): If your loaf has been in the fridge, remove it. Using a sharp knife or lame, make one swift, shallow slash lengthwise down the center of the loaf. This allows for controlled expansion and a professional look. Brush the top with a little water and sprinkle with oats or seeds if desired.
-
Bake: Place the loaf pan in the preheated oven and bake for 40-45 minutes. The bread is done when it has a deep golden-brown crust, sounds hollow when tapped on the bottom, and the internal temperature registers between 190-200°F (88-93°C) on an instant-read thermometer.
-
Cool (This is Crucial!): Immediately remove the loaf from the pan and transfer it to a wire cooling rack. You must let the bread cool completely for at least 2-3 hours before slicing. Slicing into a warm loaf will release steam and result in a gummy, dense crumb. The texture sets as it cools.
Last of the Recipe: Storage and Enjoyment
Your freshly baked sourdough sandwich bread will last for up to 3 days stored in a bread box or a plastic bag at room temperature. For longer storage, slice the completely cooled loaf, and freeze the slices in a freezer-safe bag for up to 3 months. You can pop frozen slices straight into the toaster.
This bread is wonderfully versatile. It makes incredible avocado toast, holds up to hearty sandwich fillings without getting soggy, and is sublime when transformed into French toast or bread pudding.
Nutrition Information
(Please note: The following is an estimate generated from the listed ingredients and can vary based on specific brands and precise measurements.)
Serving Size: 1 slice (approx. 1/12th of the loaf)
Calories: ~185
Total Fat: 3g
-
Saturated Fat: 0.5g
Cholesterol: 0mg
Sodium: 295mg
Total Carbohydrates: 34g -
Dietary Fiber: 1g
-
Total Sugars: 2g
Protein: 5g
This bread is a source of complex carbohydrates for sustained energy. The fermentation process from the sourdough starter can help pre-digest some of the gluten and phytic acid, potentially making it easier on the digestive system for some individuals compared to commercial bread. It contains no cholesterol and is low in saturated fat.