Mounds bars
- Prep Time: 20 minutes
- Chill Time: 1 hour
- Chocolate Coating Time: 15 minutes
- Total Time: 1 hour 35 minutes
- Difficulty Level: Easy
- Yield: 18 bars
Equipment Needed
- Mixing bowl
- Measuring cups
- Baking sheet or tray
- Parchment paper
- Microwave-safe bowl or double boiler
- Fork or dipping tool
- Spatula
Ingredients
Coconut Filling
- 3 cups sweetened shredded coconut
- ¾ cup sweetened condensed milk
- 1 teaspoon vanilla extract
- ¼ teaspoon salt
Chocolate Coating
- 12 ounces dark chocolate, chopped
- 1 tablespoon coconut oil
Optional Garnishes
- Extra shredded coconut
- Chocolate drizzle
- Sea salt flakes
Ingredient Notes
Shredded Coconut
Sweetened shredded coconut provides the traditional texture and flavor associated with Mounds Bars. Unsweetened coconut may also be used if you prefer a less sweet candy.
Sweetened Condensed Milk
This ingredient binds the coconut mixture together and adds creaminess and sweetness.
Dark Chocolate
Dark chocolate creates the signature coating found on classic Mounds Bars. Chocolate with 60–70% cocoa content works especially well.
Coconut Oil
Adding a small amount of coconut oil helps the chocolate melt smoothly and creates a glossy finish.
Step-by-Step Instructions
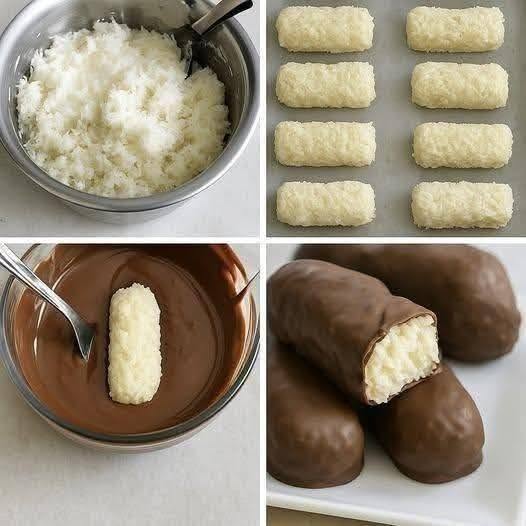
Step 1: Prepare the Coconut Mixture
Time: 10 minutes
Intensity: Easy
In a large mixing bowl, combine:
- Sweetened shredded coconut
- Sweetened condensed milk
- Vanilla extract
- Salt
Mix thoroughly until all ingredients are evenly incorporated.
The mixture should be moist and hold together when pressed between your fingers.
Step 2: Shape the Bars
Time: 10 minutes
Intensity: Easy
Line a baking sheet or tray with parchment paper.
Using your hands or a small scoop, shape the coconut mixture into rectangular bars approximately:
- 3 inches long
- 1 inch wide
- ½ inch thick
Place each bar onto the prepared tray.
Continue until all of the mixture has been used.
Step 3: Chill the Bars
Time: 1 hour
Intensity: Passive
Transfer the tray to the refrigerator.
Chill for at least 1 hour.
The bars should become firm enough to handle easily during the chocolate coating process.
For faster chilling, place them in the freezer for 20–30 minutes.
Step 4: Melt the Chocolate
Time: 5 minutes
Intensity: Easy
Place the chopped dark chocolate and coconut oil into a microwave-safe bowl.
Microwave Method
Heat in 30-second intervals, stirring after each interval until smooth.
Double Boiler Method
Place the bowl over simmering water and stir until completely melted.
The finished chocolate should be smooth, shiny, and free of lumps.
Step 5: Coat the Bars
Time: 10 minutes
Intensity: Moderate
Remove the chilled coconut bars from the refrigerator.
Using a fork or dipping tool:
- Dip each coconut bar into the melted chocolate.
- Coat completely.
- Lift and allow excess chocolate to drip off.
- Return to the parchment-lined tray.
Work carefully to maintain the shape of each bar.
Step 6: Set the Chocolate
Time: 15 minutes
Intensity: Passive
Place the chocolate-coated bars back into the refrigerator.
Chill until the chocolate is fully set.
The coating should become firm and glossy.
Step 7: Garnish and Serve
Time: 5 minutes
Intensity: Easy
If desired, decorate with:
- Extra coconut
- Chocolate drizzle
- Sea salt flakes
Allow the bars to sit at room temperature for a few minutes before serving for the best texture.
Serving Suggestions
Homemade Mounds Bars are delicious served:
- As an after-dinner dessert
- On holiday cookie trays
- With coffee or tea
- As homemade gifts
- At parties and celebrations
Pair them with:
- Espresso
- Hot chocolate
- Cappuccino
- Vanilla ice cream
for an extra-special treat.
Storage Instructions
Refrigerator
Store in an airtight container for up to 2 weeks.
Separate layers with parchment paper to prevent sticking.
Freezer
Freeze for up to 3 months.
Thaw in the refrigerator overnight before serving.
Tips for Success
Chill Thoroughly
Well-chilled coconut bars are easier to dip in chocolate.
Use Quality Chocolate
High-quality chocolate significantly improves flavor and texture.
Work Quickly
Coat the bars while they are still cold to help the chocolate set faster.
Avoid Moisture
Keep water away from the melted chocolate to prevent seizing.
Use Parchment Paper
This prevents sticking and makes cleanup easier.
Recipe Variations
Almond Mounds Bars
Place a whole almond on top of each coconut bar before coating with chocolate.
This creates a homemade version similar to Almond Joy.
Dark Chocolate Sea Salt Bars
Sprinkle flaky sea salt over the chocolate before it sets.
The contrast between sweet and salty flavors is delicious.
White Chocolate Coconut Bars
Substitute white chocolate for dark chocolate for a sweeter variation.
Extra Coconut Version
Mix an additional ½ cup shredded coconut into the filling for a denser texture.
Frequently Asked Questions
Can I use unsweetened coconut?
Yes. The bars will be less sweet but still delicious.
Why won’t my bars hold together?
The coconut mixture may need more condensed milk. Add one tablespoon at a time until it holds its shape.
Can I use milk chocolate?
Absolutely. Milk chocolate creates a sweeter candy bar.
Do these need refrigeration?
They can sit at room temperature briefly, but refrigeration helps maintain texture and freshness.
Can I make them ahead of time?
Yes. These bars are excellent make-ahead desserts and can be prepared several days in advance.
Nutrition Information
Per Bar (Based on 18 Bars)
- Calories: 180
- Protein: 2g
- Carbohydrates: 18g
- Total Fat: 11g
- Saturated Fat: 9g
- Cholesterol: 4mg
- Sodium: 45mg
- Dietary Fiber: 2g
- Sugars: 15g
- Potassium: 110mg
- Calcium: 4% Daily Value
- Iron: 6% Daily Value