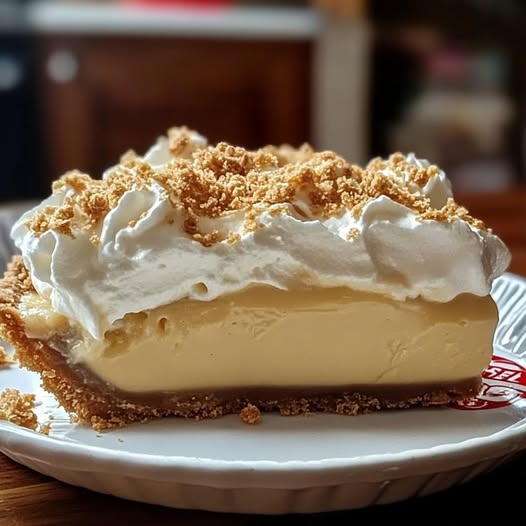
Root Beer Float Pie
Transport your taste buds back to the soda fountain with this Root Beer Float Pie! With a creamy, root beer-flavored filling, a fluffy whipped topping, and a graham cracker crust, this dessert is cool, sweet, and incredibly easy to make. No oven required!
It’s the perfect treat for root beer lovers, summertime BBQs, retro-themed parties, or anyone who loves a good old-fashioned float with a twist.
Prep & Chill Time
-
Prep Time: 15–20 minutes
-
Chill Time: 6 hours or overnight
-
Total Time: ~6.5 hours (mostly inactive)
Difficulty Level
Super Easy — No baking, no stovetop, no stress!
Ingredients (Serves 8)
For the Crust:
-
1½ cups graham cracker crumbs
-
¼ cup granulated sugar
-
6 tablespoons unsalted butter, melted
Shortcut: You can use a store-bought 9-inch graham cracker crust to save time.
For the Filling:
-
¾ cup cold root beer (not diet – full sugar works best)
-
½ teaspoon root beer concentrate or extract (optional, but enhances flavor)
-
1 (3.4 oz) package instant vanilla pudding mix
-
½ cup cold whole milk
-
4 oz cream cheese, softened
-
1 (8 oz) tub whipped topping (Cool Whip), thawed
Optional Toppings:
-
Whipped cream or extra Cool Whip
-
Maraschino cherries
-
Mini root beer candies
-
Chocolate shavings or chocolate syrup drizzle
Instructions
Step 1: Make the Crust
-
In a medium bowl, mix graham cracker crumbs, sugar, and melted butter until well combined.
-
Press the mixture evenly into the bottom and up the sides of a 9-inch pie dish.
-
Place in the fridge for at least 30 minutes to firm up while you make the filling.
Shortcut: Use a pre-made graham crust if you’re short on time!
Step 2: Make the Root Beer Filling
-
In a mixing bowl, whisk together the root beer, root beer extract (if using), pudding mix, and milk until smooth and slightly thickened (about 1–2 minutes).
-
In a separate bowl, beat the softened cream cheese until smooth and fluffy.
-
Add the pudding mixture to the cream cheese and mix until fully combined and creamy.
-
Gently fold in the whipped topping (Cool Whip) until no streaks remain.
Tip: Don’t overmix – you want it light and airy like a float!
Step 3: Assemble and Chill
-
Pour the filling into the prepared (or store-bought) crust.
-
Smooth the top with a spatula.
-
Refrigerate for at least 6 hours or overnight to set completely.
Step 4: Decorate & Serve
-
Just before serving, top with extra whipped topping, a few maraschino cherries, and fun extras like chocolate shavings or root beer candies.
-
Slice and serve chilled. Enjoy the nostalgic vibes!
Storage Tips
-
Refrigerator: Keep tightly covered for up to 4–5 days.
-
Freezer: Freeze the whole pie or slices in an airtight container for up to 1 month. Thaw in fridge before serving.
Frozen root beer float pie is also delicious slightly thawed — almost like an ice cream pie!
Nutritional Info (Per Slice – Approximate)
| Nutrient | Amount |
|---|---|
| Calories | 310–350 kcal |
| Carbs | 32 g |
| Sugars | 22 g |
| Fat | 18 g |
| Saturated Fat | 10 g |
| Protein | 3 g |
| Sodium | 240 mg |
These values will vary depending on exact ingredients (e.g., low-fat cream cheese, different brands of whipped topping, etc.).
Variations & Twists
Chocolate Root Beer Pie:
-
Use chocolate pudding mix instead of vanilla for a deeper flavor.
-
Top with chocolate shavings or Oreo crumbs.
Root Beer Float Icebox Cake (No Crust Needed!):
-
Layer graham crackers and filling in a 9×9 dish like a lasagna.
-
Chill overnight and slice into squares.
Individual Root Beer Float Cups:
-
Layer filling and crushed graham crackers in mini mason jars or cups for a portable treat.
Make It with Ice Cream:
-
Add ¼ cup softened vanilla ice cream to the filling for a more float-like flavor (may affect texture slightly).
Why You’ll Love This Recipe
No baking required
Creamy, nostalgic flavor
Fun dessert for all ages
Great for parties or make-ahead treats
Simple ingredients with big flavor
Final Thoughts
This Root Beer Float Pie is the perfect blend of creamy, cool, and classic. With just a few ingredients and no baking required, it’s ideal for summer or anytime you want something sweet and refreshing. It’s also a hit with both kids and adults alike — especially root beer lovers