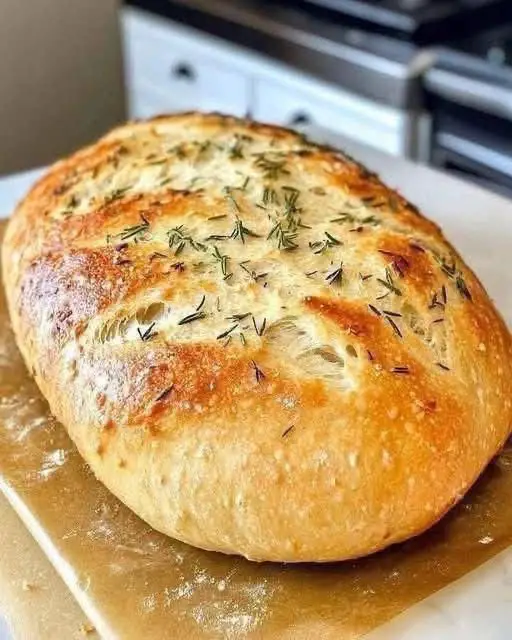
Sourdough No Knead Garlic Bread Recipe
Prep Time: 20 minutes (plus 18-24 hours inactive fermentation) | Cook Time: 45 minutes | Total Time: 18+ hours
Skill Level: Beginner-Friendly | Baking Intensity: Low-Effort, High-Reward
Yield: 1 stunning round loaf (boule)
There’s a special kind of magic in pulling a crackling, golden loaf of sourdough from your own oven. This recipe removes the intimidation factor, requiring no kneading and no complicated techniques. It leverages time and your own sourdough starter to develop incredible flavor and an open, airy crumb, all infused with the deep, aromatic notes of roasted garlic and fresh herbs. The result is a bakery-worthy masterpiece that fills your kitchen with an unforgettable fragrance.
The Story Behind This Loaf
This method is inspired by the famous “no-knead” bread revolution, which emphasizes long, slow fermentation over physical labor. By incorporating active sourdough starter, we add a layer of complex, tangy flavor and natural leavening. The roasted garlic and herbs meld into the dough during its long rest, creating a savory, nuanced taste in every single bite. It’s a perfect weekend project: mix one evening, bake the next day.
Ingredients
For the Roasted Garlic & Herb Mix:
-
1 whole head of garlic
-
1 tsp olive oil
-
3 tbsp finely chopped fresh herbs (a mix of rosemary, thyme, and parsley is ideal)
-
1 tbsp unsalted butter, softened
For the Sourdough Bread:
-
350g (1 ½ cups) lukewarm water
-
100g (½ cup) active, bubbly sourdough starter
-
500g (4 cups + 2 tbsp) bread flour (all-purpose works, but bread flour gives a better rise)
-
9g (1 ½ tsp) fine sea salt
-
Rice flour or extra all-purpose flour, for dusting
Equipment:
-
A medium mixing bowl
-
Plastic wrap or a damp towel
-
A Dutch oven (essential for the perfect crust)
-
Parchment paper
-
A razor blade or very sharp knife (lame)
Instructions
Part 1: The Night Before – Mixing & The Long Rest (5 min active time)
1. Roast the Garlic (Can be done ahead):
Preheat your oven to 400°F (200°C). Slice the top off the head of garlic to expose the cloves. Drizzle with olive oil, wrap in foil, and roast for 35-40 minutes until cloves are soft and golden. Let cool, then squeeze the soft roasted garlic into a small bowl. Mash it with the softened butter and chopped fresh herbs. Set aside.
2. Combine the Dough:
In your mixing bowl, whisk the active starter into the lukewarm water until milky. Add the bread flour and salt. Use a sturdy spoon or your hands to mix until no dry flour remains. The dough will be shaggy and sticky—this is perfect.
3. Incorporate the Flavor:
Add the roasted garlic and herb butter mixture to the shaggy dough. Use your spoon or hands to fold and pinch it through until the ingredients are fairly evenly distributed. Don’t overwork it.
4. The First Rise (Bulk Fermentation):
Cover the bowl tightly with plastic wrap or a damp towel. Let it sit at room temperature (68-75°F / 20-24°C is ideal) for 12-16 hours. The dough is ready when it’s bubbly on top, nearly doubled in size, and has a slightly domed surface.
Part 2: Baking Day – Shaping & Baking (45 min active time)
5. Shape the Loaf:
Generously flour a work surface. Gently scrape the dough out—it will be loose and bubbly. Using floured hands, fold the edges of the dough into the center about 4-6 times to create a round shape (a boule). Let it rest seam-side down for 5 minutes.
6. The Second Rise (Proofing):
Place a sheet of parchment paper over a small bowl or proofing basket. Dust it generously with rice flour (or all-purpose). Carefully flip your shaped dough into the bowl/basket so the smooth, seam-side is now up. Cover lightly with the towel and let it proof for 1-2 hours. It’s ready when it looks puffy and passes the “poke test”: lightly poke the dough; if it springs back slowly, leaving a slight indent, it’s ready. If it springs back quickly, give it more time.
7. Preheat & Score:
Place your Dutch oven (with its lid on) into your oven and preheat to 450°F (230°C) for a full 45 minutes. When the oven is hot, carefully remove the Dutch oven. Lift the dough by the parchment paper and lower the whole parcel into the hot pot.
Score the Dough: Using a razor blade, make one deep slash (about ½ inch deep) across the top of the loaf. This controls the expansion and gives that classic artisan “ear.”
8. Bake:
Immediately cover with the lid and return to the oven. Bake covered for 25 minutes. This creates a steamy environment for a great rise and shiny crust.
9. Finish for the Perfect Crust:
After 25 minutes, remove the lid. The loaf will be pale and risen. Continue baking, uncovered, for another 20-25 minutes, until the crust is a deep, glorious golden brown and the internal temperature reads 208-210°F (98-99°C).
Part 3: The Crucial Finale
10. Cool Completely:
This is the hardest but most important step. Transfer the loaf to a wire cooling rack. Let it cool completely for at least 3-4 hours before slicing. The bread is still cooking internally during this time. Cutting it early releases steam and results in a gummy crumb. Trust the process—it’s worth the wait.
Nutrition Information (Per Slice, based on 12 slices per loaf)
-
Calories: ~185 kcal
-
Total Fat: 1.5g
-
Saturated Fat: 0.8g
-
Cholesterol: 2.5mg
-
Sodium: 390mg
-
Total Carbohydrates: 36g
-
Dietary Fiber: 1.5g
-
Sugars: 0.2g
-
Protein: 6g
Nutritional information is an estimate calculated using generic ingredients and may vary based on specific products used.