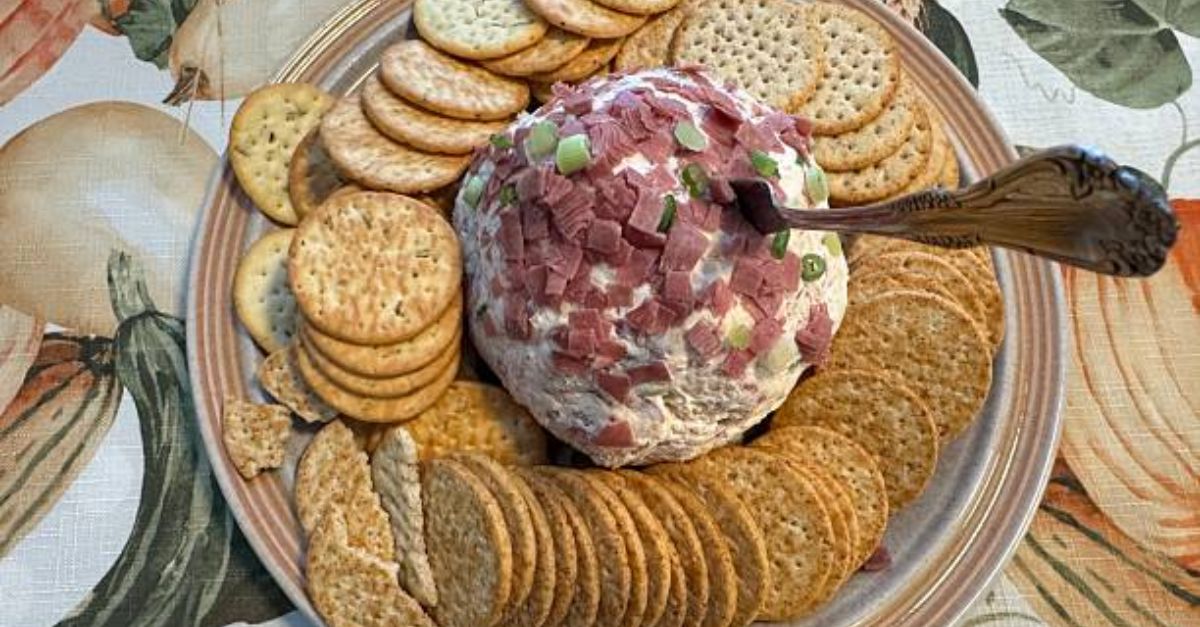
Beef cheese ball
Prep Time: 20 minutes
Chill Time: 2 hours (minimum)
Total Time: 2 hours 20 minutes
Yield: 1 large cheese ball (serves 10–12 as an appetizer)
Intensity Ratings (1–5 Scale)
| Category | Rating | Notes |
|---|---|---|
| Difficulty | ★★☆☆☆ (Easy) | No cooking required; just mixing and shaping. |
| Effort | ★★☆☆☆ (Low to Moderate) | A bit of grating and hand-mixing, but very straightforward. |
| Mess Factor | ★★★☆☆ (Moderate) | Cheese grating and hand-rolling can get your fingers sticky. Use gloves or plastic wrap for easier cleanup. |
| Make-Ahead Friendliness | ★★★★★ (Excellent) | Tastes better after 24–48 hours in the fridge. |
Why This Recipe Works
Most cheese balls lean sweet or mild. This one goes savory, smoky, and meaty. Finely chopped dried beef (the same kind used for creamed chipped beef) brings salty, umami depth, while sharp cheddar and cream cheese create a rich, spreadable base. A little Worcestershire, garlic, and onion powder round things out without overpowering the beef. The outside is rolled in more dried beef and fresh parsley for texture and color.
No baking. No last-minute fuss. Just mix, chill, and serve.
Ingredients
For the Cheese Ball
-
8 oz cream cheese (full-fat, softened to room temperature)
-
2 cups sharp cheddar cheese (freshly grated – pre-shredded has anti-caking agents that affect texture)
-
½ cup dried beef (finely chopped – look for a jar or pouch in the canned meat aisle; Buddig or Hormel work well)
-
2 tablespoons unsalted butter (softened)
-
1 teaspoon Worcestershire sauce
-
½ teaspoon garlic powder
-
½ teaspoon onion powder
-
¼ teaspoon smoked paprika (optional, but highly recommended for depth)
-
⅛ teaspoon cayenne pepper (optional – just enough warmth, not heat)
For the Coating
-
¼ cup dried beef (finely chopped)
-
2 tablespoons fresh parsley (finely minced – flat-leaf or curly both work)
-
½ cup pecans or walnuts (finely chopped – optional, but adds great crunch)
For Serving
-
Crackers (Ritz, butter crackers, or sturdy water crackers)
-
Celery sticks or bell pepper strips (for a low-carb option)
Instructions
Step 1: Prep Your Ingredients (Intensity: Low)
Take the cream cheese and butter out of the refrigerator 30–45 minutes before starting. You want them very soft – otherwise you’ll end up with lumpy cheese ball and sore arms.
Grate the sharp cheddar on the large holes of a box grater. Finely chop the dried beef. For the best texture, pulse the dried beef in a small food processor until it looks like coarse breadcrumbs, but chopping by hand works fine too.
Step 2: Mix the Base (Intensity: Moderate)
In a large mixing bowl, combine the softened cream cheese, softened butter, and Worcestershire sauce. Beat with a hand mixer on low speed (or mix vigorously with a wooden spoon) until smooth and fully combined.
Add the grated cheddar, ½ cup of the chopped dried beef, garlic powder, onion powder, smoked paprika, and cayenne. Mix again until everything is evenly distributed. The mixture will be thick and slightly sticky.
Pro Tip: If you don’t have a hand mixer, use a stiff spatula and some elbow grease. Just ensure the cheddar is thoroughly worked in – no dry pockets of cheese.
Step 3: Form the Ball (Intensity: Low to Moderate – a little sticky)
Line a small baking sheet or plate with plastic wrap. Scoop the cheese mixture onto the center. Using your hands (damp hands help prevent sticking), shape it into a rough ball. Don’t obsess over perfection – you’ll refine the shape after chilling.
Wrap the entire ball tightly in the plastic wrap, twisting the top to seal. For a more perfect sphere, you can shape it again through the plastic wrap. Refrigerate for at least 1 hour (or up to 24 hours). Chilling firms the ball so it holds its shape during the coating step.
Step 4: Prepare the Coating (Can be done while the ball chills)
On a dinner plate or shallow dish, combine the remaining ¼ cup chopped dried beef, minced parsley, and chopped nuts (if using). Mix with your fingers to distribute evenly.
Step 5: Coat the Cheese Ball (Intensity: Low – no sticky mess if you chilled properly)
Unwrap the chilled cheese ball. It should be firm but still pliable. Roll it gently in the coating mixture, pressing lightly so the beef, parsley, and nuts adhere to the entire surface. If the coating isn’t sticking, let the ball sit at room temperature for 5 minutes to soften slightly.
Step 6: Final Chill (Essential!)
Place the coated cheese ball back on the lined plate, cover loosely with fresh plastic wrap, and refrigerate for at least another 1 hour (or up to 2 days). This second chill melds the flavors and sets the coating.
Step 7: Serve
Remove the cheese ball from the fridge 15–20 minutes before serving – this softens it enough for easy spreading without becoming runny. Place it on a serving platter surrounded by crackers and veggies. Let guests dig in.
Time & Intensity Summary at a Glance
| Phase | Time Needed | Intensity |
|---|---|---|
| Ingredient prep (softening + grating + chopping) | 15 minutes active | Low |
| Mixing the cheese ball | 5–7 minutes | Moderate (hand mixer helps) |
| First chill (wrapped) | 1 hour (hands-off) | None |
| Coating preparation & rolling | 5 minutes | Low |
| Second chill (final set) | 1 hour (hands-off) | None |
| Tempering before serving | 15–20 minutes | None |
| Total active time: 25–30 minutes | Total time: ~2.5 hours |
Make-Ahead & Storage
-
Make up to 3 days ahead: Prepare the cheese ball completely (including coating), wrap tightly in plastic wrap, and refrigerate. The flavors actually improve.
-
Freezer-friendly? Yes. Wrap the uncoated cheese ball in plastic wrap then foil; freeze for up to 1 month. Thaw overnight in the fridge, then add the coating and final chill. The coating does not freeze well (parsley wilts, nuts lose crunch).
-
Leftovers: Store in an airtight container in the fridge for up to 5 days. If the outside softens, re-roll in fresh parsley or nuts before serving again.
Recipe Variations (Change the Intensity)
-
Spicy Beef & Jalapeño Ball: Add 2 tablespoons finely minced pickled jalapeños (pat dry) and swap cayenne for ¼ teaspoon chipotle powder. Intensity change: Mess goes up slightly (jalapeños add moisture).
-
Blue Cheese & Bacon Beef Ball: Replace ½ cup of the cheddar with crumbled blue cheese, and add ¼ cup cooked crumbled bacon to the mixture. Difficulty remains easy – just more ingredients.
-
Lower Mess / No-Food-Processor Version: Buy pre-shredded cheddar (texture suffers a little but it’s fine) and use a knife to chop the dried beef very finely. Mix with a sturdy silicone spatula instead of hands – shape the ball using two spoons. Mess rating drops to ★★☆☆☆.
Serving Suggestions & Pairings
-
Crackers: Ritz (buttery), Club (neutral), or rye crisps (bold enough for the beef).
-
Veggies: Celery sticks, cucumber rounds, bell pepper strips, or endive leaves.
-
Drinks: Pairs beautifully with a lager or amber ale, a dry red wine like Malbec, or even a bold rye whiskey cocktail.
-
Avoid: Delicate crackers (they’ll break) or water crackers without salt (too bland against the beef).
Pro Tips from the Test Kitchen
-
Room temperature dairy is non-negotiable. Cold cream cheese = lumpy cheese ball. Set a timer.
-
Don’t skip the double chill. The first chill shapes it; the second chill locks in the coating and flavor.
-
Use a microplane for garlic/onion powder? No need – powders are fine. But if you want fresh, replace powders with 1 small grated garlic clove and 1 tablespoon grated onion (squeeze out liquid). Mess intensity jumps to high – but it’s delicious.
-
Too salty? Dried beef is salty. Use unsalted butter and low-sodium crackers. If you’re sensitive to salt, rinse the dried beef briefly and pat dry before chopping.
Frequently Asked Questions (Recipe Website SEO Section)
Can I use fresh beef instead of dried beef?
Not for this recipe. Dried beef has a concentrated, salty, almost jerky-like flavor and firm texture. Fresh ground beef would need to be cooked, drained, and cooled – it makes a different (and much greasier) cheese ball.
Why is my cheese ball too soft to roll?
Two culprits: cream cheese wasn’t cold enough during shaping, or you used low-fat cream cheese (don’t – the fat is essential for structure). Pop it back in the freezer for 20 minutes.
Can I make this in a log instead of a ball?
Absolutely. After the first chill, shape into a log about 6 inches long. Roll in the coating. Slice into rounds for serving – looks elegant.
Final Verdict from the Website Editor
This Beef Cheese Ball hits every note for a crowd-pleasing appetizer. It’s low-difficulty, moderate-mess, and maximum flavor. The intensity ratings are honest: you’ll spend about half an hour actively working, but none of it is stressful. The make-ahead nature means you can focus on other party prep.
Best for: Super Bowl parties, Thanksgiving snacking boards, Christmas Eve buffets, or any time you want something more interesting than spinach-artichoke dip.