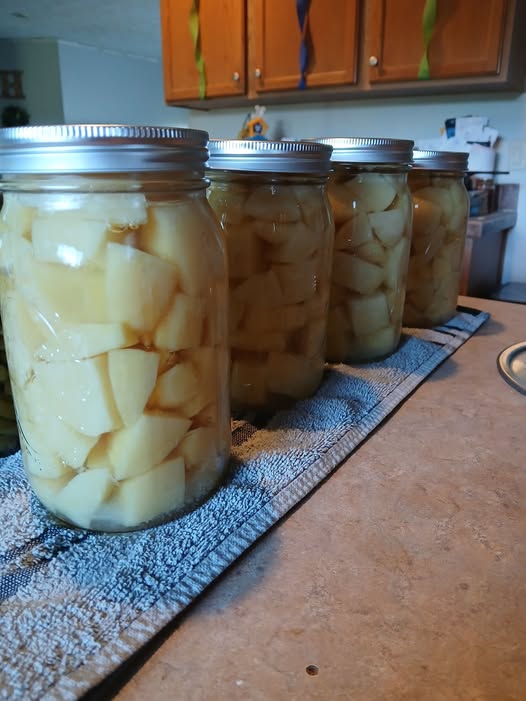
canned potatoes
| Preparation Time | 30 minutes |
| Peeling and Cutting | 20 minutes |
| Pre-Cooking Time | 10 minutes |
| Jar Filling | 15 minutes |
| Pressure Canning Time | 40 minutes |
| Cooling Time | 12–24 hours |
| Total Time | Approximately 14–25 hours |
Ingredients
- 14 pounds potatoes
- Water for boiling
- 7 teaspoons canning salt (optional)
- Fresh water for filling jars
Equipment Needed
- Pressure canner
- 7 quart-size canning jars
- New canning lids and bands
- Large stockpot
- Jar lifter
- Funnel
- Bubble remover tool
- Potato peeler
- Sharp knife
- Cutting board
Step 1: Prepare the Potatoes
Wash the potatoes thoroughly under cool running water.
Peel the potatoes to remove all skin.
Cut into:
- Cubes
- Chunks
- Small whole potatoes (if very small)
Place peeled potatoes into a bowl of cold water to prevent browning.
Preparation Intensity
- Time: 20–30 minutes
- Difficulty: Easy
- Temperature: Room temperature
Step 2: Pre-Cook the Potatoes
Bring a large pot of water to a boil.
Add the potatoes.
Cooking Intensity
- Heat Level: High
- Temperature: 212°F (100°C)
- Cook Time: 2–5 minutes
The potatoes should be partially heated but not fully cooked.
Drain immediately.
Step 3: Prepare the Jars
Wash jars thoroughly in hot soapy water.
Keep jars hot until ready to use.
Prepare lids according to manufacturer instructions.
Preparation Intensity
- Time: 10 minutes
- Water Temperature: Hot but not boiling
Step 4: Fill the Jars
Pack the hot potatoes into hot jars.
Leave:
- 1 inch headspace
Add:
- 1 teaspoon canning salt per quart (optional)
Pour boiling water over potatoes.
Maintain the 1-inch headspace.
Use a bubble remover tool to release trapped air.
Wipe jar rims clean.
Apply lids and screw bands fingertip tight.
Filling Intensity
- Time: 15 minutes
- Water Temperature: 190–212°F (88–100°C)
Step 5: Prepare the Pressure Canner
Place the filled jars into the pressure canner.
Add the recommended amount of water according to your canner’s instructions.
Secure the lid.
Heat the canner.
Allow steam to vent for:
Venting Intensity
- Heat Level: High
- Time: 10 minutes
Proper venting removes trapped air and ensures accurate pressure.
Step 6: Pressure Can the Potatoes
After venting, place the pressure regulator on the canner.
Bring the canner to the appropriate pressure.
Pressure and Processing Time
Dial-Gauge Canner
- 11 PSI at elevations up to 2,000 feet
Weighted-Gauge Canner
- 10 PSI at elevations up to 1,000 feet
Processing Intensity
- Heat Level: Medium-High
- Processing Time: 40 minutes for quart jars
- Temperature Inside Canner: Approximately 240°F (116°C)
Maintain steady pressure throughout the entire processing time.
Step 7: Cool the Canner
When processing is complete:
Turn off the heat.
Allow the canner to cool naturally.
Cooling Intensity
- Time: 30–60 minutes
- Do Not Force Cool
Wait until pressure reaches zero before opening.
Carefully remove the lid away from your face.
Step 8: Remove and Cool the Jars
Using a jar lifter, remove jars from the canner.
Place them on a towel-lined surface.
Allow jars to cool undisturbed.
Cooling Time
- Time: 12–24 hours
- Temperature: Room temperature
Do not tighten bands or press lids during cooling.
Step 9: Check Seals
After cooling:
Remove bands.
Check that each lid is properly sealed.
A properly sealed lid should not flex when pressed.
Wash jars, label them, and store in a cool, dark place.
Time and Temperature Summary
| Stage | Temperature | Time |
|---|---|---|
| Pre-Cooking | 212°F (100°C) | 2–5 minutes |
| Water Filling | 190–212°F (88–100°C) | Immediate |
| Venting | Steam Venting | 10 minutes |
| Pressure Processing | 240°F (116°C) | 40 minutes |
| Natural Cooling | Gradual Cooling | 30–60 minutes |
| Jar Cooling | Room Temperature | 12–24 hours |
Tips for Successful Canned Potatoes
Use Fresh Potatoes
Freshly harvested potatoes provide the best texture and flavor.
Avoid Overcooking
The potatoes will continue cooking during pressure canning.
Uniform Pieces
Cut potatoes into similar sizes for even heating.
Use Clean Equipment
Proper sanitation helps ensure food safety and quality.
Label Everything
Include the date of canning on each jar.
Best Potato Varieties for Canning
Excellent choices include:
- Yukon Gold
- White Potatoes
- Red Potatoes
- Kennebec Potatoes
These varieties maintain their texture better after processing.
Ways to Use Home-Canned Potatoes
Breakfast Skillet
Drain and fry with onions and peppers.
Potato Soup
Add directly to homemade soup.
Mashed Potatoes
Heat and mash with butter and milk.
Casseroles
Use in cheesy potato bakes and gratins.
Stews
Add directly to beef or chicken stew.
Roasted Potatoes
Drain, season, and roast until crisp.
Storage Instructions
Store sealed jars in:
- Cool location
- Dry area
- Dark pantry
Shelf Life
- Best quality within 12–18 months
- Often remains safe longer if seals remain intact
Once opened:
- Refrigerate immediately
- Use within 3–4 days
Frequently Asked Questions
Can potatoes be canned without a pressure canner?
No. Potatoes are a low-acid food and must be pressure canned for safe preservation.
Can I leave the skins on?
For best results and quality, peeling is recommended.
Why did my potatoes become cloudy?
Cloudiness may result from excess starch and is usually harmless if proper canning procedures were followed.
Can I season the potatoes?
Only canning salt is recommended during processing. Additional seasonings can be added when serving.
Nutrition Information
Per 1-Cup Serving
- Calories: 135
- Protein: 3g
- Carbohydrates: 31g
- Dietary Fiber: 3g
- Sugars: 1g
- Total Fat: 0g
- Saturated Fat: 0g
- Cholesterol: 0mg
- Sodium: 320mg (with canning salt)
- Potassium: 720mg
- Calcium: 20mg
- Iron: 1mg
- Vitamin C: 15% Daily Value
- Vitamin B6: 12% Daily Value