canning beef stew
- Prep Time: 35 minutes
- Cook Time: 30 minutes
- Pressure Canning Time:
- Pint jars: 75 minutes
- Quart jars: 90 minutes
- Total Time: Approximately 2½ to 3 hours
Yield
- About 7 quart jars
- Or 14 pint jars
Difficulty Level
Intermediate
Ingredients
- 5 pounds beef chuck roast, trimmed and cut into 1-inch cubes
- 2 tablespoons vegetable oil
- 8 cups beef broth
- 4 cups potatoes, peeled and cubed
- 3 cups carrots, sliced
- 2 cups celery, sliced
- 2 cups onions, chopped
- 2 cups green beans, cut into 1-inch pieces (optional)
- 3 cloves garlic, minced
- 2 teaspoons salt
- 1 teaspoon black pepper
- 2 teaspoons dried thyme
- 2 teaspoons dried parsley
- 2 bay leaves (remove before filling jars)
Optional Seasonings
- Worcestershire sauce
- Smoked paprika
- Rosemary
- Garlic powder
Do not add flour, cornstarch, dairy products, rice, or pasta before canning, as these ingredients are not recommended for pressure canning in this recipe. Thicken the stew after opening, if desired.
Equipment
- Pressure canner
- 7 quart jars or 14 pint jars with new lids and bands
- Jar lifter
- Canning funnel
- Bubble remover or nonmetallic spatula
- Large stockpot
- Ladle
- Clean towels
Instructions
Step 1: Prepare the Jars
Wash jars, lids, and bands in hot, soapy water. Keep the jars hot until ready to fill. Prepare the pressure canner according to the manufacturer’s instructions.
Step 2: Brown the Beef
Heat the vegetable oil in a large stockpot over medium-high heat.
Brown the beef cubes in batches for about 5–7 minutes per batch. Browning develops a deeper flavor, though it is optional if you’re short on time.
Step 3: Prepare the Stew
Add the onions, carrots, celery, garlic, potatoes, green beans (if using), thyme, parsley, salt, pepper, and beef broth to the pot.
Bring the mixture to a gentle boil.
Reduce the heat and simmer for 20–30 minutes, allowing the flavors to combine. The vegetables should begin to soften but not become fully cooked.
Remove the bay leaves before filling the jars.
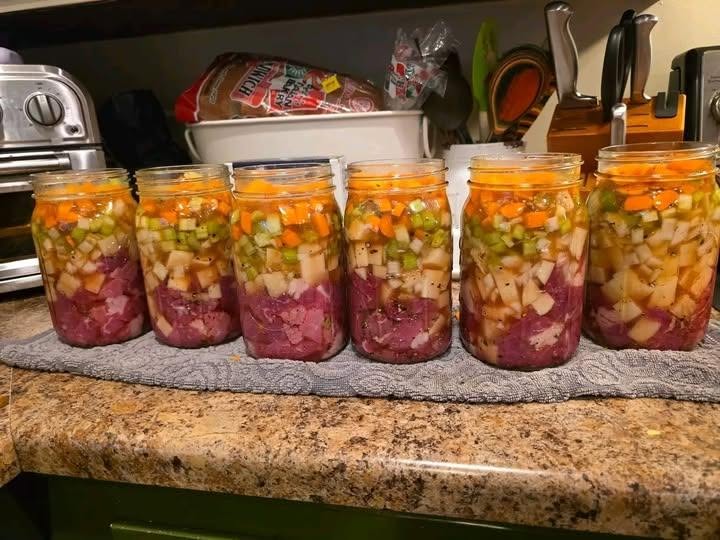
Step 4: Fill the Jars
Using a canning funnel, fill each hot jar with the hot stew.
Leave 1 inch of headspace at the top of each jar.
Remove air bubbles using a nonmetallic utensil and adjust the liquid level if needed.
Wipe the jar rims with a clean, damp cloth.
Place the lids on the jars and screw on the bands until fingertip tight.
Step 5: Pressure Can the Stew
Place the filled jars into the prepared pressure canner.
Lock the lid and vent the canner according to the manufacturer’s directions before bringing it up to pressure.
Process using tested pressure canning recommendations for your jar size and altitude:
- Pint jars: 75 minutes
- Quart jars: 90 minutes
Use the pressure (typically 10–15 PSI, depending on your canner type and altitude) specified in your pressure canner’s manual or the latest tested home canning guidelines.
When the processing time is complete, allow the canner to return to zero pressure naturally before opening the lid.
Step 6: Cool the Jars
Carefully remove the jars using a jar lifter and place them on a towel-lined counter.
Let the jars cool undisturbed for 12–24 hours.
Step 7: Check the Seals
After cooling, remove the bands and check each lid for a proper seal. The center of the lid should be slightly concave and should not flex when pressed.
Any jars that did not seal should be refrigerated and used within a few days.
Label the sealed jars with the date and store them in a cool, dark, dry place.
Tips for Successful Canning
- Always use a pressure canner for beef stew.
- Start with fresh, high-quality ingredients.
- Cut vegetables into uniform pieces for even cooking.
- Leave the recommended 1-inch headspace.
- Use new canning lids for each batch.
- Follow your pressure canner manufacturer’s instructions.
- Adjust processing pressure for your altitude when required.
- Store sealed jars away from direct sunlight and heat.
Variations
Rustic Herb Beef Stew
Add extra thyme, rosemary, and parsley for a fragrant herbal flavor.
Beef and Mushroom Stew
Include sliced mushrooms when preparing the stew for a richer taste.
Spicy Beef Stew
Add crushed red pepper flakes or diced mild green chilies before simmering.
Root Vegetable Stew
Replace some potatoes with parsnips or turnips for added variety.
Garlic Lover’s Stew
Increase the garlic to five or six cloves for a more robust flavor.
Serving Suggestions
When ready to enjoy, pour the contents of one jar into a saucepan and heat until simmering.
For a thicker stew, stir in a cornstarch slurry after opening and heating.
Serve with:
- Fresh crusty bread
- Homemade biscuits
- Cornbread
- Mashed potatoes
- Steamed rice
- Buttered noodles
- Simple green salad
Storage
Store properly sealed jars in a cool, dry location away from direct sunlight.
For the best quality, use within 12 months, though properly sealed jars may remain safe longer if stored under appropriate conditions.
Once opened, refrigerate the stew and consume it within 3–4 days.
Common Mistakes to Avoid
- Using a boiling-water canner instead of a pressure canner.
- Overfilling jars beyond the recommended headspace.
- Thickening the stew before canning.
- Ignoring altitude adjustments.
- Reusing single-use canning lids.
- Opening the pressure canner before it has fully depressurized.
- Storing jars with failed seals.
Frequently Asked Questions
Can I use ground beef?
Cubed beef chuck is recommended because it holds its texture better during pressure canning.
Can I freeze this instead?
Yes. If you prefer not to can it, prepare the stew, cool it completely, and freeze it in airtight containers for up to 3 months.
Why shouldn’t I add flour before canning?
Flour, cornstarch, and other thickeners can interfere with heat penetration during processing. For safety, thicken the stew only after opening the jar.
Do I need to brown the beef?
Browning is optional but highly recommended because it adds richer flavor and improves the finished texture.
Nutrition Information (Per Serving)
- Calories: 330
- Protein: 28g
- Carbohydrates: 16g
- Fat: 17g
- Saturated Fat: 6g
- Cholesterol: 80mg
- Sodium: 620mg
- Fiber: 3g
- Sugar: 4g
- Potassium: 820mg
- Calcium: 55mg
- Iron: 3mg