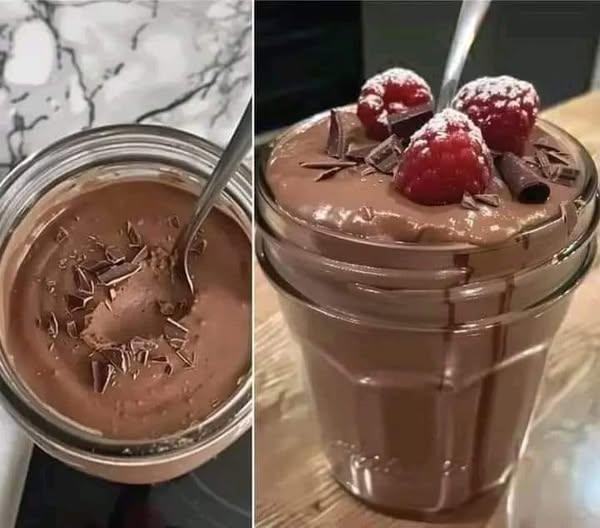
Carnivore chocolate mouse
-
Prep Time: 20 minutes
-
Cook Time: 10 minutes
-
Chill Time: 2 hours (minimum)
-
Total Time: 2 hours 30 minutes
-
Servings: 4
-
Dietary Info: Carnivore, Keto, Zero-Carb, Gluten-Free, Grain-Free
Ingredients
-
For the “Chocolate” Base:
-
6 large egg yolks (from pastured eggs for the best colour and flavour)
-
1/4 cup honey or maple syrup (Note: If you are a strict carnivore, omit this. The flavour will be more like a rich caramel custard. For a closer “chocolate” mimic, this small amount of natural sweetener is often included in “carnivore-ish” baking. For zero-carb, use a few drops of liquid stevia or monk fruit extract to taste.)
-
1/4 cup unsalted butter (high-quality grass-fed is recommended)
-
-
For the Whipped Cream:
-
2 cups heavy whipping cream (must be pure cream with no additives or carrageenan)
-
Pinch of sea salt (optional, but enhances flavour)
-
Instructions
Step 1: Create the “Chocolate” Base
-
Separate your eggs while they are cold. Place the 6 yolks in a medium, heat-safe bowl (glass or stainless steel is best). Save the whites for another recipe (like carnivore meringues or an omelette). Whisk the yolks lightly and set them aside.
-
In a small, heavy-bottomed saucepan, combine the honey (or sweetener) and the butter.
-
Place the pan over medium heat. Stir constantly with a whisk or silicone spatula as the butter melts and combines with the sweetener. The mixture will bubble and foam.
-
Continue cooking for 4-6 minutes, stirring constantly. You are looking for a visual and aromatic cue. The mixture will transform from a light yellow to a deep, beautiful amber-brown colour. It will smell intensely nutty, caramel-like, and rich. This is your “chocolate” flavour developing. Be careful not to let it burn—if you see any black specks or smell a bitter burn, remove it from the heat immediately. As soon as it reaches a deep amber, pull it off the burner.
Step 2: Temper the Egg Yolks (The Key Step!)
-
This next part requires focus. With the hot butter mixture off the heat, you are going to slowly introduce it to the egg yolks.
-
Using a ladle or a measuring cup with a spout, drizzle a tiny, thin stream of the hot butter mixture into the egg yolks while whisking the yolks vigorously and constantly.
-
Keep drizzling and whisking. This slowly raises the temperature of the yolks without cooking them. Go slowly—it should take about a minute to add the first half of the liquid. If you stop whisking or pour too quickly, you’ll have scrambled eggs.
-
Once about half of the hot liquid is incorporated and the yolk mixture is warm, you can pour the tempered yolk mixture back into the saucepan with the remaining butter mixture, whisking constantly.
-
Return the saucepan to low heat and cook for another 1-2 minutes, stirring continuously, until the mixture thickens slightly. It should coat the back of a spoon. Do not let it boil.
-
Remove from the heat. If you are using a liquid stevia or monk fruit, stir it in now. Pour the finished “chocolate” base into a clean bowl and let it cool to room temperature. It will thicken further as it cools.
Step 3: Whip the Cream
-
While the base is cooling, pour the heavy whipping cream and the optional pinch of sea salt into a large, chilled mixing bowl.
-
Using a hand mixer or a stand mixer with the whisk attachment, whip the cream on medium-high speed until stiff peaks form. You want it to be firm enough to hold its shape and support the heavy base. Be careful not to overwhip it into butter. You’ll know it’s ready when you lift the beaters and the cream stands up in peaks that don’t flop over.
Step 4: Fold and Assemble
-
Take about a quarter of the whipped cream and stir it into the completely cooled “chocolate” base. This is called “sacrificing” some cream—it loosens the base’s consistency, making it easier to fold in the rest without deflating it.
-
Gently pour the lightened base over the remaining whipped cream in the large bowl.
-
Using a rubber spatula, fold the mixtures together. To fold, cut down through the center of the mixture, scrape along the bottom of the bowl, and bring the spatula up the side, turning the mixture over. Rotate the bowl and repeat. Do this gently until no streaks of white or brown remain and the colour is uniform.
-
Spoon or pipe the mousse into 4 individual serving dishes (ramekins, small glasses, or teacups work beautifully).
Step 5: Chill and Serve
-
Cover each dish with plastic wrap and refrigerate for at least 2 hours, or until fully chilled and set. This allows the flavours to meld and the texture to become perfectly mousse-like.
-
Serve cold. If you’re feeling extra decadent, you can top it with a tiny pinch of flaky sea salt right before serving to really elevate that “chocolate” flavour.
Chef’s Tips for Success
-
Room Temperature Ingredients: While we start with cold cream for whipping, letting your egg yolks sit out for 15 minutes before starting can help them temper more smoothly.
-
The Colour Guide: Don’t rely on time alone; use your eyes and nose. The colour of your butter-honey mixture is the true indicator of flavour. A pale yellow will result in a simple vanilla/caramel flavour. The deep amber is where the magic happens.
-
No Grit: If you use a granulated sweetener like allulose or erythritol, it may not dissolve completely and can leave a grainy texture in the final mousse. Stick to liquid sweeteners for the smoothest result.
-
Make it Dairy-Free/Carnivore: To make this recipe 100% carnivore (meat, salt, water only), you would need to omit the honey/sweetener. The result is a very rich, eggy, and buttery “savory-sweet” mousse. It’s not for everyone, but some carnivores adore it. You can also replace the heavy cream with tallow-whipped cream, though the texture is vastly different and much heavier.
Nutritional Information (Per Serving, using honey)
Note: This is an estimate and will vary based on the specific brands of ingredients used and if you use a different sweetener.
| Nutrient | Amount |
|---|---|
| Calories | 595 |
| Fat | 57g |
| Saturated Fat | 34g |
| Carbohydrates | 15g |
| Fiber | 0g |
| Net Carbs | 15g |
| Protein | 6g |
| Cholesterol | 370mg |
| Sodium | 65mg |