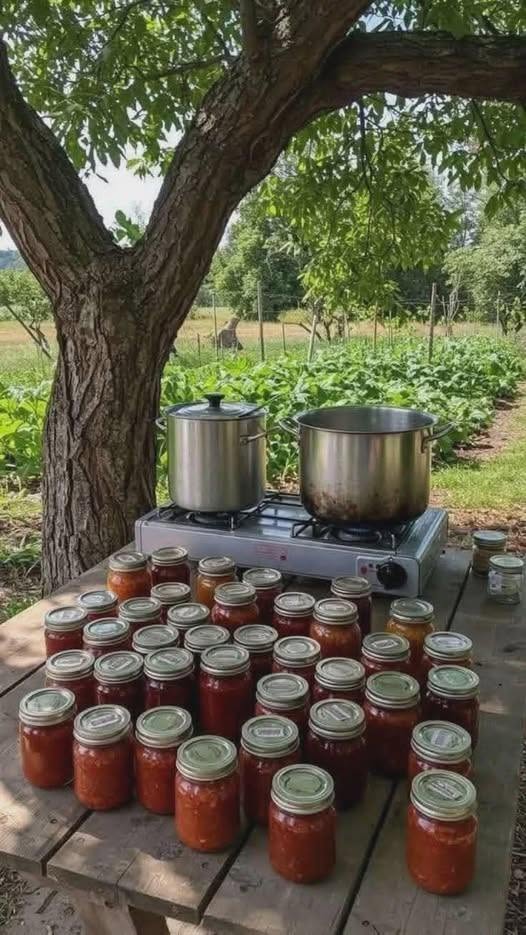
outdoor canning station
- Preparation Time: 1 hour
- Assembly Time: 3–5 hours
- Total Project Time: 4–6 hours
- Difficulty: Moderate
- Completed Size: Approximately 6 feet long by 2 feet deep (adjust as desired)
Materials
- 2×4 lumber for the frame
- Exterior-grade plywood or butcher block for the countertop
- Deck screws (2½ inches)
- Outdoor wood sealant or exterior paint
- Heavy-duty caster wheels (optional)
- Metal storage hooks
- Pegboard (optional)
- Outdoor storage bins
- Stainless steel shelving or wire rack
- Heat-resistant pavers or concrete blocks
- Propane burner or outdoor canning burner
- Weather-resistant hardware
- Sandpaper
- Wood glue (optional)
Tools Needed
- Circular saw or miter saw
- Power drill
- Measuring tape
- Carpenter’s square
- Level
- Clamps
- Paintbrush or roller
- Safety glasses
- Work gloves
Step 1: Plan the Layout
Choose a flat, well-ventilated outdoor location such as a covered patio, garage apron, or backyard workspace. Ensure there is ample clearance around the burner and that the area is protected from strong winds while still allowing good airflow.
Measure the available space and determine the dimensions of your station. Leave enough room for food preparation, jars, and cooling racks.
Step 2: Build the Frame
Cut the 2×4 lumber to size and assemble a sturdy rectangular frame using deck screws. Add cross supports to increase strength, especially if you plan to support a heavy water bath or pressure canner.
Check that the frame is level before tightening all fasteners.
Step 3: Install the Countertop
Attach the plywood or butcher block securely to the frame with screws. Sand all rough edges until smooth.
Seal the surface with an exterior-grade wood sealer or paint to protect it from moisture and weather exposure. Allow the finish to dry completely according to the manufacturer’s instructions.
Step 4: Add Storage
Install a lower shelf beneath the countertop for storing jars, lids, stockpots, and baskets.
Attach hooks to the sides for hanging jar lifters, funnels, ladles, measuring cups, and towels.
If desired, mount a pegboard on the back of the station to keep frequently used tools within easy reach.
Step 5: Create a Heat-Safe Cooking Area
Position your propane burner on heat-resistant pavers or a concrete slab next to the station rather than directly on a wooden surface.
Leave adequate space between the burner and the workstation to prevent heat damage while still allowing convenient access to jars and equipment.
Always follow the burner manufacturer’s safety recommendations.
Step 6: Organize Supplies
Arrange your canning equipment in logical work zones:
- Clean jars
- Filled jars waiting for processing
- Canner and burner
- Cooling rack
- Finished jars
- Storage bins for utensils and ingredients
Keeping everything organized makes the canning process faster and safer.
Step 7: Test the Station
Before your first large canning session, perform a trial setup using empty pots and jars.
Confirm that the workspace is stable, the burner operates safely, and all tools are easily accessible.
Make any necessary adjustments before preserving food.
Helpful Tips
- Choose weather-resistant materials for long-lasting durability.
- Keep a fire extinguisher nearby whenever using a propane burner.
- Store canning lids and rings in sealed containers to protect them from moisture.
- Install wheels only if you need a mobile workstation.
- Work in the shade whenever possible during hot weather.
- Keep children and pets away from the active canning area.
- Wipe down surfaces after each use to prolong the life of the station.
Optional Upgrades
Customize your outdoor canning station with additional features:
- Fold-down side shelves
- Built-in towel holder
- Overhead canopy for shade
- LED task lighting
- Stainless steel sink with a garden hose connection
- Spice or seasoning shelf
- Drawer organizers
- Weatherproof storage cabinet
- Magnetic knife strip
- Thermometer holder
Maintenance
Inspect the station regularly for loose screws or signs of weather damage.
Reapply exterior wood sealer every one to two years as needed.
Clean the countertop with mild soap and water after each canning session, and allow it to dry thoroughly before covering or storing.
Store portable equipment indoors during extended periods of bad weather.
Safety Tips
- Operate propane burners only in well-ventilated outdoor areas.
- Never use outdoor propane burners inside a home, garage, or enclosed porch.
- Follow USDA-approved canning procedures for all food preservation.
- Check jars for cracks or chips before each use.
- Use proper canning tools to avoid burns.
- Keep a first aid kit nearby.
- Allow processed jars to cool undisturbed for 12–24 hours before checking the seals.
Frequently Asked Questions
Can I use pressure canners outdoors?
Yes. Many home preservers safely use pressure canners outdoors on propane burners designed to support the weight of a full canner. Always verify that your burner meets the manufacturer’s recommendations.
Do I need electricity?
No. A basic outdoor canning station can operate entirely with a propane burner, though electricity is helpful if you plan to use lighting or small appliances.
Can the station stay outside year-round?
Yes, if it’s built with weather-resistant materials and protected with a waterproof cover. In harsh climates, storing it under cover or in a shed will extend its lifespan.
What’s the best countertop material?
Exterior-grade plywood coated with a durable sealant is economical, while stainless steel or butcher block offers added durability and a professional appearance.