Pillsbury Biscuit Garlic Butter
-
Prep Time: 10 minutes
-
Cook Time: 15-18 minutes
-
Total Time: 25-30 minutes
-
Recipe Difficulty: ★☆☆☆☆ (Very Easy)
-
Serving Size: 8-10 cheese bombs (depending on biscuit size)
-
Best For: Snacks, Appetizers, Party Food, Game Day
This recipe is beginner-friendly, making it ideal for home cooks of any skill level. Kids can even help assemble the bombs with supervision.
Ingredients
Here’s everything you’ll need to make these irresistible cheese bombs:
For the Cheese Bombs:
-
1 can (16.3 oz) Pillsbury Grands! Flaky Layers Biscuits (8 count)
-
1 to 1 ½ cups mozzarella cheese, cubed or shredded
-
2 tablespoons unsalted butter, melted
-
1 teaspoon Italian seasoning (optional)
For the Garlic Butter:
-
4 tablespoons unsalted butter
-
2–3 cloves garlic, finely minced or crushed
-
1 tablespoon chopped fresh parsley (or 1 teaspoon dried parsley)
-
1 pinch of salt
-
Optional: 1 tablespoon grated Parmesan cheese for added flavor
Instructions
Follow these simple steps to bake up golden cheese bombs in no time:
Step 1: Preheat the Oven
Preheat your oven to 375°F (190°C). Line a baking sheet with parchment paper or a silicone baking mat for easy cleanup.
Step 2: Prepare the Biscuits
Open the can of Pillsbury biscuits and separate them. If you’re using Grands! biscuits, they’re larger and can be cut in half to make more servings or kept whole for jumbo cheese bombs.
Step 3: Add the Cheese Filling
Take one biscuit and flatten it gently in your palm. Place a cube or small mound of mozzarella cheese (about 1 tablespoon) in the center. Fold the dough around the cheese and pinch all edges tightly to seal. Roll it slightly between your hands to form a smooth ball.
Tip: Make sure there are no holes—if the cheese leaks during baking, the bombs won’t be as gooey inside.
Repeat for the remaining biscuits and cheese.
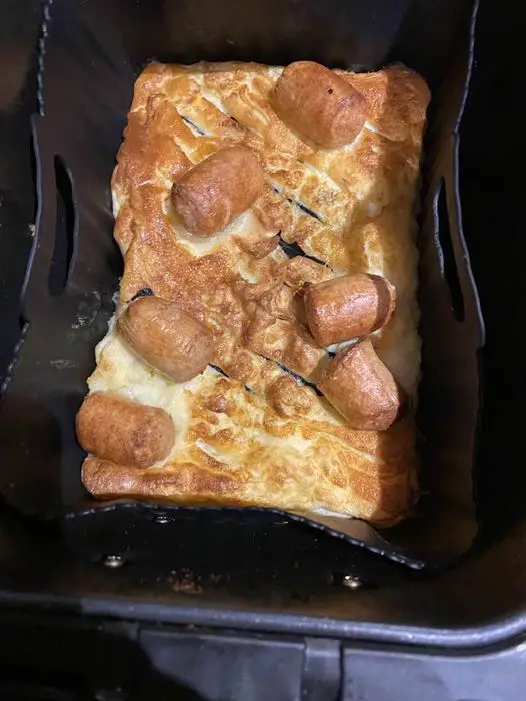
Step 4: Arrange and Bake
Place the sealed cheese bombs seam-side down on the prepared baking sheet. Leave some space between each ball so they can expand.
Lightly brush the tops with 2 tablespoons of melted butter and sprinkle with Italian seasoning if using.
Bake in the preheated oven for 15–18 minutes, or until the tops are golden brown and the dough is cooked through.
Step 5: Make the Garlic Butter
While the bombs are baking, prepare the garlic butter.
In a small saucepan over low heat, melt 4 tablespoons of butter. Add the minced garlic and cook gently for 1–2 minutes, just until fragrant—don’t let it brown. Remove from heat and stir in the parsley and a pinch of salt. Optional: stir in the Parmesan cheese for added umami.
Step 6: Brush and Serve
As soon as the cheese bombs come out of the oven, brush them generously with the warm garlic butter. This step not only adds flavor but also gives them a glossy, mouthwatering finish.
Let them cool slightly before serving—they will be molten hot inside!
Serving Suggestions
These cheese bombs are best enjoyed warm and fresh out of the oven. Serve them with:
-
Marinara Sauce for dipping
-
Ranch Dressing for a creamy contrast
-
Soup like tomato basil or minestrone as a cheesy side
-
Salads like Caesar or antipasto for a more balanced plate
They also make fantastic additions to holiday platters or game-day spreads.
Variations and Tips
Want to customize your garlic butter cheese bombs? Here are some ideas:
-
Spicy Kick: Add red pepper flakes to the garlic butter or sprinkle them on top before baking.
-
Cheese Choices: Try cheddar, pepper jack, or even Brie for a twist on the filling.
-
Stuffed Add-Ons: Include a slice of pepperoni or jalapeño with the cheese inside for extra flavor.
-
Make Ahead: Assemble bombs and refrigerate for up to 4 hours before baking. Add 1–2 extra minutes of bake time if baking from chilled.
-
Storage: Store leftovers in an airtight container in the fridge for up to 3 days. Reheat in the oven or air fryer for best texture.
Nutritional Information (Per Cheese Bomb, Approximate)
| Nutrient | Amount |
|---|---|
| Calories | 180–220 kcal |
| Carbohydrates | 18g |
| Protein | 6g |
| Fat | 12g |
| Saturated Fat | 6g |
| Cholesterol | 25mg |
| Sodium | 370mg |
| Sugar | <1g |
| Fiber | <1g |
| Calcium | 80mg (8%) |
Note: These values may vary depending on the type of cheese and butter used, as well as portion size.