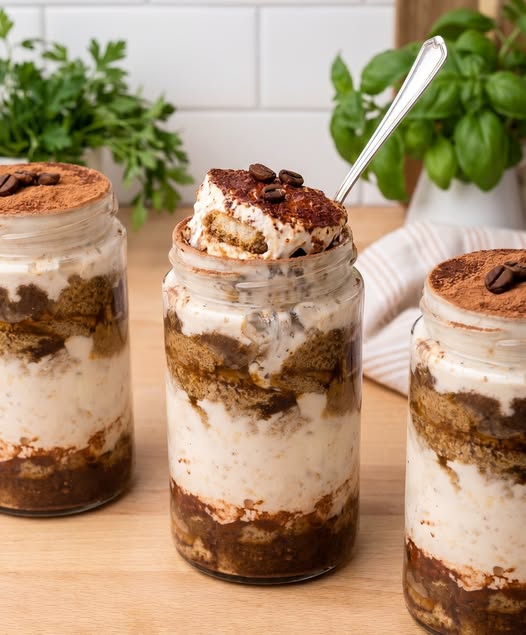
Tiramisu Jar
- Prep Time: 25 minutes
- Chill Time: 4 hours
- Total Time: 4 hours 25 minutes
- Difficulty Level: Easy to Moderate
- Servings: 6 jars
Equipment Needed
- Mixing bowls
- Electric mixer
- Rubber spatula
- Measuring cups and spoons
- Small serving jars
- Fine mesh sieve
- Whisk
Ingredients
For the Mascarpone Cream
- 8 ounces mascarpone cheese, softened
- 1 cup heavy whipping cream
- ⅓ cup granulated sugar
- 1 teaspoon vanilla extract
For the Coffee Layer
- 1 cup strong brewed espresso or coffee, cooled
- 1 tablespoon coffee liqueur (optional)
For the Layers
- 18–20 ladyfinger cookies
- 2 tablespoons unsweetened cocoa powder
Optional Garnishes
- Chocolate shavings
- Cocoa nibs
- Whipped cream
- Chocolate-covered espresso beans
Ingredient Notes
Mascarpone Cheese
Mascarpone is essential for authentic tiramisu flavor and texture. Allow it to soften slightly before mixing for smoother results.
Ladyfingers
Traditional ladyfinger biscuits absorb coffee beautifully while maintaining structure.
Espresso
Strong espresso provides the classic coffee flavor associated with tiramisu. Strong brewed coffee can also be used.
Coffee Liqueur
While optional, coffee liqueur adds depth and complexity to the dessert.
Step-by-Step Instructions
Step 1: Prepare the Coffee Mixture
Time: 5 minutes
Intensity: Easy
In a shallow bowl, combine:
- Cooled espresso or coffee
- Coffee liqueur (if using)
Stir well and set aside.
The coffee should be completely cooled before use.
Step 2: Prepare the Mascarpone Mixture
Time: 10 minutes
Intensity: Easy
In a large mixing bowl, combine:
- Mascarpone cheese
- Sugar
- Vanilla extract
Mix until smooth and creamy.
Avoid overmixing, as mascarpone can become grainy.
Step 3: Whip the Cream
Time: 5 minutes
Intensity: Moderate
In a separate chilled bowl, beat the heavy cream until stiff peaks form.
This creates the light, airy texture that makes tiramisu so appealing.
Step 4: Fold the Mixtures Together
Time: 3 minutes
Intensity: Easy
Gently fold the whipped cream into the mascarpone mixture.
Use a spatula and work slowly to preserve the airy texture.
Continue folding until fully incorporated.
The mixture should be smooth, light, and fluffy.
Step 5: Prepare the Ladyfingers
Time: 3 minutes
Intensity: Easy
Dip each ladyfinger briefly into the coffee mixture.
Only 1–2 seconds per side is needed.
Avoid soaking them too long, as they may become overly soft.
Break the cookies into smaller pieces if necessary to fit your jars.
Step 6: Assemble the First Layer
Time: 5 minutes
Intensity: Easy
Place a layer of coffee-soaked ladyfingers into the bottom of each jar.
Press gently to create an even base.
Cover with a layer of mascarpone cream.
Spread evenly.
Step 7: Repeat the Layers
Time: 5 minutes
Intensity: Easy
Add another layer of:
- Coffee-soaked ladyfingers
- Mascarpone cream
Continue layering until the jars are nearly full.
Finish with a layer of mascarpone cream on top.
Step 8: Chill the Tiramisu Jars
Time: 4 hours
Intensity: Passive
Cover the jars and refrigerate for at least:
4 hours
For the best flavor, chill overnight.
This resting time allows the flavors to blend and the texture to develop properly.
Step 9: Add Cocoa Topping
Time: 2 minutes
Intensity: Easy
Just before serving, use a fine mesh sieve to dust the tops with cocoa powder.
Add optional garnishes if desired.
Serving Suggestions
Tiramisu Jars are elegant enough for special occasions and simple enough for casual gatherings.
Serve with:
- Espresso
- Cappuccino
- Coffee
- Hot chocolate
- Fresh berries
These jars also make beautiful additions to dessert tables and holiday celebrations.
Storage Instructions
Refrigerator
Store covered in the refrigerator for up to 3 days.
The flavor often improves after the first day.
Freezer
Freeze tightly covered for up to 1 month.
Thaw overnight in the refrigerator before serving.
Tips for Success
Use Cold Heavy Cream
Cold cream whips faster and produces a more stable texture.
Don’t Oversoak the Ladyfingers
Quick dipping prevents soggy layers.
Chill Thoroughly
Adequate chilling is essential for authentic tiramisu texture.
Use Quality Coffee
Since coffee is a primary flavor, high-quality espresso creates the best result.
Dust Cocoa Before Serving
Fresh cocoa powder looks more attractive and prevents moisture absorption.
Recipe Variations
Chocolate Tiramisu Jars
Add:
- Chocolate shavings between layers
- Chocolate syrup drizzle
for a richer dessert.
Berry Tiramisu Jars
Add layers of:
- Strawberries
- Raspberries
- Blueberries
for a fruity twist.
Mocha Tiramisu Jars
Mix:
- 1 tablespoon cocoa powder
into the mascarpone filling.
Caramel Tiramisu Jars
Drizzle caramel sauce between layers for additional sweetness and richness.
Frequently Asked Questions
Can I make tiramisu jars ahead of time?
Yes. In fact, they taste even better after chilling overnight.
Can I substitute cream cheese for mascarpone?
Mascarpone is preferred, but cream cheese can be used in a pinch for a slightly tangier flavor.
Do I need coffee liqueur?
No. It is optional and can be omitted entirely.
Why is my filling runny?
The whipped cream may not have reached stiff peaks, or the mixture may have been overmixed.
Can I use decaffeinated coffee?
Absolutely. Decaf coffee works well if you prefer to avoid caffeine.
Nutrition Information
Per Jar (Based on 6 Servings)
- Calories: 390
- Protein: 6g
- Carbohydrates: 28g
- Total Fat: 28g
- Saturated Fat: 17g
- Cholesterol: 95mg
- Sodium: 95mg
- Dietary Fiber: 1g
- Sugars: 15g
- Potassium: 140mg
- Calcium: 8% Daily Value
- Iron: 6% Daily Value