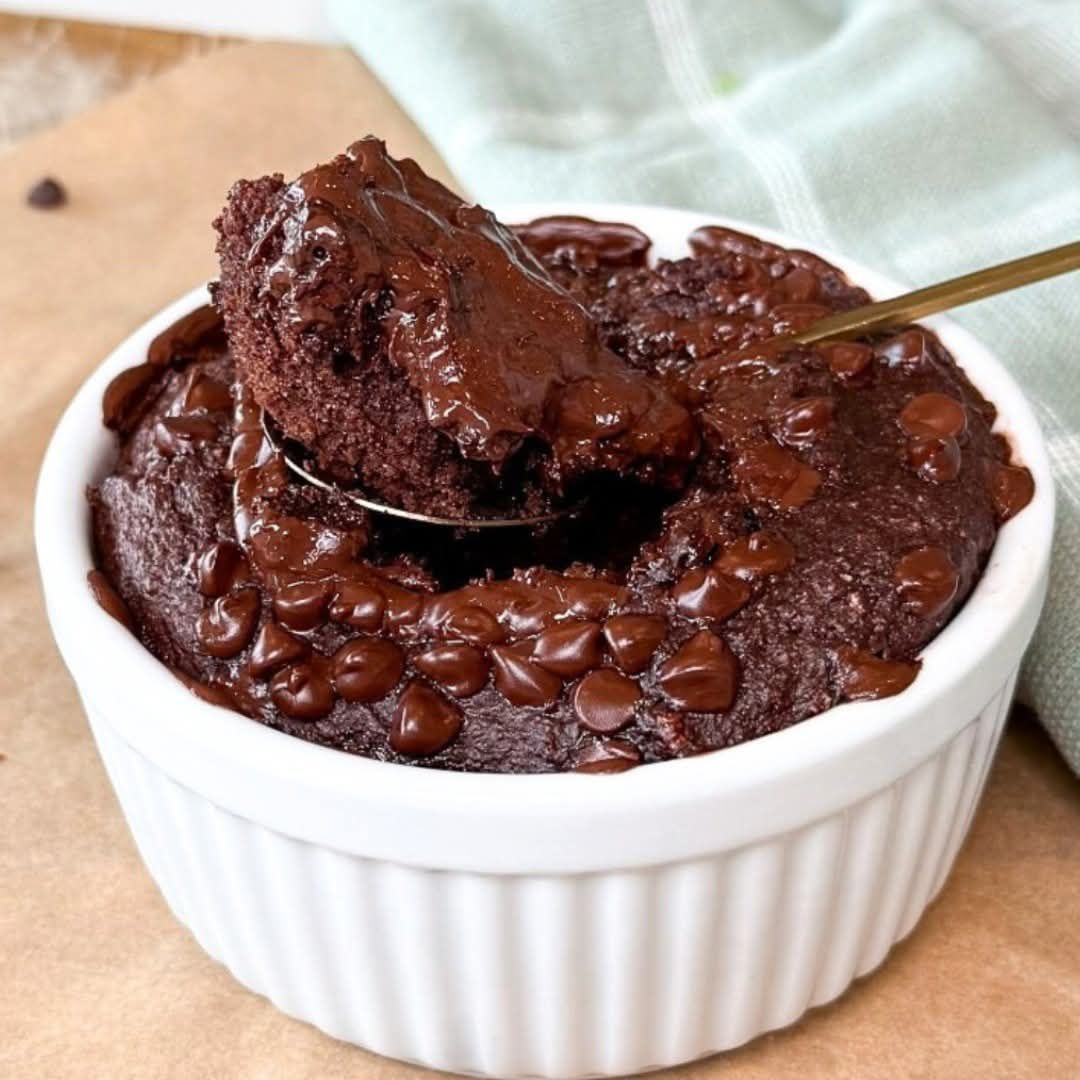
2 Minute Protein Brownie (Easy & 33g Protein)
Prep time: 1 minute
Cook time: 1 minute (Microwave) OR 12 minutes (Oven)
Intensity: Low (Microwave) / Medium (Oven)
Total time: 2 minutes (Microwave Method)
Yield: 1 Brownie
Category: Dessert, Snack, High Protein
Method: Microwave, Baking
Cuisine: American, Healthy
The Story Behind the Recipe
We all know the feeling. It’s 9:00 PM. The sugar cravings hit like a tidal wave. You want something warm, gooey, and chocolatey, but you don’t want to undo a day of healthy eating or spend an hour baking.
Enter the 2 Minute Protein Brownie. This isn’t your average dry, chalky “protein mug cake.” This recipe was rigorously tested to achieve the holy grail of diet desserts: a crispy, flaky top crust with a dense, fudgy, under-baked center.
With a whopping 33 grams of protein and just over 300 calories, this single-serving brownie functions as a legitimate post-workout meal replacement or a macro-friendly dessert that actually tastes like the real thing.
Whether you have a microwave in your office kitchen or prefer to bake in a traditional oven, this recipe is foolproof. Let’s dive into the quickest, most satisfying brownie of your life.
Why You’ll Love This Recipe
-
High Protein, Low Sugar: 33g of muscle-building protein with almost zero refined sugar.
-
No Banana, No Pumpkin: Unlike many “healthy” brownies, this one doesn’t taste like fruit. It tastes like butter and chocolate.
-
Flourless Option: Easily made gluten-free depending on your protein powder.
-
Customizable: Safe for keto, low-carb, and gluten-free diets with simple swaps.
Ingredient Intensity & Rationale
Intensity Level: Low (2/5)
This recipe requires no electric mixers, no tempering chocolate, and no fancy techniques. If you can stir, you can make this brownie.
Ingredient Intensity Notes:
-
Whey/Casein Blend (Recommended): If you use 100% whey, the brownie may puff up and deflate, becoming spongy. If you use 100% casein, it will be too dry. A blend yields the perfect fudgy texture. (Intensity: Medium) .
-
Dutch Process Cocoa: For a deep, dark color and rich flavor. Standard cocoa works, but Dutch-process provides that “bakery-style” darkness. (Intensity: Low) .
Equipment Needed
-
1 Microwave-safe mug or ramekin (approx. 12oz capacity)
-
1 Small mixing bowl (to avoid overmixing in the mug)
-
1 Fork or small whisk
-
Measuring spoons
The Ingredients
The Magic Ratio
-
1 scoop (35g) Vanilla or Chocolate Whey/Casein Blend Protein Powder
-
2 tbsp (15g) Dutch-processed unsweetened cocoa powder
-
1/2 tsp Baking powder (essential for the “flaky top” crust)
-
Pinch of sea salt
-
1 Large egg white (or 3 tbsp liquid egg whites)
-
2 tbsp (30g) Unsweetened applesauce (or 1 tbsp oil for more fat)
-
1-2 tbsp Water or unsweetened almond milk (as needed)
-
1 tbsp (15g) Sugar-free chocolate chips (plus extra for topping)
-
1/2 tsp Vanilla extract
Optional Boosters:
-
1 tbsp Peanut butter powder (adds 2g protein, subtract 1 tbsp cocoa)
-
1 shot of espresso powder (enhances chocolate flavor)
Method: 2 Minute Microwave (The Standard Way)
Intensity: Low
This is the primary method for the “2 Minute” claim.
-
Prep the Vessel: Lightly spray your mug or ramekin with non-stick spray. This is crucial if you want to tip the brownie out onto a plate.
-
Combine Dry Ingredients: In your small bowl, sift together the protein powder, cocoa powder, baking powder, and salt. Why sift? Protein powder clumps easily. Sifting ensures you don’t bite into a pocket of raw powder.
-
Combine Wet Ingredients: Add the egg white, applesauce (or oil), and vanilla extract to the dry mix.
-
Stir: Mix vigorously with a fork. The batter will be very thick. Slowly add water or milk one teaspoon at a time until the batter resembles traditional brownie batter—thick, glossy, and slightly pourable.
-
Fold in Chips: Gently fold in the sugar-free chocolate chips.
-
Transfer: Pour the batter into the prepared mug. Smooth the top. Press a few extra chocolate chips onto the surface (this creates that “melted pool” effect).
-
Cook: Microwave on high for 60 to 90 seconds.
-
60 seconds: Extremely gooey, almost lava cake.
-
75 seconds: Perfect fudgy brownie.
-
90 seconds: Well done, cake-like texture.
-
-
The “Rest”: Do not eat immediately. Let it rest for 60 seconds in the mug. The brownie continues to cook and set during this time.
Method: Traditional Oven Bake
Intensity: Medium
Better texture, requires patience.
-
Preheat oven to 350°F (175°C).
-
Follow steps 2-5 above.
-
Pour batter into a small oven-safe ramekin or mini loaf pan.
-
Bake for 10-12 minutes.
-
The top should look set and slightly cracked, but a toothpick inserted should come out with wet crumbs (not dry).
-
Cool for 5 minutes. The oven method yields a superior crust-to-fudge ratio.
The Secret to the “Crust”
Most protein mug cakes taste like steamed sponges. The secret to the thin, crispy top crust on this 2 Minute Protein Brownie is the combination of baking powder and a high heat source.
-
Baking Powder: Creates rapid CO2 bubbles. In the microwave, these bubbles rise quickly, pushing the batter to the top. The surface dries out instantly in the microwave radiation, creating a “skin” before the bubbles pop, leaving a thin, crackly layer.
-
The Sugar Swap: Traditional brownies use sugar to caramelize. Here, we rely on the natural sugars in the chocolate chips and the slight caramelization of the protein powder (Maillard reaction) to achieve that browned top.
Nutrition Information
*Serving Size: 1 entire brownie (Microwave recipe as written with applesauce, whey/casein blend, sugar-free chips)*
| Nutrition Facts | Amount |
|---|---|
| Calories | 335 kcal |
| Protein | 33g |
| Carbohydrates | 18g |
| Dietary Fiber | 7g |
| Net Carbs | 11g |
| Sugars | 2g |
| Fat | 12g |
| Saturated Fat | 6g |
| Cholesterol | 45mg |
| Sodium | 380mg |
| Potassium | 450mg |
| Calcium | 180mg |
| Iron | 3.5mg |
(Nutrition calculated using standard whey/casein blend, unsweetened cocoa, egg white, applesauce, and Lily’s sugar-free chocolate chips)