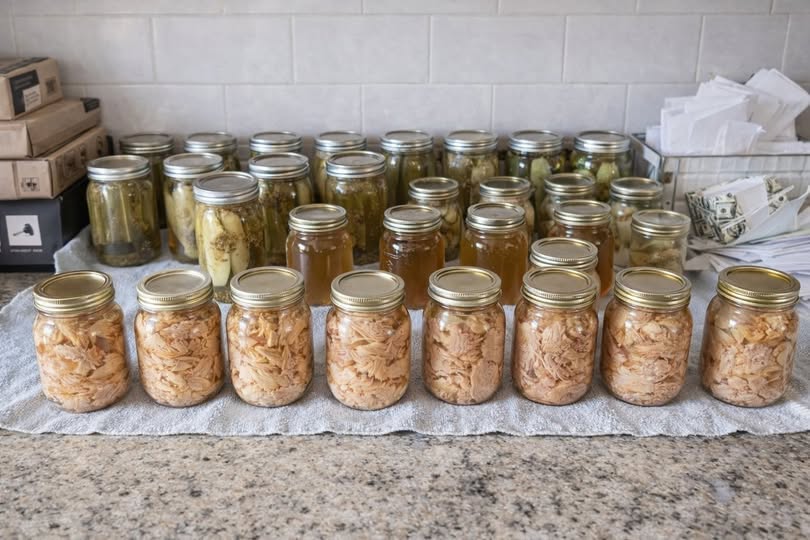
canned turkey
- Prep Time: 30 minutes
- Processing Time: 75–90 minutes (depending on jar size)
- Cooling Time: 12–24 hours
- Total Time: Approximately 14–25 hours (including cooling)
- Difficulty: Intermediate
- Yield: About 6 pint jars or 3 quart jars
Ingredients
- 6 pounds boneless turkey breast or turkey thighs
- 2 teaspoons canning salt (optional, about ½ teaspoon per pint jar)
- Boiling water or turkey broth (for hot-pack method, if needed)
Optional Flavorings (Per Jar)
- 1 garlic clove
- ¼ teaspoon dried thyme
- ¼ teaspoon dried rosemary
- 2–3 black peppercorns
- Small bay leaf (remove after opening)
- Pinch of poultry seasoning
Equipment
- Pressure canner
- Pint or quart canning jars
- New canning lids and screw bands
- Jar lifter
- Bubble remover or non-metallic spatula
- Funnel
- Clean towels
- Large pot
Before You Begin
Use only jars that are free of cracks or chips. Wash jars, lids, and bands thoroughly.
Prepare your pressure canner according to the manufacturer’s instructions.
This recipe follows the hot-pack method, which helps produce better-quality canned turkey.
Instructions
Step 1: Prepare the Turkey
Trim away excess fat, skin, and gristle.
Cut the turkey into approximately 1-inch cubes.
If desired, lightly brown the turkey pieces in a skillet over medium-high heat for 5–8 minutes to enhance flavor. The meat does not need to be fully cooked.
Step 2: Heat the Turkey
Place the turkey in a large pot.
Add a small amount of water or broth and heat over medium heat until the meat is hot throughout.
Do not boil vigorously.
Step 3: Prepare the Jars
Keep clean jars hot until ready to fill.
Add optional canning salt and any desired herbs or spices to each jar.
Pack the hot turkey pieces into the jars, leaving 1 inch of headspace.
If needed, add hot broth or boiling water to cover the meat while maintaining the 1-inch headspace.
Remove trapped air bubbles with a non-metallic utensil and adjust the liquid level if necessary.
Wipe the jar rims with a clean damp cloth.
Apply the lids and screw bands until fingertip tight.
Step 4: Load the Pressure Canner
Place the filled jars on the rack inside the prepared pressure canner.
Add the amount of water specified by your canner’s manufacturer.
Secure the lid.
Vent steam for 10 minutes before pressurizing.
Step 5: Process the Jars
Process according to current pressure-canning guidance for your altitude and canner type:
- Pint jars: 75 minutes
- Quart jars: 90 minutes
Maintain the correct pressure for your canner throughout the entire processing time. Do not allow the pressure to drop below the recommended level during processing.
Step 6: Cool the Canner
When processing is complete, turn off the heat.
Allow the pressure canner to return to zero pressure naturally.
Do not force-cool the canner.
Wait the additional time recommended by your canner manufacturer before opening the lid.
Step 7: Cool the Jars
Using a jar lifter, remove the jars and place them on a towel-lined counter.
Leave them undisturbed for 12–24 hours.
After cooling, check that each lid has sealed properly.
Remove the screw bands, wipe the jars clean, label them with the date, and store them in a cool, dark place.
Processing Time and Heat Intensity
- Turkey Browning: Medium-high heat, 5–8 minutes (optional)
- Heating Meat: Medium heat
- Steam Venting: 10 minutes
- Pressure Processing: 75 minutes (pints) or 90 minutes (quarts)
- Cooling: Natural pressure release, followed by 12–24 hours of undisturbed cooling
Always use the pressure setting appropriate for your altitude and the type of pressure canner (dial-gauge or weighted-gauge) as specified in current, tested canning guidance.
Tips for Success
Use fresh, high-quality turkey for the best flavor and texture.
Trim excess fat, as large amounts of fat can affect the quality of the finished product.
Keep jars hot before filling to reduce the risk of thermal shock.
Avoid overpacking the jars; leave enough space for proper heat circulation.
Label each jar with the date so you can use the oldest jars first.
Serving Suggestions
Home-canned turkey is ready to eat once opened and can be used in many dishes, including:
- Turkey noodle soup
- Turkey pot pie
- Turkey salad
- Tacos
- Enchiladas
- Sandwiches
- Wraps
- Casseroles
- Fried rice
- Pasta dishes
- Stuffing
- Shepherd’s pie
- Turkey chili
Storage
Store sealed jars in a cool, dry, dark place.
For the best quality, use within 1 year, though properly processed jars may remain safe longer if the seal remains intact.
Once opened, refrigerate the turkey in a covered container and use it within 3–4 days.
Do not consume any jar that has an unsealed lid, leaking contents, an off odor, or visible mold.
Frequently Asked Questions
Can I water-bath can turkey?
No. Turkey is a low-acid food and requires pressure canning for safe preservation.
Can I season the turkey before canning?
Yes, dried herbs and small amounts of salt are suitable. Avoid adding flour, dairy products, or thickening agents before canning.
Can I can leftover cooked turkey?
Yes, provided it has been handled safely and is still fresh. Reheat it before packing into the jars for the hot-pack method.
Why is there liquid loss in some jars?
A small amount of liquid loss can occur during processing and does not necessarily mean the food is unsafe, provided the jar sealed properly. However, significant liquid loss may affect quality.
Can I freeze turkey instead?
Absolutely. Freezing is another excellent preservation method, though canned turkey offers the convenience of shelf-stable storage.
Estimated Nutrition (Per 4-Ounce Serving)
- Calories: 170
- Protein: 32 g
- Total Fat: 4 g
- Saturated Fat: 1 g
- Carbohydrates: 0 g
- Fiber: 0 g
- Sugars: 0 g
- Sodium: 280 mg (varies depending on added salt)
- Cholesterol: 85 mg
- Potassium: 350 mg
- Iron: 6% Daily Value
- Vitamin B6: 20% Daily Value
- Niacin: 35% Daily Value