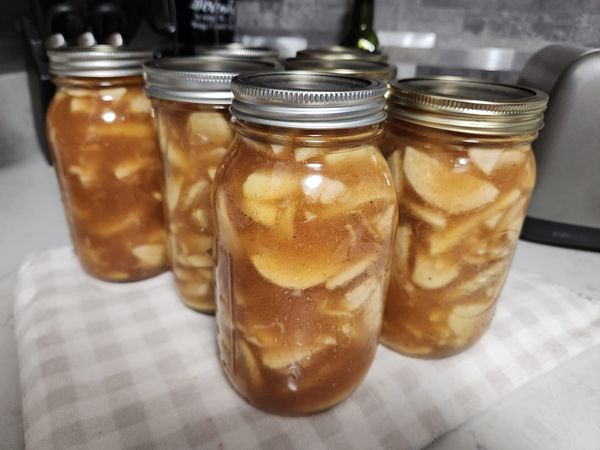
canning apple pie filling
Byadmin
Ingredients (for 7 quart-sized jars):
- 6 lbs (about 16 cups) firm apples, peeled, cored, and sliced
- 2 3/4 cups sugar
- 3/4 cup brown sugar (optional for added depth)
- 1 cup ClearJel (modified cornstarch for canning; do not substitute with regular cornstarch)
- 1 1/2 tsp ground cinnamon
- 1/2 tsp ground nutmeg (optional)
- 1/4 tsp ground allspice (optional)
- 5 cups water
- 2 1/2 cups apple juice or cider
- 3/4 cup bottled lemon juice
- 1/2 tsp salt (optional)
Equipment:
- 7 quart-sized canning jars with lids and bands
- Water bath canner
- Large stockpot
- Apple peeler, corer, and slicer
- Jar lifter and canning funnel
Instructions:
Step 1: Prepare the Jars
- Sterilize the canning jars by washing them in hot soapy water, then placing them in boiling water for 10 minutes.
- Keep the jars hot until ready to fill. Also, have the lids and bands ready, following the manufacturer’s instructions for heating.
Step 2: Prepare the Apples
- Peel, core, and slice the apples (about 1/4-inch thick slices).
- To prevent browning, place the apple slices in a bowl of cold water with a few tablespoons of lemon juice.
Step 3: Make the Filling
- In a large stockpot, combine the sugar, brown sugar (if using), ClearJel, cinnamon, nutmeg, allspice (if using), and salt.
- Stir in the water and apple juice/cider. Mix well to dissolve the ClearJel and prevent clumps.
- Cook the mixture over medium heat, stirring constantly, until it thickens and starts to bubble. This may take about 5-10 minutes.
- Once thickened, add the bottled lemon juice and continue to cook for another minute.
- Remove the thickened mixture from heat.
Step 4: Add the Apples
- Drain the apple slices from the lemon water and fold them into the hot, thickened sauce.
- Stir to coat the apples evenly in the sauce.
Step 5: Fill the Jars
- Using a canning funnel, carefully ladle the hot apple pie filling into the prepared jars, leaving 1-inch headspace at the top.
- Remove air bubbles by running a plastic or wooden spatula along the sides of the jar.
- Wipe the rims of the jars with a clean, damp cloth to ensure a proper seal.
- Place the lids on the jars and screw on the bands until fingertip-tight.
Step 6: Process the Jars
- Place the filled jars in the water bath canner. Make sure the water covers the jars by at least 1-2 inches.
- Bring the water to a rolling boil, and process the jars for 25 minutes for quart-sized jars (adjusting for altitude if needed).
- After processing, carefully remove the jars with a jar lifter and place them on a towel-lined counter to cool.
Step 7: Cool and Store
- Let the jars cool completely, undisturbed, for 12-24 hours. Check that the lids have sealed by pressing down in the center; if it doesn’t pop back, the jar is sealed.
- Label the jars with the date and store them in a cool, dark place. Properly sealed jars can last for up to 1 year.
Notes:
- ClearJel: It’s crucial to use ClearJel for canning because it maintains its thickness through the canning process. Regular cornstarch or flour is not safe for canning as it may cause the filling to break down or the jars not to seal properly.
- Apple Varieties: Use firm apples that hold their shape when baked, such as Granny Smith, Honeycrisp, Jonathan, or Golden Delicious.
Nutritional Information (per serving, approx. 1 cup):
- Calories: ~150 kcal
- Carbohydrates: ~40g
- Fat: ~0g
- Sugar: ~35g
- Fiber: ~4g
This Canned Apple Pie Filling is perfect for a quick and easy dessert throughout the year—just pop open a jar, pour it into a pie crust, and bake for a delicious homemade pie in no time!