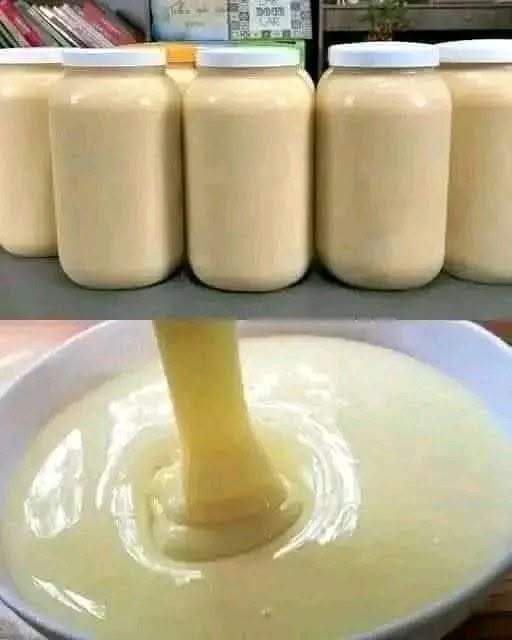
condensed milk
Preparation Time: 5 minutes
Cooking Time: 35–40 minutes
Cooling Time: 20 minutes
Total Time: Approximately 1 hour
Difficulty Level: Easy
Cooking Intensity: Low to Medium-Low Heat
What Is Sweetened Condensed Milk?
Sweetened condensed milk is cow’s milk that has had much of its water content removed through gentle heating while sugar is added. The result is a thick, creamy, sweet product that can be stored for extended periods and used in numerous recipes.
Unlike evaporated milk, sweetened condensed milk contains a significant amount of sugar, which acts as a preservative and gives the ingredient its characteristic sweetness and texture.
Ingredients
- 4 cups whole milk
- 1¼ cups granulated sugar
- 3 tablespoons unsalted butter (optional, for extra richness)
- 1 teaspoon pure vanilla extract (optional)
Equipment Needed
- Heavy-bottom saucepan
- Wooden spoon or silicone spatula
- Measuring cups
- Fine mesh strainer (optional)
- Glass jar or airtight container
Why Use Whole Milk?
Whole milk produces the richest and creamiest condensed milk. The higher fat content contributes to the smooth texture and luxurious consistency.
If necessary, you may substitute:
- 2% milk
- Lactose-free milk
- Plant-based milk alternatives
Keep in mind that substitutions may slightly alter the final texture and flavor.
Step-by-Step Instructions
Step 1: Combine Ingredients
Time: 5 minutes
Heat Intensity: No Heat
Pour the whole milk into a heavy-bottom saucepan.
Add the granulated sugar and stir until mostly dissolved.
If using butter, add it at this stage.
Place the saucepan on the stove and prepare to heat gently.
Step 2: Bring to a Gentle Simmer
Time: 5–10 minutes
Heat Intensity: Medium Heat
Turn the burner to medium heat.
Stir frequently while the mixture warms.
Avoid boiling rapidly. The goal is to gradually heat the milk until small bubbles begin forming around the edges of the pan.
Once the sugar has completely dissolved and the milk reaches a gentle simmer, reduce the heat.
Step 3: Slowly Reduce the Milk
Time: 30–35 minutes
Heat Intensity: Low to Medium-Low Heat
Reduce the heat to low or medium-low.
Allow the milk mixture to simmer gently without boiling vigorously.
Stir every few minutes to prevent scorching on the bottom of the pan.
As the liquid cooks, water evaporates and the mixture gradually thickens.
You should notice:
- A slightly darker cream color
- A thicker texture
- Reduced volume
The mixture is ready when it has reduced by approximately half and lightly coats the back of a spoon.
Step 4: Add Vanilla
Time: 1 minute
Heat Intensity: No Heat
Remove the saucepan from the heat.
Stir in the vanilla extract if desired.
The vanilla adds subtle sweetness and depth of flavor, making the condensed milk especially suitable for desserts.
Step 5: Cool the Mixture
Time: 20 minutes
Heat Intensity: Cooling Stage
Allow the condensed milk to cool in the saucepan.
As it cools, it will continue to thicken considerably.
If desired, strain through a fine mesh sieve for an ultra-smooth texture.
Transfer to a clean glass jar or airtight container.
How to Know When It’s Done
The most common mistake when making homemade condensed milk is stopping the reduction process too early.
Signs that it is ready include:
- Reduced volume by roughly half
- Light golden cream color
- Thick consistency
- Coats the back of a spoon
- Slightly thick but still pourable while warm
Remember that the mixture thickens significantly after cooling.
Serving Suggestions
Homemade sweetened condensed milk can be used in countless ways:
Coffee and Tea
Add a spoonful to:
- Iced coffee
- Vietnamese coffee
- Milk tea
- Cold brew beverages
Baking
Use in:
- Cakes
- Brownies
- Cookies
- Cheesecakes
- Cupcakes
Desserts
Perfect for:
- Fudge
- Ice cream
- Caramel sauce
- Key lime pie
- Tres leches cake
Breakfast
Drizzle over:
- Pancakes
- Waffles
- French toast
- Oatmeal
Storage Instructions
Refrigerator
Store in an airtight container for up to 7 days.
The condensed milk may thicken further while refrigerated.
Stir before using.
Freezer
Freeze for up to 3 months.
Place in a freezer-safe container with room for expansion.
Thaw overnight in the refrigerator before use.
Helpful Tips for Success
Use a Heavy-Bottom Pan
A heavy saucepan distributes heat evenly and reduces the risk of scorching.
Keep the Heat Low
Rapid boiling can cause the milk to separate or develop a grainy texture.
Stir Regularly
Frequent stirring prevents milk solids from sticking to the bottom.
Don’t Over-Reduce
The mixture will thicken considerably after cooling. Remove from heat once it reaches a slightly thick consistency.
Measure the Final Volume
For most recipes, the finished product should yield approximately 1¼ cups.
Recipe Variations
Chocolate Condensed Milk
Add:
- 2 tablespoons cocoa powder
Whisk thoroughly during cooking.
Cinnamon Condensed Milk
Add:
- ½ teaspoon ground cinnamon
Perfect for coffee and holiday desserts.
Coconut Condensed Milk
Replace dairy milk with full-fat coconut milk for a tropical variation.
Salted Caramel Version
Add:
- ¼ teaspoon sea salt
This creates a rich salted caramel flavor profile.
Common Questions
Can I Use Brown Sugar?
Yes. Brown sugar produces a deeper, caramel-like flavor and a slightly darker color.
Why Is My Condensed Milk Too Thin?
It likely needs additional simmering time. Continue reducing over low heat until thickened.
Why Is It Too Thick?
The mixture may have reduced too much. Stir in a small amount of warm milk until the desired consistency is reached.
Can I Make It Dairy-Free?
Yes. Full-fat coconut milk or oat milk can be used, though texture and flavor will vary.
Nutritional Information
Serving Size: 2 tablespoons
Approximate Nutrition Per Serving
- Calories: 130
- Protein: 2g
- Carbohydrates: 22g
- Sugar: 22g
- Fat: 4g
- Saturated Fat: 2.5g
- Cholesterol: 12mg
- Sodium: 25mg
- Calcium: 80mg
- Potassium: 95mg