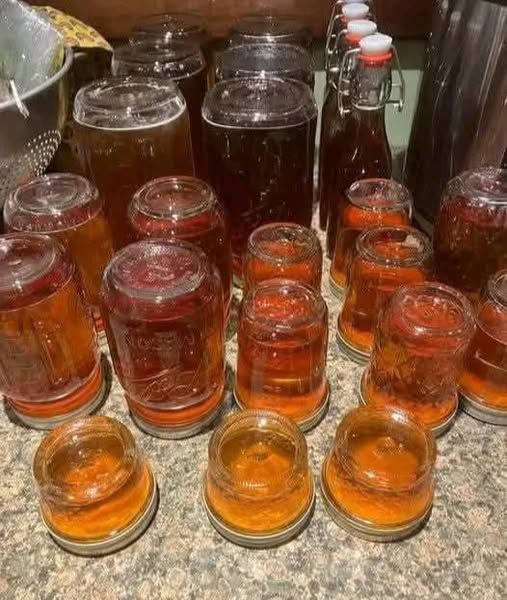
fruit syrups
- Prep Time: 10 minutes
- Cook Time: 20 minutes
- Total Time: 30 minutes
Difficulty Level: Easy
Yield: About 4 cups of syrup
Ingredients
- 4 cups fresh or frozen fruit (washed and prepared)
- 2 cups granulated sugar
- 1 cup water
- 2 tablespoons fresh lemon juice
- 1 teaspoon lemon zest (optional)
- 1 teaspoon vanilla extract (optional, depending on the fruit)
Optional flavor additions:
- Cinnamon stick
- Fresh mint
- Fresh basil
- Fresh rosemary
- Fresh thyme
- Whole cloves
- Star anise
- Fresh ginger slices
Best Fruits to Use
Almost any fruit can be turned into a delicious syrup, including:
- Strawberries
- Blueberries
- Blackberries
- Raspberries
- Mixed berries
- Cherries
- Peaches
- Nectarines
- Apricots
- Plums
- Cranberries
- Apples
- Pears
- Mangoes
- Pineapple
- Oranges
- Lemons
- Limes
Mixing two or more fruits creates unique and flavorful combinations.
Equipment Needed
- Large saucepan
- Wooden spoon or silicone spatula
- Fine-mesh strainer
- Measuring cups
- Measuring spoons
- Glass jars or bottles with lids
- Funnel (optional)
Instructions
Step 1: Prepare the Fruit
Wash all fresh fruit thoroughly.
Remove stems, pits, seeds, or tough skins as needed.
Cut larger fruits such as peaches, apples, or mangoes into small pieces for faster cooking.
Frozen fruit can be used directly without thawing.
Step 2: Combine Ingredients
In a large saucepan, combine:
- Prepared fruit
- Sugar
- Water
- Lemon juice
- Lemon zest (if using)
Stir until the fruit is evenly coated.
Step 3: Bring to a Simmer
Place the saucepan over medium-high heat.
Bring the mixture to a gentle boil while stirring occasionally.
As the fruit heats, it will begin releasing its natural juices.
Step 4: Cook the Syrup
Reduce the heat to medium-low.
Allow the fruit mixture to simmer gently for 15–20 minutes, stirring occasionally.
Cooking intensity:
- First 5 minutes: Fruit softens and releases juice.
- Next 10 minutes: Sugar dissolves completely, and flavors concentrate.
- Final 5 minutes: Syrup thickens slightly while the fruit becomes very tender.
Avoid vigorous boiling, which can dull the fresh fruit flavor.
Step 5: Mash the Fruit
Using the back of a spoon or a potato masher, gently crush the softened fruit.
This helps extract every bit of flavor and color into the syrup.
Step 6: Strain
Pour the mixture through a fine-mesh strainer into a clean bowl or measuring cup.
Press gently on the fruit solids to extract additional syrup, but avoid forcing too much pulp through if you prefer a clear syrup.
Discard the solids or save them for stirring into yogurt or oatmeal.
Step 7: Finish the Syrup
Return the strained syrup to the saucepan.
If desired, stir in vanilla extract.
Simmer over low heat for another 3–5 minutes if you prefer a thicker consistency.
Keep in mind that the syrup will continue to thicken slightly as it cools.
Step 8: Bottle the Syrup
Carefully pour the hot syrup into clean, heat-safe glass bottles or jars.
Allow it to cool completely before sealing.
Refrigerate until ready to use.
For shelf-stable storage, process filled jars in a boiling water bath according to current home canning guidelines appropriate for the recipe and jar size.
Cooking Time and Heat Intensity
- Bring to Boil: Medium-high heat, 5 minutes
- Simmer: Medium-low heat, 15–20 minutes
- Optional Thickening: Low heat, 3–5 minutes
Gentle simmering preserves the bright fruit flavor while allowing the syrup to naturally develop body.
Flavor Variations
Strawberry Vanilla Syrup
Add vanilla extract after straining for a sweet, classic flavor.
Blueberry Lemon Syrup
Increase the lemon zest for a bright, refreshing finish.
Peach Cinnamon Syrup
Simmer with one cinnamon stick and remove it before bottling.
Raspberry Mint Syrup
Steep a few fresh mint leaves during the last 5 minutes of cooking.
Mixed Berry Syrup
Combine strawberries, raspberries, blueberries, and blackberries for a rich, colorful syrup.
Tropical Syrup
Blend pineapple, mango, and passion fruit for an exotic topping.
Serving Suggestions
Homemade fruit syrup is delicious served over:
- Pancakes
- Waffles
- French toast
- Crepes
- Ice cream
- Cheesecake
- Pound cake
- Yogurt
- Oatmeal
- Smoothie bowls
- Fresh fruit salad
- Biscuits
- Scones
It also makes an excellent sweetener for:
- Lemonade
- Sparkling water
- Iced tea
- Hot tea
- Cocktails
- Mocktails
- Coffee drinks
Storage Instructions
Store refrigerated syrup in a tightly sealed glass bottle or jar for up to 3 weeks.
For longer storage, freeze in freezer-safe containers for up to 6 months, leaving room for expansion.
If you choose to preserve the syrup by canning, always follow current, tested home canning recommendations for fruit syrups to ensure safe processing and shelf stability.
Helpful Tips
- Use ripe, flavorful fruit for the best taste.
- Fresh lemon juice brightens the flavor and helps preserve color.
- Stir occasionally to prevent scorching.
- Avoid overcooking, which can create a jam-like texture.
- Taste before bottling and adjust sweetness if desired.
- Label jars with the preparation date.
Frequently Asked Questions
Can I use frozen fruit?
Yes. Frozen fruit works exceptionally well and requires no thawing.
Can I reduce the sugar?
You can reduce the sugar somewhat, though it may result in a thinner syrup and a shorter refrigerated shelf life.
Can I make sugar-free syrup?
Yes. Use a sugar substitute designed for cooking, but be aware that the flavor, texture, and storage life may differ from the original recipe.
Why is my syrup too thin?
Continue simmering over low heat for a few extra minutes until it reaches your preferred consistency.
Why did my syrup become too thick?
It likely simmered too long. Stir in a little hot water until the desired consistency is reached.
Nutrition Information (Approximate Per 2 Tablespoons)
- Calories: 55
- Protein: 0 g
- Carbohydrates: 14 g
- Fat: 0 g
- Saturated Fat: 0 g
- Cholesterol: 0 mg
- Sodium: 1 mg
- Fiber: 0 g
- Sugar: 13 g
- Potassium: 20 mg
- Vitamin C: 4% DV
- Calcium: 0% DV
- Iron: 0% DV