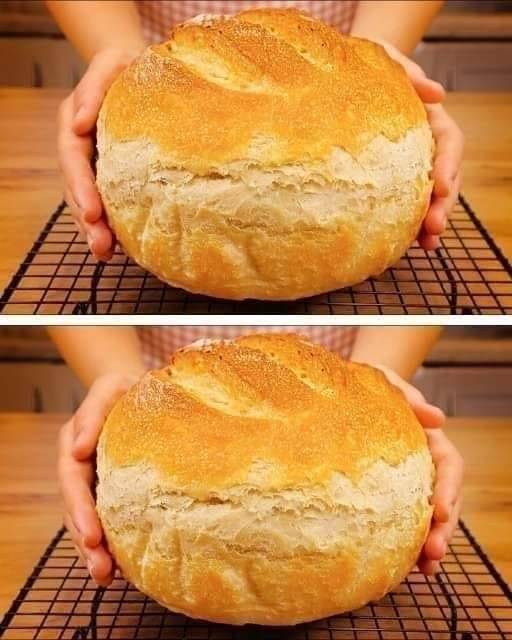
No Oven Stovetop Bread
Preparation Time: 10 minutes
Cooking Time: 20-25 minutes
Total Time: 30-35 minutes
Difficulty Level: Easy
Servings: 8 slices
Introduction:
Bread is one of the oldest and most cherished foods worldwide, loved for its simplicity, versatility, and the warmth it brings to a meal. While many people might associate baking bread with the use of an oven, it is entirely possible to create soft, fluffy, and delicious bread without one. This No-Oven Stovetop Bread recipe is perfect for those who may not have an oven or are looking for a quicker, more energy-efficient method of making bread. It only requires a stovetop and a heavy-bottomed pan, making it the ideal solution for anyone craving homemade bread in less time.
This stovetop bread recipe uses a simple combination of ingredients that are likely already in your pantry. It results in a rustic, soft loaf with a slight golden crust, perfect for sandwiches, dipping in soup, or serving as a side dish. Plus, you can customize the flavor by adding herbs, garlic, or seeds to the dough.
Ingredients:
- 2 cups all-purpose flour (plus extra for dusting)
- 1 tablespoon baking powder
- 1 teaspoon salt
- 1 tablespoon sugar (optional, for a slightly sweet flavor)
- 2 tablespoons olive oil or melted butter
- 3/4 cup milk (dairy or plant-based)
- 1/4 cup water
- 1 teaspoon of dried herbs (optional, such as rosemary, thyme, or oregano)
- 1 tablespoon sesame seeds or poppy seeds (optional, for topping)
Instructions:
Step 1: Mix the Dry Ingredients
- Start by placing 2 cups of all-purpose flour in a large mixing bowl.
- Add 1 tablespoon of baking powder, 1 teaspoon of salt, and 1 tablespoon of sugar (if you’re using it) to the flour. Mix the dry ingredients together until they are evenly combined. The baking powder is crucial for making the bread rise, so make sure it’s distributed well throughout the flour.
Step 2: Combine the Wet Ingredients
- In a separate bowl, combine 3/4 cup of milk and 1/4 cup of water. If you’re using any optional herbs, add them to the wet ingredients for more flavor. Add 2 tablespoons of olive oil (or melted butter) to the mixture. Stir the wet ingredients together until they are fully incorporated.
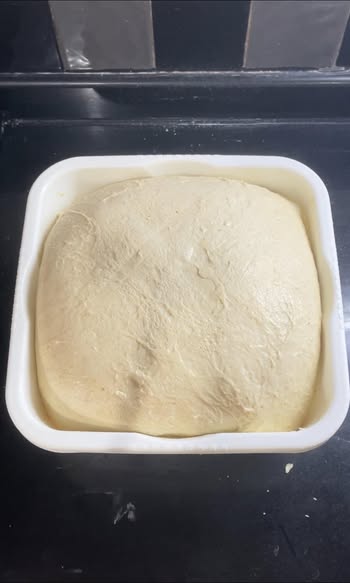
Step 3: Form the Dough
- Slowly add the wet ingredients to the dry ingredients, stirring as you go. You can use a wooden spoon or your hands to mix everything together. The dough will be slightly sticky, but that’s okay.
- Once the dough has come together, transfer it onto a lightly floured surface. Knead the dough for about 2-3 minutes. The goal is to form a smooth, slightly tacky dough. Be careful not to over-knead, as this can make the bread tough.
Step 4: Shape the Dough
- Roll the dough into a ball and then flatten it with your hands to form a round disc. The thickness of the dough should be about 1 to 1.5 inches. You can make it thinner for a crispier bread or thicker for a softer loaf.
- If you’re adding seeds, now is the time to press them gently into the top of the dough for decoration and added flavor.
Step 5: Cook the Bread on the Stovetop
- Heat a large, heavy-bottomed skillet or non-stick pan over medium heat. If you have a lid for your skillet, keep it nearby.
- Once the pan is hot, place the dough disc into the pan. Reduce the heat to low or medium-low so that the bread doesn’t burn before it’s fully cooked through.
- Cover the skillet with a lid (if available), as this will help trap heat and cook the bread more evenly.
- Let the dough cook for 10-12 minutes, checking occasionally to ensure that it doesn’t burn. The bread should develop a golden-brown crust on the bottom.
- Once the bottom is nicely browned, flip the bread over using a spatula. If you’re worried about it breaking, you can use two spatulas or even a plate to help flip the bread.
- Cover the skillet again and cook for an additional 10-12 minutes. The bread should be fully cooked through when you check with a toothpick or fork. It should come out clean when inserted into the center of the bread.
Step 6: Let it Cool and Serve
- Once cooked, remove the bread from the pan and place it on a wire rack or a clean surface to cool for a few minutes.
- Slice the bread into 8 pieces and serve warm. You can enjoy it as is or with butter, jam, cheese, or your favorite spread.
Tips for Success:
- Use a Heavy-Duty Pan: A thick, heavy-bottomed pan is essential for ensuring even heat distribution. It helps to avoid hot spots and ensures the bread cooks uniformly.
- Low and Slow Cooking: Since we’re not using an oven, the key to success is to cook the bread over low heat. This helps the bread cook through without burning the outside.
- Customize the Flavor: Feel free to add garlic powder, onion powder, or your favorite seasonings to the dough to elevate the flavor. A tablespoon of chopped fresh herbs can also be added to the dough for a fragrant, herby bread.
- Check the Doneness: If you’re unsure whether the bread is fully cooked, simply insert a toothpick or a knife into the center. If it comes out clean, your bread is ready!
Variations:
- Cheese-Stuffed Bread: After shaping the dough, roll it out slightly and place some shredded cheese in the center. Fold the dough over the cheese, seal it, and then cook as directed for a cheesy surprise in every bite.
- Sweet Version: Add 1/4 cup of honey or maple syrup to the wet ingredients for a slightly sweeter loaf. You can also add some cinnamon or nutmeg for flavor. Top the bread with a sprinkle of sugar before cooking for a slightly crunchy and sweet finish.
- Vegan Option: Simply replace the milk with a plant-based milk, and use vegetable oil in place of butter for a fully vegan bread recipe.
Serving Suggestions:
- As a Side Dish: Serve this bread alongside soups, stews, or salads. It’s great for soaking up sauces and broths.
- For Sandwiches: Slice the bread thinly and use it for making delicious sandwiches with your favorite fillings, such as grilled vegetables, deli meats, or cheese.
- With Dips: Perfect for serving with hummus, guacamole, or any dip of your choice.
- For Breakfast: Toast the slices and spread some butter or jam for a warm, comforting breakfast.
Storage:
- Room Temperature: Once the bread has completely cooled, store it in an airtight container or wrap it in a clean kitchen towel. It will stay fresh at room temperature for about 2-3 days.
- Freezing: You can freeze any leftover bread slices for up to 1 month. Simply wrap them tightly in plastic wrap or foil and place them in a freezer-safe bag. To reheat, simply toast the slices or warm them in the pan for a few minutes.
Nutrition (Per Serving – 1 Slice):
- Calories: 150-180 kcal (depending on whether you add butter or oil)
- Carbohydrates: 30g
- Protein: 4g
- Fat: 4g
- Fiber: 1g
- Sugar: 1g
- Sodium: 350mg
Note: These values are approximate and may vary based on ingredient substitutions or variations.
Conclusion:
This No-Oven Stovetop Bread is a game-changer for anyone who loves fresh bread but doesn’t want to deal with the hassle of an oven. Quick, easy, and delicious, it’s the perfect solution for anyone craving a homemade loaf without the need for special equipment. Whether you’re new to baking or a seasoned pro, this recipe will leave you with a delicious, warm loaf every time. Enjoy it as a snack, a side dish, or even a base for your next sandwich creation. Happy cooking