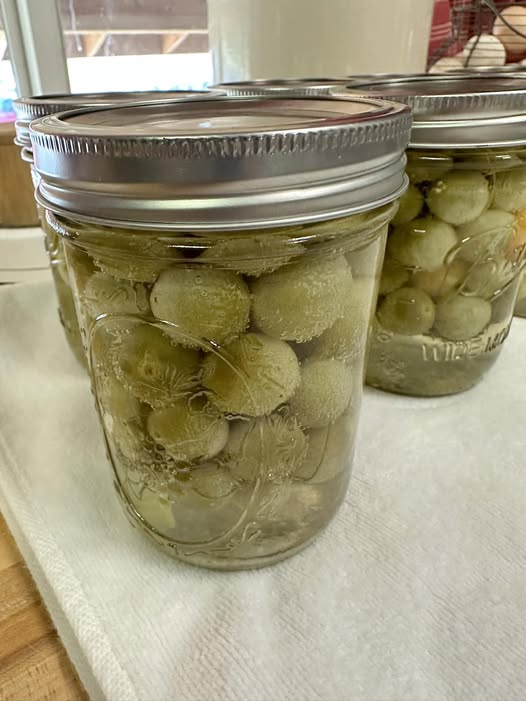
Pickled Green Grapes
Recipe Overview & Timings
-
Prep Time: 10 minutes
-
Cook Time: 5 minutes
-
Chilling Time: 2 hours (minimum) or 24 hours (optimal)
-
Total Time: 2 hours 15 minutes
-
Course: Condiment, Appetizer, Snack
-
Cuisine: Modern American / Quick Pickle
-
Yields: 1 Pint Jar (approx. 4 servings)
Intensity & Difficulty Scale
-
Skill Level: Easy / Beginner Friendly
-
Active Effort: Low
-
Flavor Profile: Tangy, Sweet, Herbal, and Peppery
Ingredients
To achieve the ultimate crunch and flavor balance, use firm, unblemished green grapes and high-quality vinegar.
-
2 cups Green Grapes (seedless, washed and removed from stems)
-
1/2 cup Apple Cider Vinegar (or white wine vinegar for a cleaner tang)
-
1/2 cup Water
-
1 tablespoon Granulated Sugar (to balance the acidity)
-
1 teaspoon Kosher Salt (or fine sea salt)
-
1 clove Garlic (lightly smashed)
-
1 sprig Fresh Rosemary
-
1/2 teaspoon Whole Black Peppercorns
-
1/4 teaspoon Mustard Seeds (optional, for extra depth)
Step-by-Step Instructions
Step 1: Prepare the Grapes and Jar
-
Thoroughly wash your green grapes under cold water.
-
Carefully pluck the grapes from their stems, discarding any bruised or overly soft grapes. Keeping the individual grapes intact with a tiny bit of the stem cap left on prevents the vinegar from making the inside overly soggy.
-
Pat the grapes completely dry with a clean kitchen towel.
-
Pack the prepared grapes tightly into a clean, heat-safe 1-pint glass mason jar along with the smashed garlic clove and fresh rosemary sprig.
Step 2: Create the Pickling Brine
-
In a small saucepan, combine the apple cider vinegar, water, granulated sugar, kosher salt, whole black peppercorns, and mustard seeds.
-
Place the saucepan over medium-high heat and bring the mixture to a gentle boil.
-
Stir continuously for 1 to 2 minutes until the sugar and salt are completely dissolved and the liquid becomes clear.
Step 3: Pour and Infuse
-
Carefully pour the hot pickling brine directly over the grapes in the jar, ensuring that the grapes are fully submerged in the liquid. The whole peppercorns and mustard seeds should settle naturally around the fruit.
-
Let the jar sit uncovered at room temperature for about 20 to 30 minutes to allow the initial heat to gently infuse the flavors without cooking the grapes into mush.
Step 4: Chill and Store
-
Secure the lid tightly on the mason jar.
-
Transfer the jar to the refrigerator. While you can enjoy them after just 2 hours of chilling, allowing them to marinate for at least 24 hours yields a much deeper, more complex flavor profile.
Chef’s Pro-Tips for Success
-
Choose the Right Fruit: Always select firm, crisp green grapes. If the grapes are slightly soft before pickling, the vinegar will break down their texture too quickly, resulting in a mushy bite.
-
Customize Your Aromatics: Feel free to experiment with different flavor profiles. Substitute the rosemary with fresh thyme, add a slice of fresh ginger, or toss in a pinch of red pepper flakes if you prefer a spicy kick.
-
Storage Life: Because this is a quick-pickle recipe (refrigerator pickle), store the jar sealed in the fridge. They will maintain their best crisp texture for up to 3 weeks, though they rarely last that long once you start snacking on them!
Serving Suggestions
Pickled green grapes are wonderfully versatile and add an instant gourmet touch to everyday meals:
-
Charcuterie & Cheese Boards: Pair them alongside creamy brie, sharp aged cheddar, goat cheese, and salty prosciutto or salami.
-
Green Salads: Toss them into a crisp arugula salad with toasted walnuts and balsamic vinaigrette.
-
Warm Grain Bowls: Add a bright, acidic pop to quinoa, farro, or roasted chicken bowls.
Nutritional Information
Note: Nutrition values are estimated per serving (approx. 1/4 cup of pickled grapes), calculated based on standard ingredients without added sodium retention from the brine.
-
Calories: 45 kcal
-
Carbohydrates: 11 g
-
Sugars: 10 g
-
Fiber: 1 g
-
Protein: 0.5 g
-
Sodium: 140 mg
-
Fat: 0 g