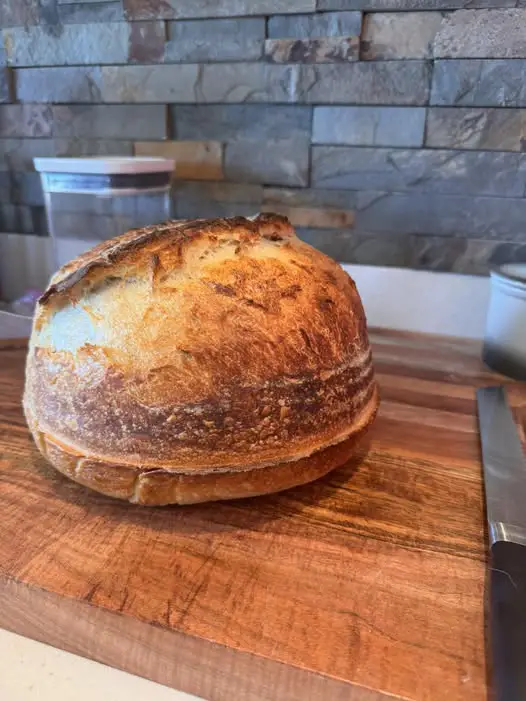
Unloaf Sourdough Bread
Total Time: 24-48 hours (largely hands-off)
Active Time: 30 minutes
Difficulty: Intermediate (requires a sourdough starter)
Yield: 1 beautiful, rustic loaf
Category: Baking, Bread, Artisan
Introduction
Welcome to the Unloaf—a bread that defies the constraints of a traditional loaf pan to achieve a truly rustic, artisanal crumb and crust. This recipe is for the patient baker, the one who understands that great flavor is born from time. It’s a no-knead method that relies on your active sourdough starter, long fermentation, and the magic of a Dutch oven to create a bread with a crackling, blistered crust, an open, airy interior, and that distinct, tangy depth only sourdough can provide. Don’t be intimidated by the timeline; most of it is waiting, while nature does the hard work.
Ingredients
-
500g Bread Flour (high-protein, such as King Arthur)
-
350g Lukewarm Water (approx. 90°F/32°C)
-
100g Active, Bubbly Sourdough Starter (fed 4-12 hours prior)
-
10g Fine Sea Salt
-
Rice flour for dusting (optional, prevents sticking)
Equipment
-
Digital kitchen scale (highly recommended for accuracy)
-
Large mixing bowl
-
Bench scraper
-
Banneton (proofing basket) or a medium bowl lined with a well-floured tea towel
-
Dutch oven with lid
-
Razor blade or very sharp knife (for scoring)
-
Parchment paper
Method
Phase 1: Autolyse & Mixing (Day 1, Morning – 30 min active)
Intensity: Low
-
Autolyse: In your large mixing bowl, combine the 500g bread flour and 350g lukewarm water. Use a spatula or your hands to mix until no dry flour remains. The dough will be shaggy. Cover the bowl and let it rest (autolyse) for 30 minutes to 1 hour. This allows the flour to fully hydrate and gluten development to begin effortlessly.
-
Incorporate Starter & Salt: After the autolyse, add the 100g of active sourdough starter and 10g of salt to the bowl. Use wet hands to pinch and fold the dough, thoroughly incorporating the new additions. It will be messy at first but will come together after a few minutes of mixing. Once uniform, cover the bowl tightly with a damp tea towel, plastic wrap, or a reusable bowl cover.
Phase 2: Bulk Fermentation (Day 1, All Day – 5 min hands-on every 30-60 min)
Intensity: Low, but requires schedule attention
-
This is the most critical phase for developing flavor and strength. Let the dough rise at room temperature (ideally 70-75°F / 21-24°C) for 6-10 hours. The time is highly dependent on your starter’s vigor and kitchen temperature.
-
Stretch and Folds: During the first 3-4 hours of bulk fermentation, perform a series of “stretch and folds.” Every 30-60 minutes, wet your hand, reach under one side of the dough, stretch it up, and fold it over the center. Give the bowl a quarter turn and repeat 3-4 more times until you’ve gone around the bowl. This builds gluten structure without kneading.
-
Watch for Signs: The dough is ready for the next phase when it has increased in volume by 50-75%, looks puffy and aerated, and has a smooth, slightly domed surface. It should jiggle if you shake the bowl.
Phase 3: Shape & Cold Proof (Day 1, Evening to Day 2 – 15 min active)
Intensity: Medium
-
Pre-Shape & Bench Rest: Gently turn the dough out onto a lightly floured surface. Using your bench scraper, shape it into a loose round. Let it rest, uncovered, for 20-30 minutes. This relaxes the gluten for final shaping.
-
Final Shape: Dust your banneton or towel-lined bowl generously with flour (rice flour works brilliantly as it doesn’t burn). Shape the dough into a tight boule (round) or batard (oval). Create surface tension by pulling the dough toward you on the counter. Place it seam-side UP into the prepared banneton.
-
Cold Proof: Cover the banneton with a plastic bag and place it directly in the refrigerator for a minimum of 12 hours, and up to 48. This long, slow proof develops exceptional flavor and makes the dough easier to score.
Phase 4: Bake (Day 2 or 3 – 1 hour active)
Intensity: Medium-High
-
Preheat: At least 30 minutes before baking, place your Dutch oven (with the lid on) into your oven and preheat to 450°F (230°C).
-
Score: Carefully remove the banneton from the fridge. Place a sheet of parchment paper over the top, flip it over, and gently lift off the banneton. The dough should hold its shape. Using a razor blade, make one confident, deep slash (or a decorative pattern) about ¼ to ½ inch deep. This controls the expansion—the “oven spring.”
-
Bake Covered: Using the parchment as a sling, carefully lower the dough into the scorching hot Dutch oven. Put the lid back on. Bake for 25 minutes.
-
Bake Uncovered: After 25 minutes, remove the lid. The bread will be pale but puffed. Reduce the oven temperature to 425°F (220°C) and bake for another 20-25 minutes, until the crust is a deep, glorious golden brown and sounds hollow when tapped on the bottom.
-
Cool: This is the hardest step. Transfer the bread to a wire cooling rack and let it cool completely (at least 2-3 hours) before slicing. The interior is still cooking and setting during this time. Cutting too soon results in a gummy crumb.
The Last Slice: Storage & Serving
The Unloaf is best enjoyed the day it’s baked. To maintain the perfect crust, store it cut-side down on a bread board or in a paper bag at room temperature for up to 2 days. For longer storage, slice and freeze in an airtight bag for up to 3 months. Simply toast frozen slices directly.
This bread is a celebration in itself. Serve thick slices slathered with good butter, dipped in high-quality olive oil and balsamic vinegar, or as the foundation for epic sandwiches and avocado toast. Its robust crust and tangy crumb can stand up to the strongest cheeses and richest soups.
Nutrition Information (Per 1/12th of Loaf – Approximate)
-
Calories: 160 kcal
-
Total Carbohydrates: 33g
-
Dietary Fiber: 1g
-
Sugars: <1g
-
Protein: 5g
-
Total Fat: 0.5g
-
Sodium: 325mg
Note: Nutritional information is an estimate based on the ingredients used. Values can vary depending on specific brands and measurements. This bread contains no commercial yeast, dairy, or added sugar.