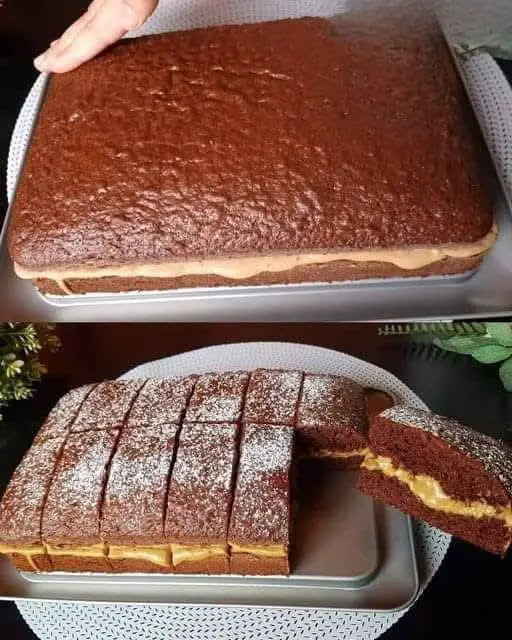
Velvet Cocoa Caramel Cake Squares
Introduction
If you’re searching for the ultimate dessert to wow a crowd, look no further than these Velvet Cocoa Caramel Cake Squares. They’re everything you want in a treat — soft, moist cake with a deep cocoa flavor, layered with gooey caramel, and finished with a glossy chocolate glaze or drizzle of salted caramel.
These squares are elegant enough for a party, easy enough for potlucks, and sinfully rich for any chocoholic. Whether you’re baking for a holiday table, a dinner party, or just craving something extra indulgent, this recipe will earn you rave reviews and repeat requests.
Recipe Overview
-
Prep Time: 20 minutes
-
Cook Time: 30–35 minutes
-
Cooling Time: 1 hour
-
Total Time: 1 hour 50 minutes
-
Yield: 16 squares
-
Difficulty: Moderate
-
Course: Dessert
-
Cuisine: American
-
Method: Baked
Ingredients
For the Velvet Cocoa Cake Base:
-
1½ cups all-purpose flour
-
½ cup unsweetened cocoa powder (Dutch-process recommended)
-
1 teaspoon baking powder
-
½ teaspoon baking soda
-
¼ teaspoon salt
-
¾ cup unsalted butter, softened
-
1¼ cups granulated sugar
-
2 large eggs
-
1 teaspoon vanilla extract
-
½ cup sour cream
-
½ cup whole milk
-
1 tablespoon white vinegar (or lemon juice)
For the Caramel Layer:
-
1 cup soft caramels, unwrapped (like Werther’s or Kraft)
-
2 tablespoons heavy cream
-
Pinch of sea salt (optional, for salted caramel version)
For the Optional Chocolate Glaze:
-
¾ cup semi-sweet chocolate chips
-
¼ cup heavy cream
-
1 teaspoon butter (for shine)
Equipment Needed
-
8×8 or 9×9-inch square baking pan
-
Mixing bowls
-
Hand or stand mixer
-
Rubber spatula
-
Small saucepan or microwave-safe bowl (for melting caramel/chocolate)
-
Parchment paper (for easy removal)
-
Wire rack (for cooling)
Step-by-Step Instructions
Step 1: Preheat and Prep
-
Preheat your oven to 350°F (175°C).
-
Line your baking pan with parchment paper, leaving overhang for easy removal. Lightly grease.
Step 2: Mix the Cake Batter
-
In a medium bowl, whisk together:
-
Flour
-
Cocoa powder
-
Baking powder
-
Baking soda
-
Salt
-
-
In a large mixing bowl, cream the butter and sugar together until light and fluffy (about 2–3 minutes).
-
Add eggs one at a time, beating well after each. Stir in the vanilla.
-
In a separate cup, combine milk and vinegar. Let sit for 2–3 minutes to sour.
-
Alternate adding the dry ingredients and the milk mixture to the butter mixture, beginning and ending with dry. Mix until just combined.
-
Fold in the sour cream to create a velvety, thick batter.
Step 3: Bake the Cake
-
Spread the batter evenly into your prepared baking pan.
-
Bake for 30–35 minutes, or until a toothpick inserted in the center comes out clean.
-
Let cool completely on a wire rack.
Don’t overbake — the moist velvet texture is key!
Step 4: Prepare the Caramel Layer
-
In a small saucepan (or microwave-safe bowl), melt together:
-
1 cup caramels
-
2 tbsp heavy cream
-
-
Stir frequently until smooth and glossy.
-
Let cool for 5–10 minutes, then pour over the cooled cake in an even layer.
-
Optional: Sprinkle with flaky sea salt for a salted caramel kick.
Step 5: Add the Chocolate Glaze (Optional)
-
In a heatproof bowl, microwave:
-
¾ cup chocolate chips
-
¼ cup heavy cream
-
1 tsp butter
in 20-second bursts, stirring until smooth.
-
-
Drizzle or spread gently over the caramel layer.
-
Chill for 30–45 minutes to set.
Step 6: Slice into Squares
-
Lift the cake out of the pan using parchment paper.
-
Use a hot knife (run under hot water and dried) to slice into 16 even squares.
-
Wipe the blade clean between cuts for neat edges.
Serving Ideas
Serve these decadent squares:
-
On a holiday dessert platter
-
As a potluck showstopper
-
With a scoop of vanilla ice cream
-
Drizzled with extra caramel or chocolate sauce
-
With a glass of red wine or strong espresso
Storage Tips
-
Room Temperature: Store in an airtight container for up to 3 days.
-
Refrigerator: Keeps well for up to 1 week. Bring to room temperature before serving for best texture.
-
Freezer: Freeze individually wrapped squares in an airtight container for up to 2 months. Thaw in the fridge overnight.
Nutrition Information (Per Square – Approximate)
| Nutrient | Amount |
|---|---|
| Calories | 320–350 kcal |
| Carbs | 40g |
| Protein | 3g |
| Fat | 18g |
| Sugar | 28g |
| Fiber | 2g |
| Sodium | 120mg |
Values may vary based on ingredients and glaze usage.
Variations & Add-Ins
Mocha Cocoa Caramel
Add 1 tablespoon instant espresso powder to the dry ingredients for a coffee kick.
Peanut Butter Swirl
Add a few tablespoons of melted peanut butter over the caramel before the glaze.
Black Forest Style
Top the caramel with a thin layer of cherry preserves before adding chocolate glaze.
Salted Pretzel Crunch
Sprinkle crushed salted pretzels over the caramel for a sweet-salty texture bomb.
Frequently Asked Questions
Can I use boxed cake mix instead of making it from scratch?
Yes! Use a high-quality chocolate or devil’s food cake mix, bake as directed in an 8×8 or 9×9-inch pan, and continue with the caramel and glaze layers.
How do I keep the caramel from hardening?
Adding heavy cream keeps the caramel soft and chewy. Let it cool slightly before pouring over the cake, and avoid overcooking it.
Can I make this gluten-free?
Yes — substitute a 1:1 gluten-free flour blend. Ensure other ingredients (like caramels and chocolate) are certified gluten-free.
Is the chocolate glaze necessary?
Not at all. The caramel layer alone is rich and satisfying — the glaze just adds an extra level of indulgence.
Why You’ll Love These Velvet Cocoa Caramel Cake Squares
-
Fudgy, moist, and rich — the perfect texture
-
Gooey caramel adds luxurious sweetness
-
Beautiful layers that look as good as they taste
-
Easy to slice and serve
-
Great make-ahead dessert for parties and potlucks
Final Thoughts
Velvet Cocoa Caramel Cake Squares are pure dessert bliss. With the texture of a tender velvet cake, the richness of deep cocoa, and the gooey decadence of caramel, these treats are impossible to resist. They’re elegant enough to impress at a dinner party, but easy enough to whip up for a weeknight treat.
Once you try these, they’ll become a new staple in your dessert rotation — and everyone will be asking for the recipe.