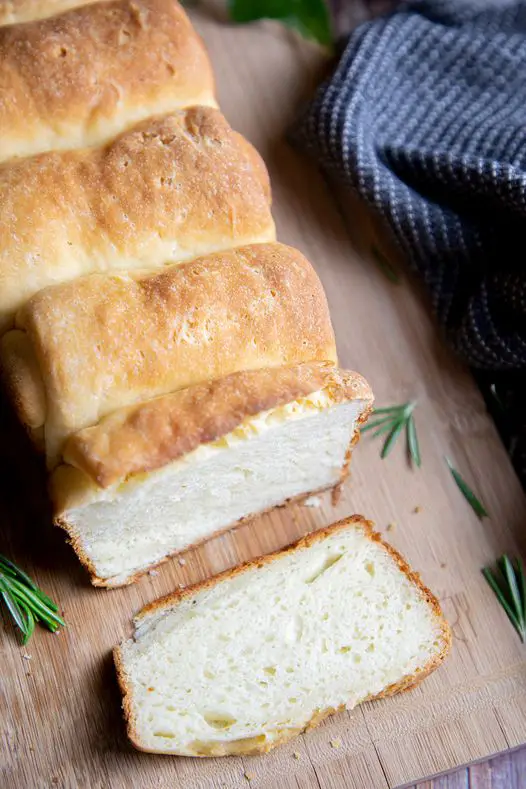
gluten-free Japanese milk bread
Ingredients:
For the Tangzhong (Water Roux):
- 3 tablespoons (45g) gluten-free all-purpose flour
- 1/2 cup (120ml) milk (dairy or non-dairy)
- 1/2 cup (120ml) water
For the Bread Dough:
- 2 3/4 cups (330g) gluten-free all-purpose flour (ensure it’s a blend suitable for bread, with xanthan gum)
- 1/4 cup (50g) sugar
- 1 packet (2 1/4 teaspoons) active dry yeast
- 1/2 cup (120ml) warm milk (110°F/45°C, dairy or non-dairy)
- 1 large egg
- 4 tablespoons (60g) butter, softened (or dairy-free alternative)
- 1 teaspoon salt
Instructions:
1. Prepare the Tangzhong (Water Roux):
- In a small saucepan, whisk together the flour, milk, and water over medium heat.
- Cook, stirring constantly, until the mixture thickens into a smooth paste, about 3-5 minutes. The roux should form lines at the bottom of the pan when stirred.
- Remove from heat and let it cool to room temperature.
2. Activate the Yeast:
- In a small bowl, mix the warm milk and sugar, then sprinkle the yeast on top. Let it sit for 5-10 minutes until the mixture becomes foamy and bubbly, indicating that the yeast is activated.
3. Make the Dough:
- In a large mixing bowl or the bowl of a stand mixer, combine the gluten-free flour, salt, and cooled tangzhong.
- Add the activated yeast mixture, egg, and softened butter.
- Mix with a dough hook attachment or by hand until a smooth, soft dough forms. Gluten-free dough will be stickier than regular dough, but it should be smooth and elastic.
4. First Rise:
- Transfer the dough to a lightly greased bowl, cover with plastic wrap or a damp cloth, and let it rise in a warm place for 1-2 hours, or until doubled in size.
5. Shape the Bread:
- Once the dough has risen, turn it out onto a lightly floured surface and divide it into 3 equal portions.
- Roll each portion into a ball, then flatten each one into an oval shape. Fold one side of the oval toward the center, then fold the other side over it (like folding a letter). Roll it up from the short end to form a log.
- Place the three logs, seam-side down, into a greased 9×5-inch loaf pan.
6. Second Rise:
- Cover the loaf pan with a damp cloth and let the dough rise again for 45 minutes to 1 hour, or until the dough has puffed up and nearly doubled in size.
7. Preheat the Oven:
- Preheat your oven to 350°F (175°C).
8. Bake the Bread:
- If desired, brush the top of the loaf with a little milk or egg wash for a shiny finish.
- Bake the bread for 25-30 minutes, or until the top is golden brown and the loaf sounds hollow when tapped on the bottom.
9. Cool and Serve:
- Remove the bread from the oven and let it cool in the pan for 10 minutes, then transfer it to a wire rack to cool completely before slicing.
Total Time:
- Preparation Time: 25 minutes
- First Rise Time: 1-2 hours
- Second Rise Time: 45 minutes-1 hour
- Baking Time: 25-30 minutes
- Total Time: 2.5-3.5 hours
Nutritional Information (per slice, based on 12 slices):
- Calories: 160
- Total Fat: 6g
- Saturated Fat: 3g
- Cholesterol: 35mg
- Sodium: 250mg
- Total Carbohydrates: 25g
- Fiber: 2g
- Sugars: 4g
- Protein: 3g
Notes:
- Flour Blend: Ensure your gluten-free flour blend contains xanthan gum or guar gum to mimic the elasticity of gluten. If not, add 1 teaspoon of xanthan gum to the recipe.
- Storage: This bread stays fresh for 2-3 days at room temperature. It can also be frozen for up to 2 months. Slice before freezing for easier defrosting.
- Milk Substitute: You can use any dairy-free milk or butter substitute to make this bread completely dairy-free without losing its signature softness.
Enjoy the soft, fluffy texture of this Gluten-Free Japanese Milk Bread as toast, sandwich bread, or simply with a smear of butter!