Green Pepper Jelly
| Prep Time | 20 minutes |
| Cook Time | 15 minutes |
| Canning Time (Optional) | 10 minutes |
| Total Time | 45 minutes |
| Heat & Spice Intensity | Mild-Medium (2 / 5) |
| Cooking Intensity / Difficulty | Moderate (2 / 5) |
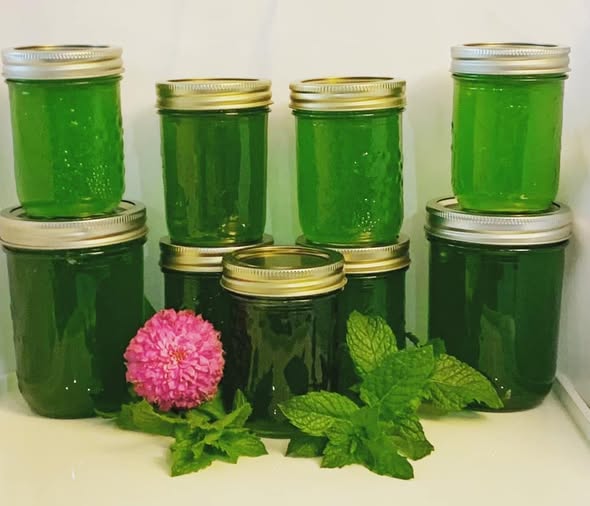
| Yield | 6 half-pint (8 oz) mason jars |
| Dietary Specs | Vegan, Gluten-Free, Dairy-Free, Nut-Free, Fat-Free |
The Flavor Profile: Sweet, Tangy, and Spicy
The magic of green pepper jelly lies in contrast. Green bell peppers provide a vibrant, grassy base with plenty of crisp sweetness, while fresh jalapeños bring a balanced kicked-up warmth. Apple cider vinegar contributes a clean, bright acidity that cuts through rich cheeses, while sugar acts both as a sweetener and as a critical structural component that interacts with fruit pectin to achieve a firm, glossy gel set.
Why You Will Love This Recipe:
-
Perfect Balance: Sweet enough to pair with desserts or biscuits, yet savory and spicy enough to glaze pork tenderloin or grilled chicken.
-
Gifting Ready: Bright emerald jelly packaged in small glass jars makes a thoughtful, elegant holiday or host gift.
-
Preservation Choice: Works equally well as a quick refrigerator jelly (no special canning equipment needed) or processed in a boiling water bath for shelf-stable pantry storage.
Selecting the Best Peppers
Quality produce makes a noticeable difference in color, aroma, and final texture:
-
Green Bell Peppers: Look for heavy, firm peppers with smooth, unblemished skin. Avoid peppers with soft spots or yellowing edges.
-
Jalapeño Peppers: Choose bright green jalapeños. If you prefer a milder jelly, thoroughly scrape out the inner white membranes and seeds. If you prefer higher heat, leave half of the jalapeño seeds in the mixture.
-
Poblano Peppers (Optional Swap): For a deeper, earthier pepper note with very mild heat, swap out one green bell pepper for a fresh poblano.
Safety Tip: Always wear disposable kitchen gloves when handling hot jalapeño peppers. The capsaicin oils can linger on skin for hours and cause severe burning if you touch your eyes or face.
Essential Kitchen Equipment
-
Food Processor or Blender: Crucial for finely pulse-chopping the peppers without turning them into a mushy liquid puree.
-
Large Heavy-Bottomed Stockpot or Dutch Oven: Jelly boils rapidly and expands quickly; a deep 6-quart to 8-quart pot prevents boiling over.
-
Candy / Liquid Thermometer: Helps track temperature during the rolling boil phase.
-
Fine Mesh Strainer or Cheesecloth (Optional): Used if you prefer a crystal-clear jelly without pepper flecks (though keeping fine pepper flecks creates a gorgeous rustic texture).
-
6 Half-Pint (8 oz) Mason Jars with Lids & Bands: Sterilized and warm prior to filling.
-
Water Bath Canner & Jar Lifter: Only required if preserving for long-term pantry storage.
Ingredients
-
1.5 cups Finely Chopped Green Bell Peppers (approx. 2 medium peppers)
-
0.5 cups Finely Chopped Jalapeño Peppers (approx. 3-4 jalapeños, seeded)
-
1.5 cups High-Quality Apple Cider Vinegar (5% acidity)
-
5 cups Granulated White Sugar
-
1 pouch (3 fl oz / 85 ml) Liquid Fruit Pectin (such as Certo)
-
1/2 teaspoon Butter or Margarine (Optional: reduces foam formation during boiling)
-
2-3 drops Green Food Coloring (Optional: enhances the vibrant emerald green color)
Step-by-Step Instructions
Follow these precise steps to ensure proper set, high safety standards, and optimal flavor distribution.
Troubleshooting & Chef’s Notes
-
Jelly Didn’t Set Immediately: Do not panic! Pepper jelly can take anywhere from 24 to 48 hours to fully set into a firm gel as it cools.
-
Why Liquid Pectin over Powdered? Liquid pectin is added after boiling sugar and vinegar, ensuring high transparency and preventing premature setting during ladle transfers.
-
Controlling Heat Levels:
-
Milder Jelly: Replace half of the jalapeños with extra green bell pepper.
-
Spicier Jelly: Include a habanero pepper or keep the jalapeño seeds.
-
Delicious Ways to Serve Green Pepper Jelly
-
The Ultimate Party Appetizer: Pour generously over a block of cold cream cheese or goat cheese; serve with buttery wheat crackers or toasted crostini.
-
Meat & Poultry Glaze: Brush onto grilled pork chops, roasted turkey, or chicken wings during the last 5 minutes of cooking for a glossy, sweet-and-spicy finish.
-
Gourmet Sandwiches: Spread onto grilled cheese, turkey paninis, or ham slider rolls for an unexpected burst of flavor.
-
Charcuterie Companion: Pair with sharp cheddar, aged gouda, prosciutto, and roasted nuts.
Storage & Shelf Life
-
Unopened (Canned Jars): Store in a cool, dark pantry for up to 12 months.
-
Opened Jars (or Refrigerator Jelly): Keep refrigerated and consume within 2 to 3 months.
-
Freezer Storage: Can be frozen in freezer-safe jars (leave 1/2-inch headspace) for up to 6 months. Thaw in the refrigerator before serving.
Nutritional Information
The following estimated nutrition values are based on 1 tablespoon (20g) serving size.
| Nutrient | Amount per Serving | % Daily Value* |
| Calories | 42 kcal | — |
| Total Fat | 0.0 g | 0% |
| Saturated Fat | 0.0 g | 0% |
| Sodium | 2 mg | 0% |
| Total Carbohydrates | 10.8 g | 4% |
| Dietary Fiber | 0.2 g | 1% |
| Sugars (Natural & Added) | 10.4 g | 21% |
| Protein | 0.1 g | 0% |
| Vitamin C | 6.5 mg | 7% |
| Vitamin A | 18 IU | 0% |
| Potassium | 12 mg | 0% |