Knead Dutch Oven Bread
- Prep Time: 10 minutes
- First Rise: 12–18 hours
- Second Rise: 1–2 hours
- Bake Time: 45 minutes
- Cooling Time: 1 hour
- Total Time: Approximately 15–22 hours
Yield
- Servings: 12 slices
- Yield: 1 round artisan loaf
Ingredients
- 3 cups (360 g) bread flour
- 1½ teaspoons fine sea salt
- ½ teaspoon instant yeast
- 1½ cups (360 ml) warm water
Optional Toppings
- Flour for dusting
- Rolled oats
- Sesame seeds
- Poppy seeds
- Everything bagel seasoning
- Fresh rosemary
- Flaky sea salt
Equipment Needed
- Large mixing bowl
- Wooden spoon or dough whisk
- Plastic wrap or clean kitchen towel
- Parchment paper
- Dutch oven with lid
- Sharp bread lame or razor blade
- Cooling rack
Instructions
Step 1: Mix the Dough
In a large mixing bowl, combine the bread flour, salt, and instant yeast.
Pour in the warm water and stir with a wooden spoon until all of the flour is hydrated. The dough will be shaggy, sticky, and slightly loose.
Cover the bowl tightly with plastic wrap or a clean kitchen towel.
Step 2: First Rise
Leave the dough at room temperature for 12 to 18 hours.
During this long fermentation, the yeast slowly develops flavor while creating an airy dough with plenty of bubbles.
The dough is ready when it has doubled in size and the surface is dotted with bubbles.
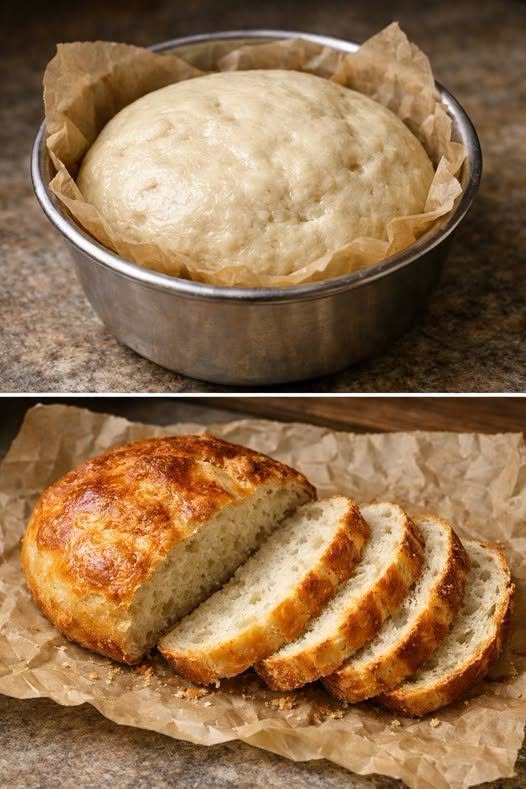
Step 3: Shape the Dough
Lightly flour your work surface.
Turn the dough out gently and fold the edges toward the center a few times to create a rough ball.
Avoid pressing out too much air, as those bubbles help create the open crumb.
Place the dough seam-side down on a sheet of parchment paper.
Cover loosely with a towel.
Step 4: Second Rise
Allow the dough to rise for 1 to 2 hours.
The loaf should become slightly puffed and relaxed.
Step 5: Preheat the Dutch Oven
About 30 minutes before baking, place the Dutch oven with its lid into the oven.
Preheat the oven to 450°F (230°C).
Heating the Dutch oven thoroughly is essential for achieving a crisp crust.
Step 6: Score the Dough
Using a sharp bread lame or razor blade, make one deep slash across the top of the loaf or create your preferred scoring pattern.
Scoring allows the bread to expand evenly as it bakes.
Step 7: Bake
Carefully remove the hot Dutch oven from the oven.
Using the parchment paper as a sling, lower the dough into the Dutch oven.
Cover with the lid and bake for 30 minutes.
Remove the lid and continue baking for 15 minutes, or until the crust is deeply golden brown and the loaf reaches an internal temperature of 205–210°F (96–99°C).
Step 8: Cool
Transfer the bread to a wire cooling rack.
Allow it to cool for at least 1 hour before slicing.
Cooling completely helps the crumb finish setting and makes slicing easier.
Tips for Success
- Use bread flour for the best chewy texture.
- Measure ingredients accurately, preferably with a kitchen scale.
- Don’t rush the long fermentation—it develops the bread’s signature flavor.
- Preheat the Dutch oven thoroughly before baking.
- Avoid adding too much extra flour when shaping the dough.
- Let the loaf cool completely before slicing to preserve its texture.
- Store the bread in a paper bag or bread box for the best crust.
Recipe Variations
Rosemary Garlic Bread
Mix 1 tablespoon chopped fresh rosemary and 2 minced garlic cloves into the dough before the first rise.
Cheddar Herb Bread
Fold 1 cup shredded sharp cheddar cheese and 1 tablespoon chopped chives into the dough before fermentation.
Whole Wheat Version
Replace up to one-third of the bread flour with whole wheat flour for a heartier loaf.
Everything Seasoning Bread
Sprinkle everything bagel seasoning over the loaf before baking for extra flavor and crunch.
Olive and Herb Bread
Add chopped Kalamata olives and dried Italian herbs for a Mediterranean-inspired variation.
Serving Suggestions
This rustic loaf pairs beautifully with:
- Butter
- Olive oil and balsamic vinegar
- Homemade soups
- Beef stew
- Chili
- Pasta dishes
- Sandwiches
- Avocado toast
- Cheese boards
- Scrambled eggs
It also makes exceptional garlic bread, crostini, croutons, and grilled cheese sandwiches.
Storage Instructions
Store the cooled bread in a bread box, paper bag, or loosely wrapped in a clean kitchen towel at room temperature for up to 3 days.
Avoid refrigerating, as refrigeration can dry out homemade bread more quickly.
Freezing Instructions
Slice the loaf before freezing for added convenience.
Wrap tightly in plastic wrap, then place in a freezer-safe bag.
Freeze for up to 3 months.
Thaw slices at room temperature or toast them directly from frozen.
Frequently Asked Questions
Can I use all-purpose flour?
Yes. All-purpose flour works well, though bread flour produces a slightly chewier crumb and a taller loaf.
Why is my dough so sticky?
No-knead dough has a high hydration level, which is essential for creating the open, airy crumb. Lightly flour your hands and work surface when shaping.
Do I really need a Dutch oven?
A Dutch oven is highly recommended because it traps steam, helping create the crisp crust. If you don’t have one, you can bake the loaf on a preheated baking stone while placing a pan of hot water in the oven to create steam.
How do I know when the bread is done?
The loaf should be deep golden brown and have an internal temperature between 205°F and 210°F (96–99°C).
Can I make the dough ahead of time?
Yes. After the first rise, you can refrigerate the dough for up to 24 hours before shaping and baking. This can further develop the bread’s flavor.
Estimated Nutrition (Per Slice)
- Calories: 150
- Protein: 5 g
- Total Fat: 0.5 g
- Saturated Fat: 0 g
- Cholesterol: 0 mg
- Carbohydrates: 31 g
- Dietary Fiber: 1 g
- Total Sugars: 0 g
- Sodium: 290 mg
- Potassium: 45 mg
- Calcium: 6 mg
- Iron: 2 mg