S’Mores Crunchwrap Ores
-
Prep Time: 8 minutes
-
Cook Time: 6-8 minutes
-
Total Time: ~15 minutes
-
Course: Dessert, Snack
-
Cuisine: American
-
Yield: 1 generous serving (can easily be scaled)
-
Skill Level: Easy (Beginner-Friendly)
Nutritional Information (Per Serving – Estimate)
-
Calories: ~650 kcal
-
Total Fat: 28g
-
Saturated Fat: 14g
-
Cholesterol: 25mg
-
Sodium: 380mg
-
Total Carbohydrates: 95g
-
Dietary Fiber: 4g
-
Sugars: 58g
-
Protein: 8g
Note: Nutritional information is an estimate calculated using standard ingredients. Values may vary based on specific brands and portions.
Ingredients
-
1 large (10-inch) burrito-size flour tortilla
-
1/2 cup mini marshmallows (or 2-3 large marshmallows, torn)
-
1/4 cup semi-sweet chocolate chips (or chopped chocolate bar)
-
1 full sheet of graham cracker, finely crushed (about 3-4 tbsp crumbs)
-
1 tsp unsalted butter, melted
-
1 tsp granulated sugar (optional, for extra sweetness)
-
A pinch of flaky sea salt (optional, but highly recommended to balance sweetness)
-
1 small (6-inch) flour or corn tortilla (or an extra graham cracker round) – for the critical “crunchwrap seal”
-
Butter or neutral oil for brushing the pan
Why This Combo Works: The large tortilla is your vessel, the small tortilla acts as a cap to contain the molten filling, the marshmallows provide the goo, the chocolate chips melt into a sauce, and the graham cracker crumbs deliver that essential texture and flavor foundation.
Equipment Needed
-
Small mixing bowl
-
Pastry brush (or your fingers)
-
Non-stick skillet or griddle (a cast-iron works great)
-
Spatula
-
Plate for assembly
Step-by-Step Instructions
Step 1: Prepare Your Filling Station
In your small bowl, combine the crushed graham cracker crumbs with the melted butter and the optional teaspoon of sugar. Mix until it resembles wet sand. This buttery mixture will toast beautifully and hold everything together. Set your marshmallows, chocolate chips, and crumb mixture within easy reach. Have your large and small tortillas ready.
Step 2: Construct the Crunchwrap
Lay the large 10-inch tortilla flat on a plate. Visualize a 3-4 inch circle in the very center. This is your build zone.
-
Graham Cracker Base: Sprinkle the buttery graham cracker crumbs evenly over that central circle, leaving a 1-inch border clear.
-
Chocolate Layer: Scatter the chocolate chips evenly over the crumbs.
-
Marshmallow Mountain: Pile the mini marshmallows on top. If using large marshmallows, tear them into smaller pieces for even melting.
-
The Secret “Seal”: Place the small 6-inch tortilla (or a graham cracker round) directly on top of the marshmallow mound. This cap is crucial—it creates a barrier so the filling doesn’t ooze out during folding and cooking, and it adds an extra interior layer of crunch.
Step 3: The Art of the Fold (It’s Easier Than It Looks!)
This is the signature Crunchwrap fold. Start at any point on the large tortilla’s edge and fold it up and over the central small tortilla cap. As you work your way around, continue folding pleats, creating a hexagon shape. The tortilla’s natural flexibility will allow it to seal the package. The final “fold” should leave a small exposed area of the inner tortilla cap. Don’t worry; this will get toasted and sealed in the pan. Press down gently to secure the shape.
Step 4: Cook to Golden Perfection
-
Heat your non-stick skillet or griddle over medium-low heat. You want it warm enough to toast and melt, not burn.
-
Lightly brush the pan with butter or oil.
-
Carefully place your Crunchwrap fold-side down in the skillet. This seals the folds first. Cook for 3-4 minutes, until the tortilla is golden brown and crispy. If you see a little marshmallow or chocolate trying to escape, just gently press the fold with your spatula.
-
Here’s the tricky part: The Confident Flip. Slide your spatula under the Crunchwrap. Place your hand gently on top for stability. In one smooth motion, flip it over to cook the other side. Don’t panic!
-
Cook the second side for another 3-4 minutes until equally golden and crisp. You should see the tortilla puffing up slightly—a sign that the interior is becoming a molten dreamscape.
Step 5: Serve Immediately!
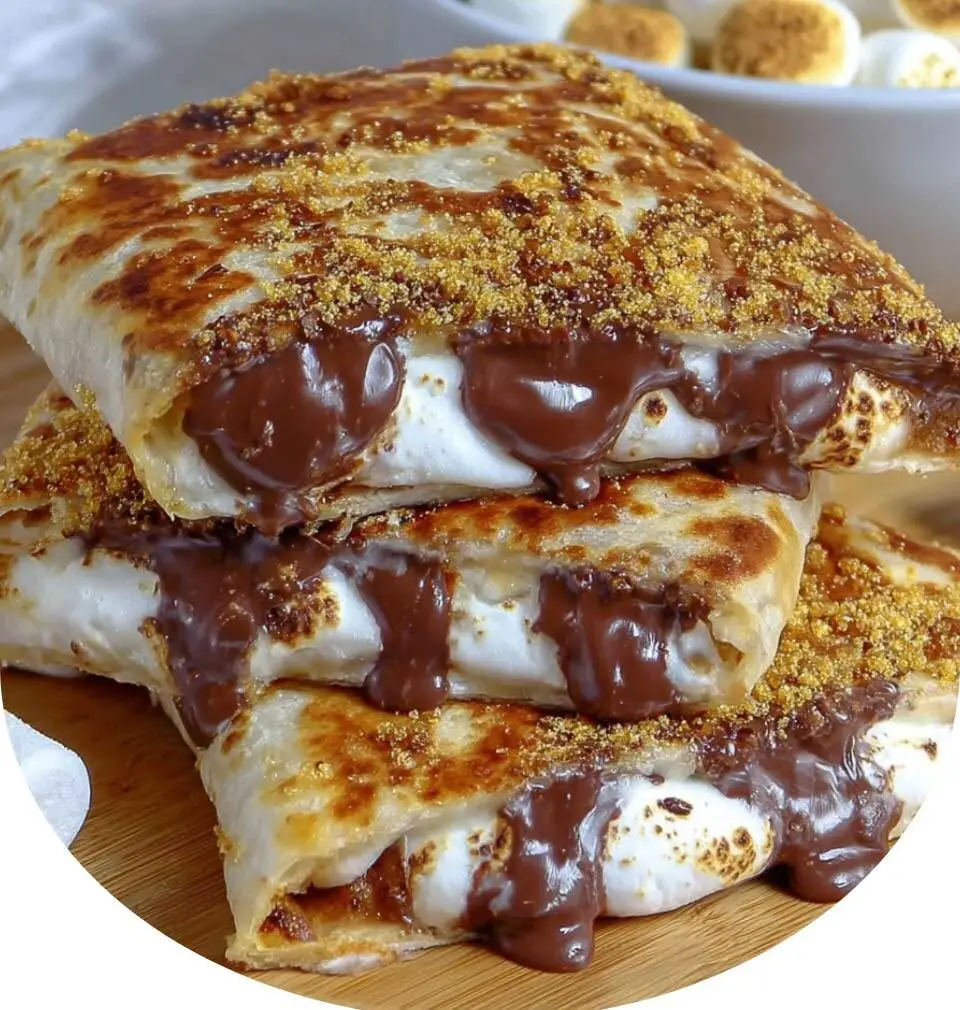
Transfer your glorious S’Mores Crunchwrap Supreme to a plate. Let it rest for exactly 60 seconds. This brief pause allows the molten chocolate and marshmallow to settle slightly, preventing a scorching lava mouthful (though some risks are worth it!). Sprinkle with a tiny pinch of flaky sea salt to elevate all the flavors. Slice in half with a sharp knife, revealing the glorious, gooey cross-section, or simply bite right in.
Chef’s Notes & Variations
-
Pro-Tip for Guaranteed Meltiness: Warm your large tortilla for 10-15 seconds in the microwave before assembling. It becomes more pliable and less likely to tear.
-
Flavor Twists: Add a tablespoon of peanut butter or Nutella under the chocolate layer. Sprinkle in some crushed pretzels for a salty-sweet crunch.
-
No Stove? No Problem! This works beautifully in a panini press or a preheated oven at 400°F (200°C) on a baking sheet (flip halfway through).
-
Storage: This is a serve-immediately masterpiece. It does not store well once assembled, as the tortilla will soften. However, you can pre-mix the graham cracker crumbs and have your components ready to assemble and cook in minutes.