Buffalo Chicken Taquitos
Preparation Time: 20 minutes
Cooking Time: 15–20 minutes
Resting Time: 5 minutes
Total Time: 45 minutes
Difficulty Level: Easy
Ingredients
For the Filling
- 3 cups cooked shredded chicken
- ½ cup buffalo sauce
- 4 ounces cream cheese, softened
- 1 cup shredded cheddar cheese
- ½ cup shredded mozzarella cheese
- 1 teaspoon garlic powder
- ½ teaspoon onion powder
- ¼ teaspoon black pepper
For the Taquitos
- 12 small flour tortillas
- 2 tablespoons melted butter or olive oil
Optional Garnishes
- Chopped green onions
- Fresh parsley
- Crumbled blue cheese
- Extra buffalo sauce drizzle
For Serving
- Ranch dressing
- Blue cheese dressing
- Celery sticks
- Carrot sticks
Equipment Needed
- Large mixing bowl
- Baking sheet
- Parchment paper
- Pastry brush
- Measuring cups and spoons
- Spoon or spatula
Step 1: Preheat the Oven
Preheat your oven to 425°F (220°C).
Line a baking sheet with parchment paper.
This helps prevent sticking and promotes even browning.
Cooking Intensity
High Oven Heat (425°F / 220°C)
High heat helps create crispy taquitos without deep frying.
Step 2: Prepare the Buffalo Chicken Filling
In a large mixing bowl, combine:
- Shredded chicken
- Buffalo sauce
- Cream cheese
- Cheddar cheese
- Mozzarella cheese
- Garlic powder
- Onion powder
- Black pepper
Mix thoroughly until all ingredients are evenly incorporated.
The mixture should be creamy and easy to spread.
Preparation Intensity
No Heat Required
Step 3: Warm the Tortillas
To prevent cracking during rolling, warm the tortillas.
Place them on a microwave-safe plate.
Cover with a damp paper towel.
Microwave for 20–30 seconds.
Heating Intensity
Low Microwave Heat
Warm tortillas become flexible and easier to roll.
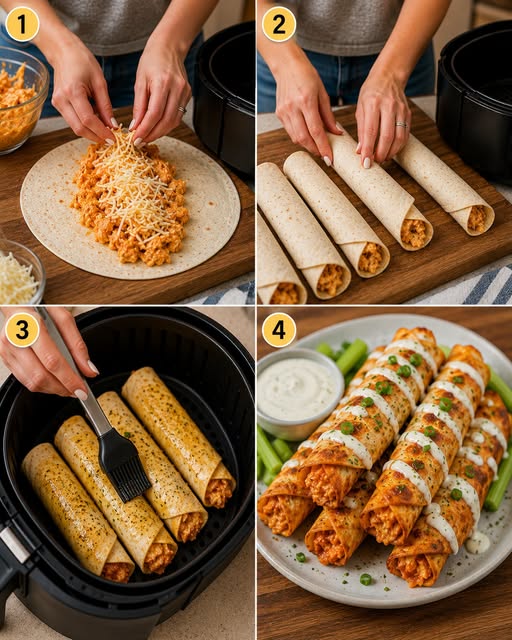
Step 4: Fill the Tortillas
Place approximately 2–3 tablespoons of filling near one edge of each tortilla.
Spread the filling evenly across the center.
Avoid overfilling, as excess filling may spill out during cooking.
Step 5: Roll the Taquitos
Starting from the filled edge, roll each tortilla tightly into a cylinder.
Place seam-side down on the prepared baking sheet.
Repeat until all taquitos are assembled.
Arrange them with a little space between each one.
Step 6: Brush with Oil or Butter
Lightly brush the tops of the taquitos with melted butter or olive oil.
This encourages even browning and crispiness.
Step 7: Bake the Taquitos
Transfer the baking sheet to the preheated oven.
Bake for 15–20 minutes.
Cooking Intensity
High Heat Baking
The taquitos are done when:
- The tortillas are golden brown
- The edges are crisp
- The filling is hot and bubbly
For extra crispiness, bake for an additional 2–3 minutes.
Optional Air Fryer Method
Arrange taquitos in a single layer in the air fryer basket.
Cook at 400°F (200°C) for 8–10 minutes.
Cooking Intensity
High Air Fryer Heat
Flip halfway through cooking for even crispness.
Optional Pan-Frying Method
Heat ½ inch of oil in a skillet.
Cooking Intensity
Medium-High Heat
Fry each taquito for 2–3 minutes per side until golden brown.
Drain on paper towels before serving.
Step 8: Rest Before Serving
Remove the taquitos from the oven.
Allow them to rest for 5 minutes.
Resting Intensity
Room Temperature Resting
This helps the filling set slightly and prevents burns from hot cheese.
Step 9: Garnish and Serve
Top with:
- Green onions
- Parsley
- Crumbled blue cheese
- Extra buffalo sauce
Serve with ranch or blue cheese dressing for dipping.
Serving Suggestions
Buffalo Chicken Taquitos pair wonderfully with:
Fresh Vegetables
- Celery sticks
- Carrot sticks
- Cucumber slices
Side Dishes
- Coleslaw
- Potato wedges
- Sweet potato fries
- Corn salad
Dipping Sauces
- Ranch dressing
- Blue cheese dressing
- Garlic aioli
- Chipotle sauce
Storage Instructions
Refrigerator
Store leftover taquitos in an airtight container for up to 4 days.
Freezer
Freeze cooked or uncooked taquitos for up to 3 months.
Place parchment paper between layers to prevent sticking.
Reheating
Oven
Bake at 375°F (190°C) for 8–10 minutes.
Air Fryer
Cook at 375°F (190°C) for 3–5 minutes.
Microwave
Heat for 1–2 minutes, though crispness may be reduced.
Tips for Perfect Buffalo Chicken Taquitos
Use Rotisserie Chicken
Rotisserie chicken saves time and adds flavor.
Don’t Overfill
Too much filling may cause tortillas to split.
Warm Tortillas First
Warm tortillas roll more easily and resist cracking.
Brush with Oil
A light coating helps achieve a crispy golden finish.
Serve Immediately
Taquitos are crispiest when served fresh.
Recipe Variations
Spicy Buffalo Taquitos
Add:
- Diced jalapeños
- Extra buffalo sauce
- Cayenne pepper
Bacon Buffalo Taquitos
Mix in:
- Crumbled cooked bacon
for smoky flavor.
Blue Cheese Buffalo Taquitos
Add crumbled blue cheese directly into the filling.
Buffalo Ranch Taquitos
Mix ranch seasoning into the chicken filling.
Low-Carb Version
Use low-carb tortillas to reduce carbohydrate content.
Frequently Asked Questions
Can I Make These Ahead of Time?
Yes.
Assemble the taquitos and refrigerate up to 24 hours before baking.
Can I Freeze Uncooked Taquitos?
Absolutely.
Freeze on a baking sheet first, then transfer to freezer bags.
What Buffalo Sauce Works Best?
Use your favorite store-bought buffalo sauce or homemade buffalo sauce.
Can I Use Corn Tortillas?
Yes, though warming them first is especially important to prevent cracking.
How Do I Keep Them Crispy?
Bake on a parchment-lined baking sheet and avoid overcrowding.
Nutritional Benefits
These taquitos provide:
- High-quality protein from chicken
- Calcium from cheese
- Flavorful satisfaction with moderate ingredients
- A versatile option for snacks or meals
Pair with vegetables for a more balanced plate.
Nutrition Information
Serving Size: 2 Taquitos
Approximate Nutrition Per Serving
- Calories: 380
- Protein: 25g
- Total Fat: 22g
- Saturated Fat: 9g
- Cholesterol: 85mg
- Sodium: 820mg
- Total Carbohydrates: 20g
- Dietary Fiber: 1g
- Sugars: 2g
- Calcium: 220mg
- Iron: 2mg
- Potassium: 280mg