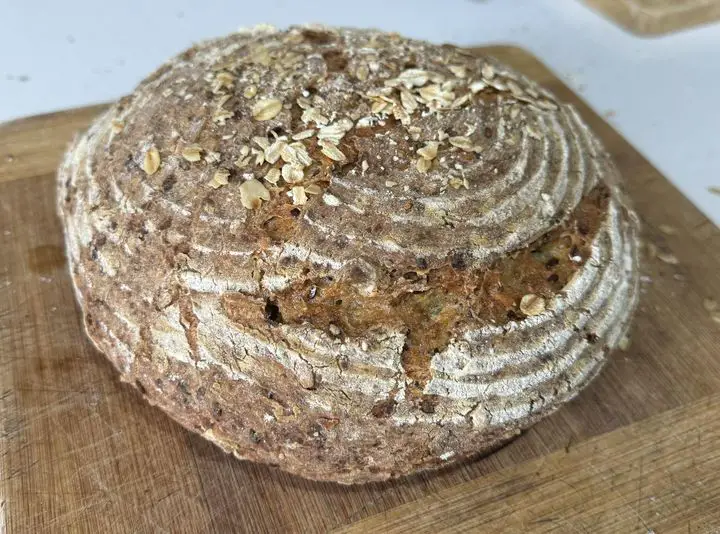
Garlic and Herb Sourdough Bread Recipe
Active Prep Time: 30 minutes
Baking Time: 45 minutes
Difficulty: Medium (requires an active sourdough starter)
Yield: 1 large loaf (approximately 12-16 slices)
Description: This aromatic, crusty sourdough boule is infused with the earthy flavors of fresh rosemary and roasted garlic. With a crackling crust, an open, airy crumb, and deep fermented tang, it’s a show-stopping bread perfect for soups, sandwiches, or simply slathered with good butter. The process is a rewarding journey of fermentation, requiring patience but not constant attention.
Ingredients
For the Roasted Garlic:
-
1 whole head of garlic
-
1 teaspoon olive oil
-
A pinch of salt
For the Bread:
-
500g (about 4 cups + 2 tbsp) bread flour
-
350g (about 1 ½ cups) water, lukewarm (90-95°F / 32-35°C)
-
100g (about ½ cup) active, bubbly sourdough starter
-
10g (about 1 ¾ tsp) fine sea salt
-
2 tablespoons fresh rosemary, finely chopped
-
All of the roasted garlic cloves, roughly mashed
For Dusting & Baking:
-
Rice flour or extra bread flour, for dusting
-
A handful of cornmeal or semolina (optional, for the baking vessel)
Equipment
-
Kitchen scale (highly recommended for accuracy)
-
Large mixing bowl
-
Bench scraper
-
Banneton proofing basket or a bowl lined with a heavily floured tea towel
-
Dutch oven or combo cooker
-
Parchment paper
-
Razor blade or sharp lame for scoring
Instructions
Day 1: Evening Prep (The Levain & Garlic)
1. Roast the Garlic (5 min active, 45 min inactive):
Preheat your oven to 400°F (200°C). Slice the top off the head of garlic to expose the cloves. Drizzle with olive oil, sprinkle with salt, wrap in foil, and roast for 40-45 minutes until cloves are deep golden and soft. Let cool, then squeeze out the cloves. Mash roughly and set aside.
2. Feed Your Starter (5 min active, 4-8 hours inactive):
Ensure your sourdough starter is active and bubbly. If it’s been in the fridge, feed it 4-8 hours before you plan to mix the dough so it’s at peak rise.
3. Autolyse (5 min active, 1 hour inactive):
In your large mixing bowl, combine the 500g bread flour and 350g water. Mix with your hands or a spatula until no dry flour remains—it will be a shaggy mass. Cover the bowl and let it rest for 1 hour. This allows the flour to fully hydrate and gluten to begin developing naturally.
Day 2: Mixing, Bulk Fermentation, & Shaping
4. Mix the Dough (10 min active):
Add the 100g active starter, 10g salt, chopped rosemary, and mashed roasted garlic to the autolysed dough. Use wet hands to pinch and fold everything together until fully incorporated. The dough will be sticky and messy—this is normal.
5. Bulk Fermentation (4-6 hours, with folds):
This is the primary rise. Cover the bowl and let it rest in a warm spot (75-78°F / 24-26°C is ideal).
-
Stretch & Folds: Over the first 2 hours, perform 3-4 sets of “stretch and folds,” spaced 30 minutes apart. With wet hands, grab one side of the dough, stretch it up, and fold it over the center. Repeat around all four sides. This builds strength without kneading.
-
Rest: After the final fold, let the dough rest, covered, for the remainder of the bulk fermentation. It should look puffy, have risen by about 30-50%, and be dotted with small bubbles.
6. Shape the Loaf (10 min active):
Lightly flour your work surface. Gently turn the dough out. Using a bench scraper, shape it into a tight round (a boule) by folding the edges into the center and creating surface tension. Be gentle to preserve the air bubbles.
7. Overnight Proof (12-14 hours inactive):
Generously dust your banneton or towel-lined bowl with rice flour. Place the dough seam-side up into the basket. Cover completely with a plastic bag or shower cap and place in the refrigerator for a long, slow cold proof. This develops incredible flavor and makes the dough easier to score.
Day 3: Baking
8. Preheat & Prep (15 min active, 45 min inactive):
Place your Dutch oven (with lid on) in your oven and preheat to 500°F (260°C) for at least 45 minutes. While it heats, take the dough from the fridge. Place a piece of parchment paper over the basket and carefully flip it over. The dough should release easily.
9. Score (2 min active):
Using a razor blade, make one confident, deep slash (about ½ inch deep) across the top of the loaf. This controls expansion and creates the classic “ear.”
10. Bake (45 min active):
Carefully remove the blazing hot Dutch oven. Using the parchment as a sling, lower the dough into the pot. Cover with the lid.
-
Bake covered: 20 minutes at 500°F (260°C). This creates steam for a great oven spring and crust.
-
Bake uncovered: Reduce heat to 450°F (230°C). Remove the lid—the loaf will be pale and puffed. Bake for another 20-25 minutes until the crust is a deep, burnished golden brown and the internal temperature reaches 208-210°F (98-99°C).
11. Cool (2+ hours, critical!):
Transfer the loaf to a wire cooling rack. Resist the urge to cut it! Let it cool completely for at least 2-3 hours. The interior is still setting, and slicing too soon results in a gummy crumb.
Nutrition Information (Per Slice, estimated for 1/12th of loaf):
-
Calories: ~180 kcal
-
Total Fat: 0.5g
-
Saturated Fat: 0.1g
-
Cholesterol: 0mg
-
Sodium: 325mg
-
Total Carbohydrates: 37g
-
Dietary Fiber: 1.5g
-
Sugars: 0.2g
-
Protein: 6g
Note: Nutritional information is an estimate based on the ingredients used and can vary. The fermentation process increases bioavailability of nutrients and may be easier to digest for some