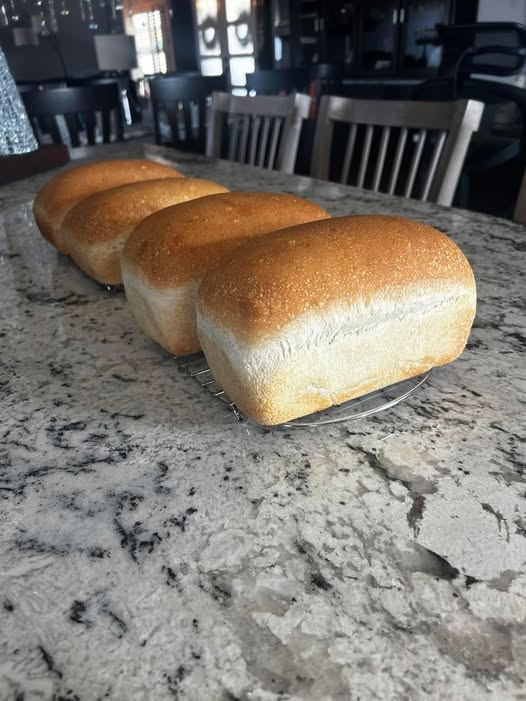
homemade sandwich bread
Prep Time: 20 minutes
Rise Time: 2 hours
Bake Time: 30–35 minutes
Total Time: 2 hours 55 minutes
Servings: 12 slices (1 loaf)
Difficulty: Easy to Moderate
Ingredients
- 3½ cups (440 g) bread flour
- 2¼ teaspoons (1 packet) active dry yeast
- 1 cup (240 ml) warm milk (about 110°F/43°C)
- ¼ cup (50 g) granulated sugar
- ¼ cup (57 g) unsalted butter, softened
- 1 teaspoon salt
- 1 large egg, room temperature
- 2 tablespoons warm water (if needed for dough consistency)
- Butter, for greasing the pan
Optional Topping
- Melted butter for brushing after baking
- Rolled oats or sesame seeds for garnish
Instructions
Step 1: Activate the Yeast
In a large mixing bowl, combine the warm milk, sugar, and yeast. Stir gently and let the mixture stand for 5–10 minutes until it becomes foamy. This indicates the yeast is active.
Step 2: Mix the Dough
Add the softened butter, egg, and salt to the yeast mixture. Stir until combined.
Gradually add the bread flour, one cup at a time, mixing until a shaggy dough forms. If the dough feels dry, add warm water a tablespoon at a time.
Step 3: Knead
Transfer the dough to a lightly floured surface and knead for 8–10 minutes, or use a stand mixer with a dough hook for 6–8 minutes.
The dough should become smooth, elastic, and slightly tacky but not sticky.
Step 4: First Rise
Place the dough in a lightly greased bowl, turning it once to coat the surface.
Cover with a clean kitchen towel or plastic wrap and let it rise in a warm place for 60–90 minutes, or until doubled in size.
Step 5: Shape the Loaf
Punch down the risen dough to release excess air.
Turn it onto a lightly floured surface and gently shape it into a rectangle. Roll it tightly into a log, pinching the seam closed.
Place the loaf seam-side down into a greased 9×5-inch loaf pan.
Step 6: Second Rise
Cover the loaf loosely and allow it to rise for another 30–45 minutes until it has risen about 1 inch above the rim of the pan.
Meanwhile, preheat the oven to 350°F (175°C).
Step 7: Bake
Bake the bread for 30–35 minutes, or until the top is golden brown and the loaf sounds hollow when tapped.
For the most accurate result, the internal temperature should reach 190–200°F (88–93°C).
If the top browns too quickly, loosely tent the loaf with aluminum foil during the last 10 minutes of baking.
Step 8: Cool
Remove the bread from the oven and let it rest in the pan for 10 minutes.
Transfer the loaf to a wire rack to cool completely before slicing.
Brush the top with melted butter for a soft, flavorful crust if desired.
Baking Tips
- Measure flour accurately using a kitchen scale or the spoon-and-level method.
- Use fresh yeast for the best rise.
- Warm—not hot—milk helps activate the yeast without killing it.
- Knead until the dough passes the “windowpane test,” stretching thin without tearing.
- Avoid adding too much flour, as this can make the bread dense.
- Let the loaf cool completely before slicing to prevent a gummy texture.
Variations
- Replace half the bread flour with whole wheat flour for a heartier loaf.
- Add 2 tablespoons of honey instead of sugar for a subtle sweetness.
- Mix in herbs such as rosemary or thyme for savory bread.
- Fold shredded cheddar cheese into the dough for cheesy sandwich bread.
- Sprinkle everything bagel seasoning on top before baking.
- Add rolled oats to the top for a rustic appearance.
- Include sunflower or flax seeds for added texture and nutrition.
Serving Suggestions
Homemade sandwich bread is delicious served in many ways, including:
- Toasted with butter and jam
- Peanut butter and banana sandwiches
- Grilled cheese sandwiches
- Turkey, ham, or roast beef sandwiches
- Avocado toast with eggs
- French toast
- Garlic bread
- Bread pudding
- Homemade croutons
- Classic BLT sandwiches
Storage Instructions
Store the cooled loaf in an airtight bread bag or container at room temperature for up to 4 days.
For longer storage, wrap the loaf tightly in plastic wrap and aluminum foil, then freeze for up to 3 months.
To serve, thaw at room temperature and warm slices in a toaster or oven if desired.
Avoid refrigerating the bread, as this can cause it to dry out more quickly.
Why You’ll Love This Recipe
- Soft, fluffy texture
- Light, tender crumb
- Perfect for sandwiches and toast
- Easy to slice
- Simple pantry ingredients
- No artificial preservatives
- Freezer-friendly
- Beginner-friendly instructions
- Delicious fresh or toasted
- Great for meal prep
Frequently Asked Questions
Can I use all-purpose flour instead of bread flour?
Yes. Bread flour provides a slightly chewier texture and better rise, but all-purpose flour also works well.
Can I make the dough ahead of time?
Yes. After the first rise, refrigerate the dough overnight. Let it come to room temperature, shape, complete the second rise, and bake.
Why didn’t my bread rise properly?
Inactive yeast, milk that was too hot or too cold, insufficient kneading, or a cool proofing environment can all affect the rise.
How do I know when the bread is done?
The loaf should be golden brown, sound hollow when tapped, and reach an internal temperature of 190–200°F (88–93°C).
Estimated Nutrition (Per Slice)
- Calories: 180
- Protein: 5 g
- Carbohydrates: 30 g
- Total Fat: 4 g
- Saturated Fat: 2 g
- Cholesterol: 25 mg
- Sodium: 190 mg
- Fiber: 1 g
- Sugar: 4 g
- Calcium: 6% Daily Value
- Iron: 10% Daily Value
- Potassium: 70 mg